Denon AVR-2802 Owners Manual - Page 22
After starting playback, Checking the currently playing program source, etc. - system setup
 |
View all Denon AVR-2802 manuals
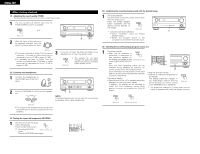
Add to My Manuals
Save this manual to your list of manuals |
Page 22 highlights
ENGLISH After starting playback [1] Adjusting the sound quality (TONE) The tone control function will not work in the Direct mode. 1 The tone switches as follows each time the TONE CONTROL button is pressed. B TONE CONTROL REMOTE SENSOR STAND BY LOCK AUTO SIGNAL DIGITAL INPUT DIGITAL PCM VOLUME LEVEL BASS TREBLE (Main unit) 2 With the name of the volume to be adjusted selected, turn the SELECT SELECT knob to adjust the level. 3 21 (Main unit) 3 • To increase the bass or treble: Turn the control clockwise. (The bass or treble sound can be If you do not want the bass and treble to be adjusted, turn on the tone defeat mode. increased to up to +12 dB in steps of 2 dB.) • To decrease the bass or treble: Turn the control counterclockwise. (The bass or treble TONE DEFEAT The signals do not pass through the bass and treble adjustment circuits, providing sound can be decreased to up to -12 dB in higher quality sound. steps of 2 dB.) (Main unit) [2] Listening over headphones 1 Connect the headphones to the PHONES jack of the front panel. PHONES 1 B REMOTE SENSOR STAND BY LOCK AUTO SIGNAL DIGITAL INPUT DIGITAL PCM VOLUME LEVEL 2 Press the SPEAKER A or B to turn the speaker off. 12 NOTE: To prevent hearing loss, do not raise the volume level excessively when using headphones. (Main unit) • The output to the speaker and pre-out jacks is turned off and no sound is produced from the speakers. [4] Combining the currently playing sound with the desired image 1 Simulcast playback Use this switch to monitor a video source other than the audio source. Press the VIDEO SELECT VIDEO SELECT button repeatedly until the desired source appears on the display. (Main unit) Cancelling simulcast playback. • Select "SOURCE" using the VIDEO SELECT button. • Switch the program source to the component connected to the video input. B REMOTE SENSOR STAND BY LOCK AUTO SIGNAL DIGITAL INPUT DIGITAL PCM VOLUME LEVEL 1 [5] Checking the currently playing program source, etc. 1 On screen display • Each time an operation is ON SCREEN performed, a description of RETURN that operation appears on TUNING SYSTEM SETUP TITLE SURROUND PARAMETER MENU/GUIDE VOLUME LEVEL BAND RDS the display connected to the (Remote control unit) MODE PTY CH SELECT ENTER SELECT unit's VIDEO MONITOR OUT MEMORY RT STATUS DISPLAY ON SCREEN RETURN 1 jack. Also, the unit's operating status can be USE/LEARN T.TONE MULTI DVD SET UP 1 checked during playback by pressing the remote control unit's ON SCREEN button. 1 Such information as the position of the input selector and the surround parameter settings is output in sequence. Front panel display • Descriptions of the unit's operations are also displayed on the front panel display. In addition, the display can be switched to check the unit's operating status while playing a source by pressing the STATUS button. Using the dimmer function • Use this to change the brightness of the display. The display brightness changes in four steps (bright, medium, dim and off) by pressing the remote control unit's DIMMER button repeatedly. DIMMER (Main unit) The brightness changes in 3 steps each time the button is pressed, and finally the display turns off. STATUS STATUS DISPLAY (Main unit) (Remote control unit) [3] Turning the sound off temporarily (MUTING) 1 Use this to turn off the audio output temporarily. MUTING Press the MUTING button. Cancelling MUTING mode. (Remote control unit) Press the MUTING button again. SPEAKER DOLBY / DTS SURROUND DIRECT DSP SIMULATION 5CH / 6CH STEREO INPUT MODE ANALOG STEREO EXT.IN MASTER VOL. AUDIO TAPE CDR/MD CD MULTI MUTING AVR/AVC VIDEO DVD TV VDP VCR 1 22
-
 1
1 -
2
-
3
-
4
-
5
-
6
-
7
-
8
-
9
-
10
-
11
-
12
-
13
-
14
-
15
-
16
-
 17
17 -
 18
18 -
 19
19 -
 20
20 -
 21
21 -
 22
22 -
 23
23 -
 24
24 -
 25
25 -
 26
26 -
 27
27 -
28
-
29
-
30
-
31
-
32
-
33
-
34
-
35
-
36
-
37
-
38
-
39
-
40
-
41
-
42
-
43
-
44
-
45
-
46
-
47
-
48
-
49
-
50
-
51
-
52
-
53
-
54
-
55
-
56
-
57
-
58
-
59
-
60
-
61
-
62
-
63
-
64
-
65
-
66
-
67
-
68
-
69
-
70
-
71
-
72
-
73
-
74
 |
 |
