Denon AVR 4806 Owners Manual - Page 102
Setting the Dolby Digital Setup, Setting the Auto Surround Mode, Auto Surround Mode at the Advanced
 |
UPC - 081757506465
View all Denon AVR 4806 manuals
Add to My Manuals
Save this manual to your list of manuals |
Page 102 highlights
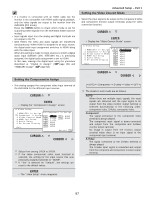
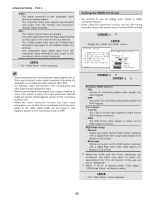
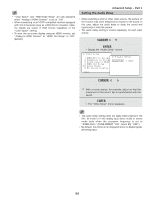
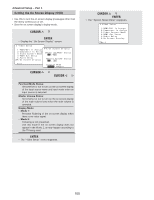
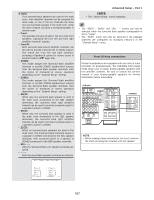
Advanced Setup - Part 1 Setting the Dolby Digital Setup Setting the Auto Surround Mode • Sets the down-mixing method when not using a center speaker or surround speakers. 1 Press the CURSOR D or H button to select the "Dolby Digital Setup" at the "Advanced Playback" menu, then press the ENTER button. • Display the "Dolby Digital Setup" screen. • The surround mode used at last for the four types of input signals shown below is stored in the memory, and the signal is automatically played with that surround mode the next time it is input. Note that the surround mode setting is also stored separately for the different input sources. q Analog and PCM 2-channel signals (STEREO) w 2-channel signals of Dolby Digital, DTS or other multichannel format (DOLBY PLIIx cinema) e Multi-channel signals of Dolby Digital, DTS or other multi-channel format (DOLBY/DTS SURROUND) r PCM and DSD multi-channel signals other than Dolby Digital and DTS (MULTI CH IN) Default settings are indicated in ( ). During playback in the PURE DIRECT mode, the surround mode does not change even if the input signal is changed. 2 Press the CURSOR F or G button to select the "ON" if you want to use the Compression, "OFF" if you do not want to use it. ON: The dynamic range is compressed automatically according to the combination of speakers being used. OFF: The dynamic range is not compressed. Set "Compression" to "ON" if it seems that sound is distorted because the input level exceeds the allowable input for the front speakers. When a center speaker or surround speakers are not connected, the sounds in those channels are directed to the front speakers. 3 Press the ENTER button to enter the setting. • The "Advanced Playback" menu reappears. 1 Press the CURSOR D or H button to select the "Auto Surround Mode" at the "Advanced Playback" menu, then press the ENTER button. • Display the "Auto Surround Mode" screen. 2 Press the CURSOR F or G button to select the "ON" if you want to use the auto surround mode, "OFF" if you do not want to use it. 3 Press the ENTER button to enter the setting. • The "Advanced Playback" menu reappears. • The various settings applied in the auto surround mode can be checked via the on screen display. Simply press the ON SCREEN button. 102
-
 1
1 -
2
-
3
-
4
-
5
-
6
-
7
-
8
-
9
-
10
-
11
-
12
-
13
-
14
-
15
-
16
-
17
-
18
-
19
-
20
-
21
-
22
-
23
-
24
-
25
-
26
-
27
-
28
-
29
-
30
-
31
-
32
-
33
-
34
-
35
-
36
-
37
-
38
-
39
-
40
-
41
-
42
-
43
-
44
-
45
-
46
-
47
-
48
-
49
-
50
-
51
-
52
-
53
-
54
-
55
-
56
-
57
-
58
-
59
-
60
-
61
-
62
-
63
-
64
-
65
-
66
-
67
-
68
-
69
-
70
-
71
-
72
-
73
-
74
-
75
-
76
-
77
-
78
-
79
-
80
-
81
-
82
-
83
-
84
-
85
-
86
-
87
-
88
-
89
-
90
-
91
-
92
-
93
-
94
-
95
-
96
-
 97
97 -
 98
98 -
 99
99 -
 100
100 -
 101
101 -
 102
102 -
 103
103 -
 104
104 -
 105
105 -
 106
106 -
 107
107 -
108
-
109
-
110
-
111
-
112
-
113
-
114
-
115
-
116
-
117
-
118
-
119
-
120
-
121
-
122
-
123
-
124
-
125
-
126
-
127
-
128
-
129
-
130
-
131
-
132
-
133
-
134
-
135
-
136
-
137
-
138
-
139
-
140
-
141
-
142
-
143
-
144
-
145
-
146
-
147
-
148
-
149
-
150
-
151
-
152
-
153
-
154
 |
 |
