Denon AVR 4806 Owners Manual - Page 124
Check the parameter, Parameter Check at the Auto Setup / Room
 |
UPC - 081757506465
View all Denon AVR 4806 manuals
Add to My Manuals
Save this manual to your list of manuals |
Page 124 highlights
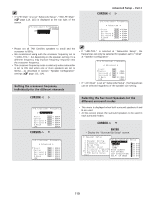
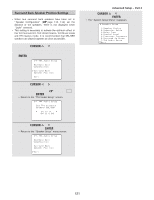
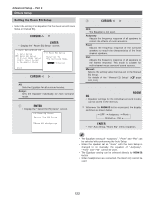
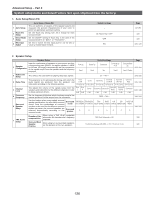
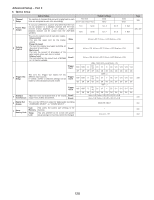
Advanced Setup - Part 2 Pressure level with SPL meter at the microphone point. Adjust AVR volume SPL meter = 80 dB (C) AVR-4806 Speaker Microphone MIC AMP with mic power supply ex. mixer amp. 120 mVrms Use the internal test tones for mic amp calibration. Measure the output level and adjust the mic amp gain to 120 mVrms using a RMS volt meter. (5) Set the Parameter "Test Tone" to "Manual" and "Test Tone Start" to "Yes" at "Channel Level" ( page 116 ~ 118). (6) Once the test tone for Front Left (FL) speaker starts, check the Sound Pressure Level at the Listening Position with an SPL Meter. You do not have to check any of the other channels. (7) Adjust the "Main Volume" so that the Sound Pressure Level measures 80 dB (C-weighted). (8) Once the "Main Volume" as been set, connect the output of microphone amplifier to the RMS Volt Meter. (9) Adjust the "microphone amplifier's gain" as the RMS Volt Meter becomes about 120 [mV RMS]. (10) Once set, exit out of "System Setup" and turn off the AVR-4806. (11) Connect the output of the microphone amplifier to the AVR-4806's front panel "V.AUX" Left channel audio input-located behind Trap Door. (12) Change the setting to "V.AUX L" at "Mic Input Select" ( page 123). (13) Start "Auto Setup" ( page 19 ~ 25). Check the parameter • The results of the measured items can be checked. • The EQ parameters that were set in Auto Setup can be checked. • This item is displayed, after the measurement result of the "Auto Setup / Room EQ" is decided. 1 Press the CURSOR D or H button to select the "Parameter Check" at the "Auto Setup / Room EQ" menu, then press the ENTER button. • Display the "Parameter Check" screen. 2 Press the CURSOR D or H button to select the items, then press the ENTER button. • Display the verification screen. For instructions on checking the results of each item ( page 24). 3 Press the CURSOR D or H button to select the "EQ Parameter Check", then press the ENTER button. • Display the "EQ Parameter Check" screen. 124
-
 1
1 -
2
-
3
-
4
-
5
-
6
-
7
-
8
-
9
-
10
-
11
-
12
-
13
-
14
-
15
-
16
-
17
-
18
-
19
-
20
-
21
-
22
-
23
-
24
-
25
-
26
-
27
-
28
-
29
-
30
-
31
-
32
-
33
-
34
-
35
-
36
-
37
-
38
-
39
-
40
-
41
-
42
-
43
-
44
-
45
-
46
-
47
-
48
-
49
-
50
-
51
-
52
-
53
-
54
-
55
-
56
-
57
-
58
-
59
-
60
-
61
-
62
-
63
-
64
-
65
-
66
-
67
-
68
-
69
-
70
-
71
-
72
-
73
-
74
-
75
-
76
-
77
-
78
-
79
-
80
-
81
-
82
-
83
-
84
-
85
-
86
-
87
-
88
-
89
-
90
-
91
-
92
-
93
-
94
-
95
-
96
-
97
-
98
-
99
-
100
-
101
-
102
-
103
-
104
-
105
-
106
-
107
-
108
-
109
-
110
-
111
-
112
-
113
-
114
-
115
-
116
-
117
-
118
-
 119
119 -
 120
120 -
 121
121 -
 122
122 -
 123
123 -
 124
124 -
 125
125 -
 126
126 -
 127
127 -
 128
128 -
 129
129 -
130
-
131
-
132
-
133
-
134
-
135
-
136
-
137
-
138
-
139
-
140
-
141
-
142
-
143
-
144
-
145
-
146
-
147
-
148
-
149
-
150
-
151
-
152
-
153
-
154
 |
 |
