Denon DBP-1610 Owners Manual - English - Page 14
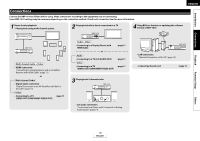
Connecting to a TV, Connecting to a Display Device with HDMI Cable, Connecting to a Display Device
 |
UPC - 883795000987
View all Denon DBP-1610 manuals
Add to My Manuals
Save this manual to your list of manuals |
Page 14 highlights
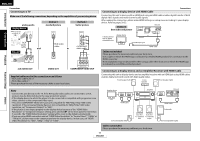
ENGLISH Connections Connecting to a TV Make one of the following connections, depending on the capabilities of your existing device. Introduction Connections analog audio display device AUDIO IN R L Method 1 standard picture VIDEO IN RCA audio cable this unit OOM TO ROOM MOTE CONTROL 2ch AUDIO OUT R L 2ch AUDIO OUT R L and RCA video cable or VIDEO OUT Method 2 better picture COMPONENT VIDEO IN Y (Green) PB/CB (Blue) PR/CR (Red) component video cable (Red) (Blue) (Green) Y B/C /C Playback 2ch AUDIO OUT VIDEO OUT COMPONENT VIDEO OUT COMPONENT VIDEO OUT Supplied cables used in this connection are as follows: • RCA audio cable (L/R) x 1 • RCA video cable x 1 Please purchase the rest of the necessary cables at your local store. Connections Connecting to a Display Device with HDMI Cable Connecting this unit to device with an HDMI jack using an HDMI cable enables digital transfer of both digital video signals and multi-channel audio signals. After making the connection, please make HDMI settings on setup menu according to your display device. Refer to pages 30-32. Method 3 this unit AC IN COAXIAL best audio and picture DIGITAL OUT ( PCM / BITSTREAM ) COMPONENT VIDEO A display device with an HDMI compatible port display device To HDMI Input jack ETHERNET HDMI OUT HDMI cable Cables not included. Please purchase the necessary cables at your local store. Use a cable on which the HDMI logo is indicated (a certified HDMI product) for connection to the HDMI connector. Normal playback may not be possible when using a cable other than one on which the HDMI logo is indicated (a non-HDMI-certified product). Connecting to a Display Device and an Amplifier/Receiver with HDMI Cable Connecting this unit to display device and an amplifier/receiver with an HDMI jack using HDMI cables enables digital surround sound with high quality video. Front Speaker (left) Center Speaker Front Speaker (right) Function Setup Others Note • Connect this unit directly to the TV. If the RCA audio/video cables are connected to a VCR, pictures may be distorted due to the copy protection system. • If the display device to which the player is to be connected is compatible with progressive scan video, connect to the component video input. • This unit's COMPONENT VIDEO OUT jacks are compatible for 480i/480p/720p/1080i video resolution. If the connected display device is not compatible for 480p/720p/1080i video resolution, set "Component Output" to "480i". • If the picture is not output properly to the display device because of the "HDMI Video Resolution" or "Component Output" setting, press and hold B on the front panel for more than 5 seconds. The "HDMI Video Resolution" setting will be reset to the default automatically. • If you are using HDMI connection and set "HDMI Video Resolution" to "Source Direct", "1080p" or "1080p24", picture may not be output properly to the display device. In that case, set "HDMI Video Resolution" to "480i", "480p", "720p" or "1080i". display device HDMI IN HDMI OUT HDMI cable amplifier Surround Speaker (left) Surround Surround back (For back (For 7.1-channel) 7.1-channel) (left) (right) Cables not included. Please purchase the necessary cables at your local store. 11 ENGLISH HDMI IN this unit AC IN COAXIAL DIGITAL OUT ( PCM / BITSTREAM ) COMPONENT VIDEO ETHERNET HDMI OUT HDMI cable Subwoofer Surround Speaker (right)
-
 1
1 -
2
-
3
-
4
-
5
-
6
-
7
-
8
-
 9
9 -
 10
10 -
 11
11 -
 12
12 -
 13
13 -
 14
14 -
 15
15 -
 16
16 -
 17
17 -
 18
18 -
 19
19 -
20
-
21
-
22
-
23
-
24
-
25
-
26
-
27
-
28
-
29
-
30
-
31
-
32
-
33
-
34
-
35
-
36
-
37
-
38
-
39
-
40
-
41
-
42
-
43
-
44
-
45
-
46
-
47
-
48
-
49
-
50
-
51
-
52
-
53
-
54
-
55
-
56
 |
 |
