Denon DBP-1610 Owners Manual - English - Page 9
Cautions on Batteries - remote control
 |
UPC - 883795000987
View all Denon DBP-1610 manuals
Add to My Manuals
Save this manual to your list of manuals |
Page 9 highlights
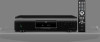
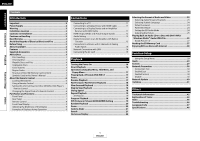
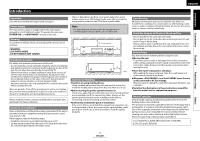
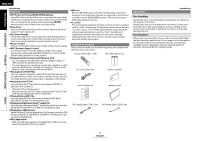
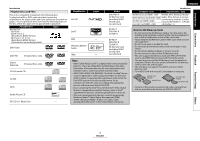
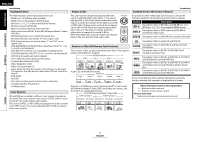
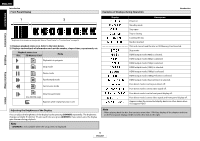
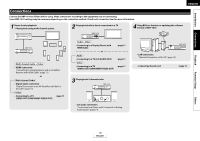
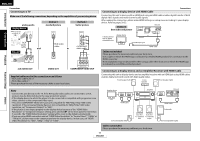
Introduction About the Remote Control Loading the Batteries A Open the battery compartment cover. B Insert two "AA" (R6) batteries, with each one oriented correctly. C Close the cover. Cautions on Batteries • Use "AA" (R6) batteries in this remote control. • Replace the batteries with new ones approximately once a year, though this depends on the frequency with which the remote control is used. • If the remote control does not operate within a close proximity of the main unit, replace the batteries with new ones, even if less than a year has passed. • The included batteries serve only for verifying operation. Replace them with new batteries as soon as possible. • When inserting the batteries, be careful to do so in the proper direction, following the and marks in the remote control's battery compartment. • To prevent damage or battery fluid leakage: - Do not mix a new battery with an old one. - Do not mix two different types of batteries such as alkaline and manganese. - Do not short-circuit, disassemble, heat or dispose of batteries in flames. • Remove the batteries when not planning to use the remote control for a long period of time. • If the batteries should leak, carefully wipe off the fluid from the inside of the battery compartment, then insert new batteries. Using a Remote Control Keep in mind the following when using the remote control: • Make sure that there are no obstacles between the remote control and infrared sensor window on the unit. • Remote operation may become unreliable if strong sunlight or fluorescent light is shining on infrared sensor window of the unit. • Remote control for different devices can interfere with each other. Avoid using remote control for other equipment located close to the unit. • Replace the batteries when you notice a fall off in the operating range of the remote control. • The maximum operable ranges from the unit are as follows. - Line of sight: approx. 23 feet (7m) - Either side of the center: approx. 23 feet (7m) within 30° ENGLISH Introduction Changing the Signal Code of a Remote Control To avoid the other DENON's BD players responding the remote signal of this unit, you can change the signal code of the remote control. If the signal code of the remote control does not match to the signal code of the unit, you cannot control the unit with the remote control. Ⅵ Change the signal code of the unit 1) In stop mode, press [SETUP]. 2) Use [Y / Z] to select , then press [ENTER]. 3) Use [Y / Z] to select , then press [ENTER]. 4) Use [U / V] to select "Remote Control Setting". 5) Press [ENTER] to select "DENON1" or "DENON2". Introduction Connections Playback Function Setup ON / STANDBY SD CARD 30° 30° 23 feet (7m) 30° 23 feet (7m) 23 feet (7m) 30° Setting this Unit not React to Other DENON's DVD Player's Remote Control If you have other DENON's DVD players around this unit, this unit reacts to the commands you made for DVD players through its remote control. To avoid this situation, you can set this unit not react to other DENON's DVD player's remote control. 1) In stop mode, press [SETUP]. 2) Press [7],[8],[9],[2]. 3) Press [SETUP]. • "Only Attached Remocon" will be displayed on the upper right corner of the screen and this unit only react to the commands from this unit's remote control. • To set back to default, press [7],[8],[9],[1] at step 2). "Normal Remocon" will be displayed on the upper right corner of the screen and this unit react to both the commands from this unit's remote control and the other DENON's DVD players' remote control. Note • The setting remains after you turn the unit to the standby mode or unplug the AC cord. • If you try to operate this unit with the other DENON's DVD players' remote control, some of the operation may not be available depending on the manufactured year or type of the remote control. 6 ENGLISH Others Remote Control Setting DENON1 HDMI CEC On Media Select Disc Network Connection Enable(Easy) Network Update 6) Press [SETUP] to exit. • At this point the new signal code of the unit is effective. Please change the signal code of the remote control to match to the signal code of the unit with following procedure. Ⅵ Change the signal code of the remote control Set to "DENON1": Press and hold [RETURN], and press [3], [2], [1]. Set to "DENON2": Press and hold [RETURN], and press [1], [2], [3]. • If the signal code does not match, the signal code of the main unit will be displayed on the front panel display. • The default setting and the setting after you change the batteries is "DENON1". • If the code setting on the unit is "DENON1", and the setting on the remote control is "DENON2", "PLAYER 1" is shown on the front panel display. Others
-
 1
1 -
2
-
3
-
 4
4 -
 5
5 -
 6
6 -
 7
7 -
 8
8 -
 9
9 -
 10
10 -
 11
11 -
 12
12 -
 13
13 -
 14
14 -
15
-
16
-
17
-
18
-
19
-
20
-
21
-
22
-
23
-
24
-
25
-
26
-
27
-
28
-
29
-
30
-
31
-
32
-
33
-
34
-
35
-
36
-
37
-
38
-
39
-
40
-
41
-
42
-
43
-
44
-
45
-
46
-
47
-
48
-
49
-
50
-
51
-
52
-
53
-
54
-
55
-
56
 |
 |