Denon S-301 Owners Manual - Page 52
Setting VIDEO SETUP
 |
UPC - 081757506748
View all Denon S-301 manuals
Add to My Manuals
Save this manual to your list of manuals |
Page 52 highlights
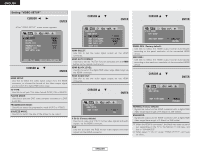
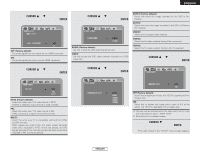
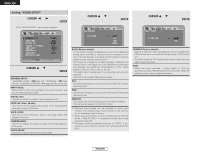
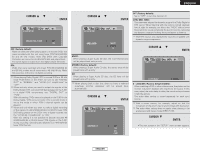
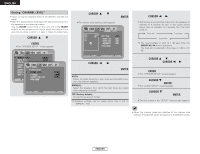
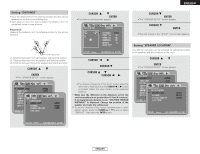
ENGLISH System Setup Setting "VIDEO SETUP" 1 Press the CURSOR 0 or 1 button to select "VIDEO SETUP" icon, then press the ENTER button. • The "VIDEO SETUP" menu screen appears. 3 When "HDMI SETUP" is selected: Press the CURSOR • or ª button to select the desired setting item, then press the ENTER button. System Setup 3 When "HDMI AUTO FORMAT" is selected: Press the CURSOR • or ª button to select the -2 desired setting item, then press the ENTER button. 2 Press the CURSOR • or ª button to select the desired setting item, then press the ENTER button. HDMI SETUP Use this to select the video signal output from the HDMI connector, to choose the format of the video output signal and to switch the digital RGB video range. TV TYPE: Use this to set your TV's video format (NTSC, PAL or MULTI). PLAYER MODE: Use this to play the DVD video contents included on a DVD audio disc. PROGRESSIVE MODE: Use this to select the progressive mode (AUTO or VIDEO). SQUEEZE MODE: Use this to switch the size of the screen to be output. HDMI SELECT: Use this to set the video signal output via the HDMI connector. HDMI AUTO FORMAT: Use this to set the "AUTO" function selected with the HDMI button on the remote control unit. HDMI BLACK LEVEL: Use this to switch the digital RGB video range (data range) via the HDMI connector. HDMI AUDIO OUT: Use this to set the audio signal output via the HDMI connector. 3 When "HDMI SELECT" is selected: Press the CURSOR • or ª button to select the -1 desired setting item, then press the ENTER button. Y Cb Cr (Factory default): Use this to output the Y Cb Cr format video signals and audio signals via the HDMI connector. RGB: Use this to output the RGB format video signals and audio signals via the HDMI connector. PANEL RES. (Factory default): Use this to select the HDMI output format automatically according to the panel resolution of the connected HDMI device. MAX RES.: Use this to select the HDMI output format automatically according to the maximum resolution of the connected HDMI device. 3 When "HDMI BLACK LEVEL" is selected: Press the CURSOR • or ª button to select the -3 desired setting item, then press the ENTER button. NORMAL (Factory default): Signals are output via the HDMI connector with a digital RGB video range (data range) of 16 (black) to 235 (white). ENHANCED: Signals are output via the HDMI connector with a digital RGB video range (data range) of 0 (black) to 255 (white). When the HDMI is connected , the black may seem to stand out, depending on the TV or the Monitor. In this case, set this to "ENHANCED". When select "Y Cb Cr" under "HDMI SELECT", will have no effect. 49 ENGLISH
-
 1
1 -
2
-
3
-
4
-
5
-
6
-
7
-
8
-
9
-
10
-
11
-
12
-
13
-
14
-
15
-
16
-
17
-
18
-
19
-
20
-
21
-
22
-
23
-
24
-
25
-
26
-
27
-
28
-
29
-
30
-
31
-
32
-
33
-
34
-
35
-
36
-
37
-
38
-
39
-
40
-
41
-
42
-
43
-
44
-
45
-
46
-
 47
47 -
 48
48 -
 49
49 -
 50
50 -
 51
51 -
 52
52 -
 53
53 -
 54
54 -
 55
55 -
 56
56 -
 57
57 -
58
-
59
-
60
-
61
-
62
-
63
-
64
-
65
-
66
-
67
-
68
-
69
-
70
-
71
-
72
-
73
-
74
-
75
-
76
-
77
-
78
-
79
-
80
-
81
-
82
-
83
-
84
-
85
-
86
-
87
-
88
-
89
-
90
-
91
-
92
-
93
-
94
-
95
-
96
-
97
-
98
-
99
-
100
-
101
-
102
-
103
-
104
-
105
-
106
-
107
-
108
-
109
-
110
-
111
-
112
-
113
-
114
-
115
-
116
-
117
-
118
-
119
-
120
-
121
-
122
-
123
-
124
-
125
-
126
-
127
-
128
-
129
-
130
-
131
-
132
-
133
-
134
-
135
-
136
-
137
-
138
-
139
-
140
-
141
-
142
-
143
-
144
-
145
-
146
-
147
-
148
 |
 |
