Dewalt DCGG571M1 Instruction Manual - Page 14
Filling the Grease Gun from a Bulk
 |
View all Dewalt DCGG571M1 manuals
Add to My Manuals
Save this manual to your list of manuals |
Page 14 highlights
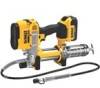
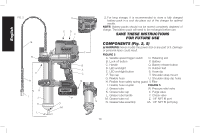
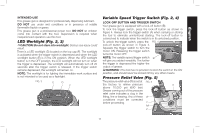
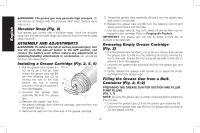
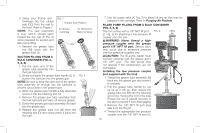
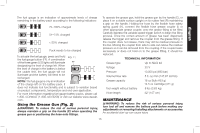
English WARNING: The grease gun may generate high pressure. Do not remove or tamper with the pressure relief valve. Serious injury may occur. Shoulder Strap (Fig. 2) Your grease gun comes with a shoulder strap. Hook the shoulder strap clips into the shoulder strap clip holes (U) found on the shoulder strap mount (T). ASSEMBLY AND ADJUSTMENTS WARNING: To reduce the risk of serious personal injury, turn tool off, push the lock-off button to the OFF position, and remove the battery pack before making any adjustments or removing/installing attachments or accessories. An accidental start-up can cause injury. Installing a Grease Cartridge (Fig. 2, 5, 6) 1. Pull the grease tube handle (L) FIG. 6 out as far as it will go, then secure the grease tube rod (M) into the retaining slot (O) by moving the rod to the side. O Ensure the rod is placed M securely in the slot to prevent it from disengaging. 2. Unscrew the grease tube assembly (N) from the grease L gun. 3. Remove the plastic cap from the grease cartridge, then insert the cartridge, open end first, into the grease tube (J). 4. Remove the seal from the other end of the grease cartridge. 5. Thread the grease tube assembly (N) back into the grease gun and screw it in securely. 6. Release the grease tube rod (M) from the retaining slot (O) and slowly press it back into the tube. 7. Use the purge valve (X, Fig. 5) to bleed off any air that may be trapped in the cartridge. Refer to Purging Air Pockets. IMPORTANT: The grease gun will lose its prime if there are air pockets in the lubricant. Removing Empty Grease Cartridge (Fig. 2) 1. Pull the grease tube handle (L) out as far as it will go, then secure the grease tube rod (M) into the retaining slot (O) by moving the rod to the side. Ensure the rod is placed securely in the slot to prevent it from disengaging. 2. Unscrew the grease tube assembly (N) from the grease gun and remove. 3. Gently release the grease tube handle (L) to expel the empty cartridge from the grease tube. Filling the Grease Gun from a Bulk Container (Fig. 2, 5-9) PREPARING THE GREASE GUN FOR SUCTION AND FILLER PUMP FILLING (FIG. 1, 7) NOTE: Be sure the grease gun is empty of grease before beginning this process. 1. Unscrew the grease tube (J) from the grease gun assembly (N). 2. Unscrew the grease tube cap (K) from the grease tube (J) and pull out the grease rod (M). 12
-
 1
1 -
2
-
3
-
4
-
5
-
6
-
7
-
8
-
 9
9 -
 10
10 -
 11
11 -
 12
12 -
 13
13 -
 14
14 -
 15
15 -
 16
16 -
 17
17 -
 18
18 -
 19
19 -
20
-
21
-
22
-
23
-
24
-
25
-
26
-
27
-
28
-
29
-
30
-
31
-
32
-
33
-
34
-
35
-
36
-
37
-
38
-
39
-
40
-
41
-
42
-
43
-
44
-
45
-
46
-
47
-
48
-
49
-
50
-
51
-
52
-
53
-
54
-
55
-
56
-
57
-
58
-
59
-
60
-
61
-
62
-
63
-
64
-
65
-
66
-
67
-
68
 |
 |
