Dewalt DCGG571M1 Instruction Manual - Page 16
Purging Air Pockets Fig. 2, 5, OPERATION, Installing and Removing the Battery Pack, Fig. 10
 |
View all Dewalt DCGG571M1 manuals
Add to My Manuals
Save this manual to your list of manuals |
Page 16 highlights
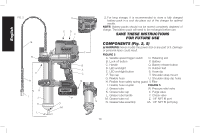
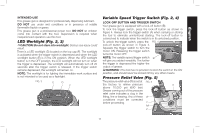
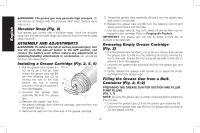
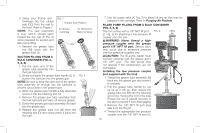
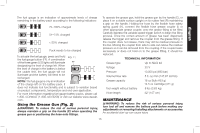
5. Release the grease tube rod (M) from the retaining slot (O) and slowly press it back into the tube. 6. Use the purge valve (X) to bleed off any air that may be trapped in the cartridge. Refer to Purging Air Pockets. NOTE: This tool has been tested at the factory, which may result in a small amount of grease left in the grease tube and hose assembly. It is recommended to purge the tool with the brand of grease to be used before first use. English FILLING THE TOOL FROM THE LOW PRESSURE FILLER PUMP (FIG. 2, 5, CON9) 1. Pull back on the grease tube handle slowly and rotate the rod until it is secure in place. NOTE: Do not lock the rod into the retaining slot (O). 2. Connect the low pressure fitting on the grease gun to the appropriate low pressure fitting on the filler pump. These fittings DO NOT lock together. This prevents the grease gun cartridge from being over filled. 3. Fill until the rod is pushed out of the grease tube approximately 8" (20 cm). Do not overfill. If the rod fails to move during the filling process, stop. This indicates that the rod is not connected to the plunger and step one must be repeated before proceeding. 4. Rotate rod to release and carefully push rod back into the grease tube. 5. Use the purge valve (X) to bleed off any air that may be trapped in the cartridge. Refer to Purging Air Pockets. OPERATION WARNING: To reduce the risk of serious personal injury, turn tool off and remove the battery pack before making any adjustments or removing/installing attachments or accessories. An accidental start-up can cause injury. Installing and Removing the Battery Pack (Fig. 10) NOTE: For best results, make sure your battery pack is fully charged. To install the battery pack (P) into the tool handle, align the battery pack with the rails inside the tool's handle and slide it into the handle until the battery pack is firmly seated in the tool and ensure that it does not disengage. To remove the battery pack from the tool, press the release button (Q) and firmly pull the battery pack out of the tool handle. Insert it into the charger as described in the charger section of this manual. FIG. 10 Purging Air Pockets (Fig. 2, 5) IMPORTANT: Air pockets in the grease can cause the grease gun to lose prime. Eliminate air pockets after each refill or if the grease gun fails to pump grease: 1. Unscrew the purge valve (X) without removing it, until all air has escaped. 2. Tighten the purge valve (X). 3. Uncap the flexible hose (G) then depress the variable speed trigger switch (A) for 10-20 seconds. 4. If grease fails to flow through the hose, repeat from step 1. Q P FUEL GAUGE BATTERY PACKS (FIG. 11) Some DeWALT battery packs include a fuel gauge which consists of three green LED lights that indicate the level of charge remaining in the battery pack. 14
-
 1
1 -
2
-
3
-
4
-
5
-
6
-
7
-
8
-
9
-
10
-
 11
11 -
 12
12 -
 13
13 -
 14
14 -
 15
15 -
 16
16 -
 17
17 -
 18
18 -
 19
19 -
 20
20 -
 21
21 -
22
-
23
-
24
-
25
-
26
-
27
-
28
-
29
-
30
-
31
-
32
-
33
-
34
-
35
-
36
-
37
-
38
-
39
-
40
-
41
-
42
-
43
-
44
-
45
-
46
-
47
-
48
-
49
-
50
-
51
-
52
-
53
-
54
-
55
-
56
-
57
-
58
-
59
-
60
-
61
-
62
-
63
-
64
-
65
-
66
-
67
-
68
 |
 |