Dewalt DCH273B Instruction Manual - Page 15
Drilling Fig. 4, Shocks - Active Vibration Control Fig. 2, SDS Chuck Fig. 9, Proper Hand Position,
 |
View all Dewalt DCH273B manuals
Add to My Manuals
Save this manual to your list of manuals |
Page 15 highlights
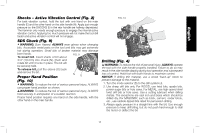
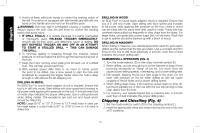
English Shocks - Active Vibration Control (Fig. 2) For best vibration control, hold the tool with one hand on the main handle (E) and the other hand on the side handle (A). Apply just enough pressure so the SHOCKS (I) in the rear handle are halfway depressed. The hammer only needs enough pressure to engage the internal active vibration control. Applying too much pressure will not make the tool drill faster and active vibration control will not engage. SDS Chuck (Fig. 9) WARNING: Burn Hazard. ALWAYS wear gloves when changing bits. Accessible metal parts on the tool and bits may get extremely hot during operation. Small bits of broken material may damage bare hands. To insert bit, insert shank of bit about FIG. 9 3/4" (19 mm) into chuck (N). Push and rotate bit until it locks in place. The bit will be securely held. To release bit, pull the sleeve (O) back and remove the bit. Proper Hand Position NO (Fig. 10) WARNING: To reduce the risk of serious personal injury, ALWAYS use proper hand position as shown. WARNING: To reduce the risk of serious personal injury, ALWAYS hold securely in anticipation of a sudden reaction. Proper hand position requires one hand on the side handle, with the other hand on the main handle. FIG. 10 Drilling (Fig. 4) WARNING: To reduce the risk of personal injury, ALWAYS operate the tool with the side handle properly installed. Failure to do so may result in the side handle slipping during tool operation and subsequent loss of control. Hold tool with both hands to maximize control. NOTICE: If drilling thin material, use a wood "back-up" block to prevent damage to the material. 1. Turn the mode selector (D) to the drill symbol (J). 2. Use sharp drill bits only. For WOOD, use twist bits, spade bits, power auger bits or hole saws. For METAL, use high-speed steel twist drill bits or hole saws. Use a cutting lubricant when drilling metals. The exceptions are cast iron and brass which should be drilled dry. For MASONRY, such as brick, cement, cinder block, etc., use carbide-tipped bits rated for percussion drilling. 3. Always apply pressure in a straight line with the bit. Use enough pressure to keep drill biting, but do not push hard enough to stall the motor or deflect the bit. 13
-
 1
1 -
2
-
3
-
4
-
5
-
6
-
7
-
8
-
9
-
 10
10 -
 11
11 -
 12
12 -
 13
13 -
 14
14 -
 15
15 -
 16
16 -
 17
17 -
 18
18 -
 19
19 -
 20
20 -
21
-
22
-
23
-
24
-
25
-
26
-
27
-
28
-
29
-
30
-
31
-
32
-
33
-
34
-
35
-
36
-
37
-
38
-
39
-
40
-
41
-
42
-
43
-
44
-
45
-
46
-
47
-
48
-
49
-
50
-
51
-
52
-
53
-
54
-
55
-
56
-
57
-
58
-
59
-
60
 |
 |
