Dewalt DW0330S Instruction Manual - Page 12
Loading Batteries, Turning the Tool On, Choosing the Settings
 |
View all Dewalt DW0330S manuals
Add to My Manuals
Save this manual to your list of manuals |
Page 12 highlights
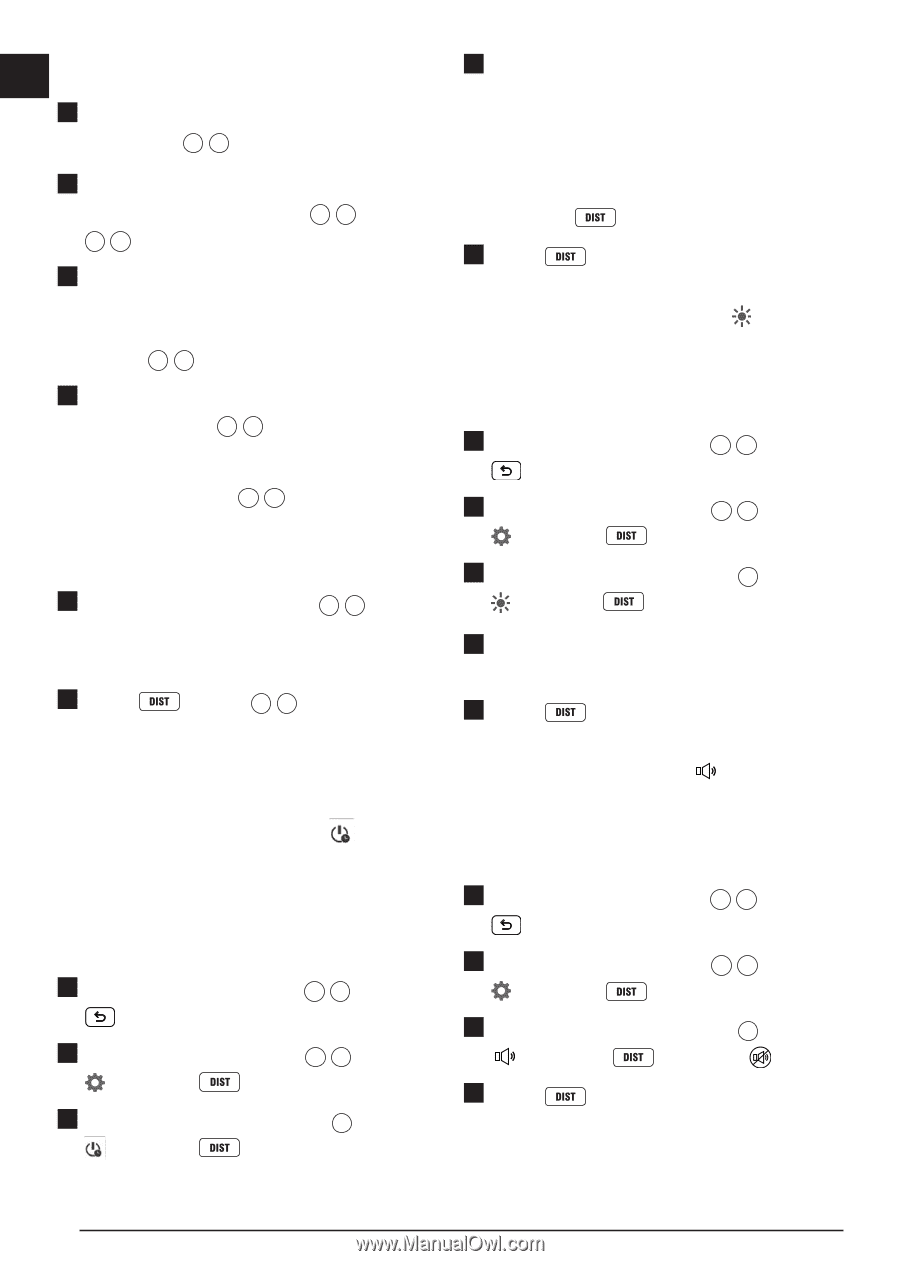
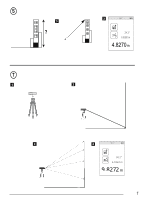
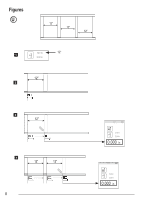
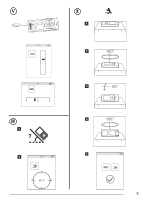
E Loading Batteries 4. Select the time. 1. Pull up the endpiece on the back of the tool (Figure D 1 ). 2. Pull up the battery compartment latch on the back of the tool (Figure D 2 and D 3 ). 3. Insert three AAA batteries, making sure to • Choose to turn off the tool after 30 sec, 60 secs, 90 secs, or 300 secs. • To keep the tool turned on until you manually turn it off (by pressing and holding ∞ for 10 seconds), select . 5. Press to save your setting. position the - and + ends of each battery as noted inside the battery compartment (Figure D 4 ). 4. Push the battery door down until it snaps in place (Figure D 5 ). Setting Screen Brightness By default, the tool's screen will be set at 25% brightness. To change the brightness level, follow these steps. 1. On the first screen (Figure E 1 ), press When the tool is ON, the battery level appears to display the Main Menu. on the screen (Figure C 1 ). 2. On the Main Menu (Figure E 2 ), select Turning the Tool On and press . 3. On the Settings Menu (Figure G ), select 1. Point the tool's laser (Figure A 1 ) toward and press . a wall or object, and not toward anyone's eyes. 4. Select the desired brightness level: 25%, 50%, 75%, or 100%. 2. Press (Figure A 3 ) to turn the tool on and display the red laser dot. 5. Press to save your new setting. Choosing the Settings Setting Automatic Turn Off By default, the tool will automatically turn off 90 seconds after no buttons or options have been selected. To change when the tool automatically turns off, follow these steps. 1. On the first screen (Figure E 1 ), press to display the Main Menu. 2. On the Main Menu (Figure E 2 ), select and press . 3. On the Settings Menu (Figure G ), select and press . Turning Off the Sound By default, the tool will beep each time you take a measurement. You can turn off the beeps. 1. On the first screen (Figure E 1 ), press to display the Main Menu. 2. On the Main Menu (Figure E 2 ), select and press . 3. On the Settings Menu (Figure G ), select and press to display . 4. Press to save your setting. 12
-
 1
1 -
2
-
3
-
4
-
5
-
6
-
 7
7 -
 8
8 -
 9
9 -
 10
10 -
 11
11 -
 12
12 -
 13
13 -
 14
14 -
 15
15 -
 16
16 -
 17
17 -
18
-
19
-
20
-
21
-
22
-
23
-
24
-
25
-
26
-
27
-
28
-
29
-
30
-
31
-
32
-
33
-
34
-
35
-
36
-
37
-
38
-
39
-
40
-
41
-
42
-
43
-
44
-
45
-
46
-
47
-
48
-
49
-
50
-
51
-
52
-
53
-
54
-
55
-
56
-
57
-
58
-
59
-
60
-
61
-
62
-
63
-
64
-
65
-
66
-
67
-
68
-
69
-
70
-
71
-
72
-
73
-
74
-
75
-
76
-
77
-
78
-
79
-
80
-
81
-
82
 |
 |