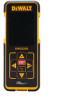
Dewalt DW0330S Instruction Manual - Page 14
Subtracting 2 Measurements, Measuring Continuously
 |
View all Dewalt DW0330S manuals
Add to My Manuals
Save this manual to your list of manuals |
Page 14 highlights
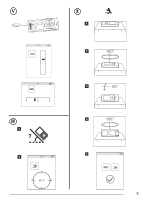
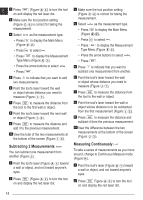
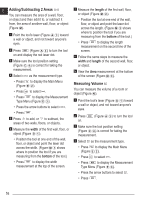
E 2. Press (Figure A 3 ) to turn the tool on and display the red laser dot. 3. Make sure the tool position setting (Figure C 4 ) is correct for taking the measurement. 4. Select as the measurement type. • Press to display the Main Menu (Figure E 2 ) • Press to select . • Press to display the Measurement Type Menu (Figure E 3 ). • Press the arrow buttons to select . • Press . 3. Make sure the tool position setting (Figure C 4 ) is correct for taking the measurement. 4. Select as the measurement type. • Press to display the Main Menu (Figure E 2 ). • Press to select . • Press to display the Measurement Type Menu (Figure E 3 ). • Press the arrow buttons to select . • Press . 5. Press to indicate that you want to subtract one measurement from another. 5. Press to indicate that you want to add two measurements. 6. Point the tool's laser toward the wall or object whose distance you need to measure (Figure I 1 ). 6. Point the tool's laser toward the wall or object whose distance you need to measure (Figure J 1 ). 7. Press to measure the distance from the tool to the wall or object. 7. Press to measure the distance from the tool to the first wall or object. 8. Point the tool's laser toward the next wall or object (Figure I 2 ). 9. Press to measure the distance and add it to the previous measurement. 10. View the total of the two measurements at the bottom of the screen (Figure I 3 ). Subtracting 2 Measurements You can subtract one measurement from another (Figure J ). 1. Point the tool's laser (Figure A 1 ) toward a wall or object, and not toward anyone's eyes. 2. Press (Figure A 3 ) to turn the tool on and display the red laser dot. 8. Point the tool's laser toward the wall or object whose distance is to be subtracted from the first measurement (Figure J 2 ). 9. Press to measure the distance and subtract it from the previous measurement. 10. View the difference between the two measurements at the bottom of the screen (Figure J 3 ). Measuring Continuously To take a series of measurements as you move around, change to Continuous Measure mode (Figure K ). 1. Point the tool's laser (Figure A 1 ) toward a wall or object, and not toward anyone's eyes. 2. Press Figure A 3 ) to turn the tool on and display the red laser dot. 14
-
 1
1 -
2
-
3
-
4
-
5
-
6
-
7
-
8
-
 9
9 -
 10
10 -
 11
11 -
 12
12 -
 13
13 -
 14
14 -
 15
15 -
 16
16 -
 17
17 -
 18
18 -
 19
19 -
20
-
21
-
22
-
23
-
24
-
25
-
26
-
27
-
28
-
29
-
30
-
31
-
32
-
33
-
34
-
35
-
36
-
37
-
38
-
39
-
40
-
41
-
42
-
43
-
44
-
45
-
46
-
47
-
48
-
49
-
50
-
51
-
52
-
53
-
54
-
55
-
56
-
57
-
58
-
59
-
60
-
61
-
62
-
63
-
64
-
65
-
66
-
67
-
68
-
69
-
70
-
71
-
72
-
73
-
74
-
75
-
76
-
77
-
78
-
79
-
80
-
81
-
82
 |
 |
