Electrolux EI30EF4CQS Installation Instructions (English, Spanish, French) - Page 10
Care, Cleaning and Maintenance, Serial Plate Information - model #
 |
View all Electrolux EI30EF4CQS manuals
Add to My Manuals
Save this manual to your list of manuals |
Page 10 highlights
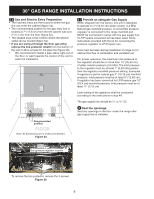
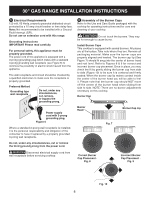
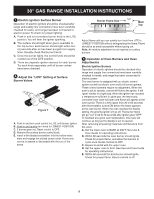
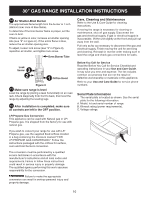
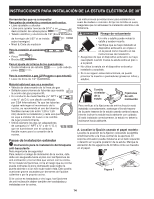
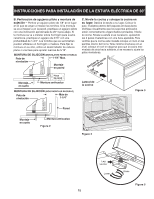
30" GAS RANGE INSTALLATION INSTRUCTIONS 10 Air Shutter-Broil Burner The approximate flame length from the burner is 1 inch (distinct inner cone of blue flame). To determine if the broil burner flame is proper, set the oven to broil. If flame is yellow in color, increase air shutter opening size (see "2" in Figure 8 ). If the entire flame is blue, reduce the air shutter opening size. To adjust, loosen lock screw (see "3" in Figure 8), reposition air shutter, and tighten lock screw. Oven Burner Tube Care, Cleaning and Maintenance Refer to the Use & Care Guide for cleaning instructions. If moving the range is necessary for cleaning or maintenance, shut off gas supply. Disconnect the gas and electrical supply. If gas or electrical supply is inaccessible, lift the unit slightly at the front and pull out away from the wall. Pull only as far as necessary to disconnect the gas and electrical supply. Finish moving the unit for servicing and cleaning. Reinstall in reverse order making sure to level the range and check gas connections for leaks. Lock 3 Screw 2 1 Orifice Hood Figure 8 11 Make sure range is level Level the range by placing a level horizontally on an oven rack. Check diagonally from front to back, then level the range by adjusting the leveling legs. 12 After installation is completed, make sure all controls are left in the OFF position. Before You Call for Service Read the Before You Call for Service Checklist and operating instructions in your Use and Care Guide. It may save you time and expense. The list includes common occurrences that are not the result of defective workmanship or materials in this appliance. Refer to your Use and Care Guide for service phone numbers. Serial Plate Information The serial plate is located as shown. See the serial plate for the following information: A. Model, lot and serial number of range. B. Kilowatt rating (power requirements). C. Voltage ratings. LP/Propane Gas Conversion This appliance can be used with Natural gas or LP/ Propane gas. It is shipped from the factory for use with natural gas. If you wish to convert your range for use with LP/ Propane gas, use the supplied fixed orifices located in a bag containing the literature marked "FOR LP/PROPANE GAS CONVERSION." Follow the instructions packaged with the orifices for surface, oven and broil burners conversion. The conversion must be performed by a qualified service technician in accordance with the manufacturer's instructions and all local codes and requirements. Failure to follow these instructions could result in serious injury or property damage. The qualified agency performing this work assumes responsibility for the conversion. Failure to make the appropriate conversion can result in serious personal injury and property damage. 10
-
 1
1 -
2
-
3
-
4
-
 5
5 -
 6
6 -
 7
7 -
 8
8 -
 9
9 -
 10
10 -
 11
11 -
 12
12 -
 13
13 -
 14
14 -
 15
15 -
16
-
17
-
18
-
19
-
20
-
21
-
22
-
23
-
24
-
25
-
26
-
27
-
28
-
29
-
30
-
31
-
32
 |
 |
