Electrolux EI30EF4CQS Installation Instructions (English, Spanish, French) - Page 5
B. Drill Pilot Holes and Fasten Bracket, C. Level and position the range
 |
View all Electrolux EI30EF4CQS manuals
Add to My Manuals
Save this manual to your list of manuals |
Page 5 highlights
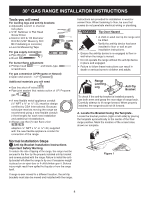
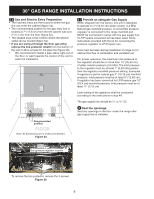
30" GAS RANGE INSTALLATION INSTRUCTIONS B. Drill Pilot Holes and Fasten Bracket - Drill a 1/8" pilot hole where screws are to be located. If bracket is to be mounted to the wall, drill pilot hole at an approximate 20° downward angle. If bracket is to be mounted to masonry or ceramic floors, drill a 3/16" pilot hole 1-3/4" deep. The screws provided may be used in wood or concrete material. Use a 5/16" nut-driver or flat head screwdriver to secure the bracket in place. C. Level and position the range - Slide range to its final position. Insert the range leveling leg in the anti-tip bracket. Visually verify if the anti-tip bracket is engaged. Lower the range by adjusting the 4 leveling legs alternatively until the range is level. Check if the range is level by placing a spirit level on the oven rack. Take 2 readings with the spirit level placed diagonally; take a reading in one direction and then in the other direction. Level the range if necessary by adjusting the leveling legs. Figure 3 Figure 2 Figure 4 Leg Leveler Raise Lower Figure 5 5
-
 1
1 -
 2
2 -
 3
3 -
 4
4 -
 5
5 -
 6
6 -
 7
7 -
 8
8 -
 9
9 -
 10
10 -
 11
11 -
12
-
13
-
14
-
15
-
16
-
17
-
18
-
19
-
20
-
21
-
22
-
23
-
24
-
25
-
26
-
27
-
28
-
29
-
30
-
31
-
32
 |
 |
