Epson ActionScanner II Mac User Manual - TWAIN Mac - Page 12
Testing the Scanning Utilities, EPSON Scan! II Untitled-l window.
 |
View all Epson ActionScanner II Mac manuals
Add to My Manuals
Save this manual to your list of manuals |
Page 12 highlights
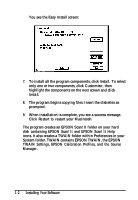
Testing the Scanning Utilities After you have installed the Scanning Utilities, test your scanner with the utilities to make sure everything works correctly. Follow these steps: 1. Raise the scanner's cover and place an image face down on the glass surface. Then carefully close the cover. 2. Double-click the EPSON Scan! II icon. 3. From the File menu, select Acquire. You see the EPSON TWAIN easy screen: 4. Click Scan. After a few moments, you see the image in the EPSON Scan! II Untitled-l window. If you do not see it, repeat the steps you performed to set up your scanner and install the scanning Utilities again. 5. ExitScan! II. Note: Before you can acquire an image from within your application the first time, you need to select EPSON TWAIN as your TWAlN data source. See your application documentation for instructions. Installing Your Software 1-3
-
 1
1 -
2
-
3
-
4
-
5
-
6
-
 7
7 -
 8
8 -
 9
9 -
 10
10 -
 11
11 -
 12
12 -
 13
13 -
 14
14 -
 15
15 -
 16
16 -
 17
17 -
18
-
19
-
20
-
21
-
22
-
23
-
24
-
25
-
26
-
27
-
28
-
29
-
30
-
31
-
32
-
33
-
34
-
35
-
36
-
37
-
38
-
39
-
40
-
41
-
42
-
43
-
44
-
45
-
46
-
47
-
48
-
49
-
50
-
51
-
52
-
53
-
54
-
55
-
56
-
57
-
58
-
59
-
60
-
61
-
62
-
63
-
64
-
65
-
66
-
67
-
68
-
69
-
70
-
71
-
72
-
73
-
74
-
75
-
76
-
77
-
78
-
79
-
80
 |
 |
