Epson BrightLink 1480Fi Installation Guide - Page 27
Distance from top of projected image to wall plate, Installation measurement tables
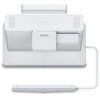 |
View all Epson BrightLink 1480Fi manuals
Add to My Manuals
Save this manual to your list of manuals |
Page 27 highlights
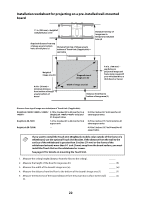
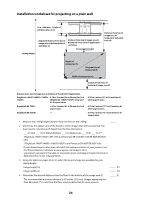
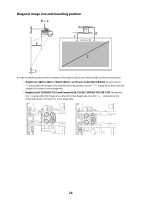
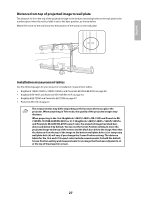
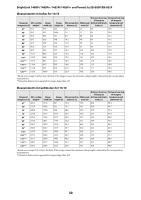
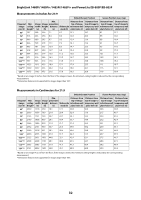
English Distance from top of projected image to wall plate The distance (c) from the top of the projected image to the bottom mounting holes on the wall plate is the number given when the vertical slide is set to the base position, as shown below. Match the notch on the wall mount to the position of the stamp on the wall plate. Installation measurement tables See the following pages for your projector's installation measurement tables: • BrightLink 1480Fi/1480Fi+/1485Fi/1485Fi+ and PowerLite EB-800F/EB-805F on page 28. • BrightLink EB-735Fi and PowerLite EB-750F/EB-755F on page 33. • BrightLink EB-725Wi and PowerLite EB-725W on page 37. • PowerLite EB-720 on page 41. The measurements may differ depending on the location where you place the projector. When projecting in Tele mode, the quality of the projected images may decrease. When projecting in the 16:6 (BrightLink 1485Fi/1485Fi+/EB-735Fi and PowerLite EB750F/EB-755F/EB-800F/EB-805F) or 21:9 (BrightLink 1480Fi/1480Fi+/1485Fi/1485Fi+ and PowerLite EB-800F/EB-805F) aspect ratio, the projected image has black bars above and below it by default. You can use the Screen Position setting to move the projected image to the top of the screen and the black bars below the image. Note that the distance from the top of the image to the bottom wall plate holes (c) or temporary wall plate hole (d) will vary if you change the Screen Position setting. The distance tables for the 16:6 and 21:9 aspect ratios include measurements for both the default Screen Position setting and measurements for an image that has been adjusted to sit at the top of the projection screen. 27
-
 1
1 -
2
-
3
-
4
-
5
-
6
-
7
-
8
-
9
-
10
-
11
-
12
-
13
-
14
-
15
-
16
-
17
-
18
-
19
-
20
-
21
-
 22
22 -
 23
23 -
 24
24 -
 25
25 -
 26
26 -
 27
27 -
 28
28 -
 29
29 -
 30
30 -
 31
31 -
 32
32 -
33
-
34
-
35
-
36
-
37
-
38
-
39
-
40
-
41
-
42
-
43
-
44
-
45
-
46
-
47
-
48
-
49
-
50
-
51
-
52
-
53
-
54
-
55
-
56
-
57
-
58
-
59
-
60
-
61
-
62
-
63
-
64
-
65
-
66
-
67
-
68
-
69
-
70
-
71
-
72
-
73
-
74
-
75
-
76
-
77
-
78
-
79
-
80
-
81
-
82
-
83
-
84
-
85
-
86
-
87
-
88
-
89
-
90
-
91
-
92
-
93
-
94
-
95
-
96
-
97
-
98
-
99
-
100
-
101
-
102
-
103
-
104
-
105
 |
 |
