Epson C31C636834 Technical Reference - Page 20
Installing and Replacing Roll Paper
 |
View all Epson C31C636834 manuals
Add to My Manuals
Save this manual to your list of manuals |
Page 20 highlights
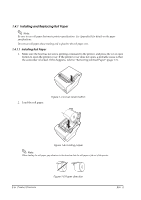
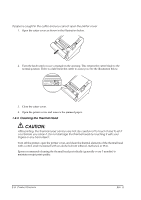
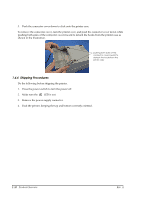
1.4.1 Installing and Replacing Roll Paper Note: Be sure to use roll paper that meets printer specifications. See Appendix B for details on the paper specifications. Do not use roll paper whose trailing end is glued to the roll paper core. 1.4.1.1 Installing Roll Paper 1. Make sure the host has not sent a printing command to the printer, and press the cover open button to open the printer cover. If the printer cover does not open, a probable cause is that the autocutter is locked. If this happens, refer to "Removing Jammed Paper" (page 1-7). 2. Load the roll paper. Figure 1-3 Cover open button Figure 1-4 Loading paper Note: When loading the roll paper, pay attention to the direction that the roll paper is fed out of the printer. 1-6 Product Overview Figure 1-5 Paper direction Rev. A
-
 1
1 -
2
-
3
-
4
-
5
-
6
-
7
-
8
-
9
-
10
-
11
-
12
-
13
-
14
-
 15
15 -
 16
16 -
 17
17 -
 18
18 -
 19
19 -
 20
20 -
 21
21 -
 22
22 -
 23
23 -
 24
24 -
 25
25 -
26
-
27
-
28
-
29
-
30
-
31
-
32
-
33
-
34
-
35
-
36
-
37
-
38
-
39
-
40
-
41
-
42
-
43
-
44
-
45
-
46
-
47
-
48
-
49
-
50
-
51
-
52
-
53
-
54
-
55
-
56
-
57
-
58
-
59
-
60
-
61
-
62
-
63
-
64
-
65
-
66
-
67
-
68
-
69
-
70
-
71
-
72
-
73
-
74
-
75
-
76
-
77
-
78
-
79
-
80
-
81
-
82
-
83
-
84
-
85
-
86
-
87
-
88
-
89
-
90
 |
 |
