Epson ColorPage 8000 Quick Start - Page 5
Replacing the waster toner collector separately, separately
 |
View all Epson ColorPage 8000 manuals
Add to My Manuals
Save this manual to your list of manuals |
Page 5 highlights
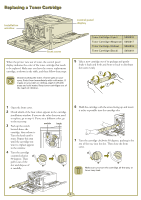
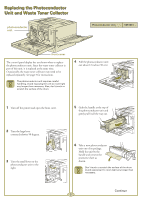
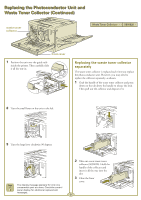
Replacing the Photoconductor Unit and Waste Toner Collector (Continued) waste toner collector Waste Toner Collector S050020 front cover 7 Position the unit over the guide rails inside the printer. Then carefully slide it all the way in. Replacing the waste toner collector separately The waste toner collector is replaced each time you replace the photoconductor unit. However, you may need to replace the collector separately, as shown. 1 Grab the handle of the waste toner collector and press down on the tab above the handle to release the lock. Then pull out the collector and dispose of it. 8 Turn the small lever on the unit to the left. 9 Turn the large lever clockwise 90 degrees. The display message appears for only one consumable part at a time. Check the control panel display for additional replacement messages. 2 Take out a new waste toner collector (S050020). Hold the handle of the collector and insert it all the way into the slot. 3 Close the front cover. 3
-
 1
1 -
 2
2 -
 3
3 -
 4
4 -
 5
5 -
 6
6 -
 7
7 -
 8
8 -
 9
9 -
 10
10 -
 11
11 -
12
-
13
 |
 |
