Epson Equity II Product Support Bulletin(s) - Page 25
Authorized Service Centers install the board in the Equity I and Equity II.
 |
View all Epson Equity II manuals
Add to My Manuals
Save this manual to your list of manuals |
Page 25 highlights
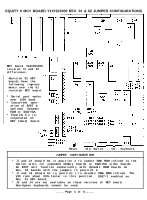
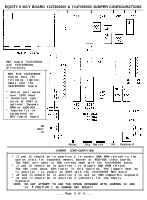
PSB No: S-0066A Page: 2 of 3 Installation of either board in the Equity I + was quick and simple to do when following the installation instructions accompanying the boards. Installation of the SOTA 286i in the Equity I and the Equity II is rather difficult. Due to the amount of disassembly required, we strongly recommend that only Authorized Service Centers install the board in the Equity I and Equity II. Installation Instructions Equity I 1. Remove the following from the main unit: a) upper case b) rear panel c) front panel d) FDD/power supply block. 2. Follow instructions for a standard installation for the SOTA 286i in an 8088 - based system. Take care to fold the SOTA connector cable so as not to prevent reassembly. The cable is sturdy and will tolerate being folded. 3. Reassemble the main unit and go through the testing and initialization procedure outlined in the SOTA manual. Equity II 1. Remove the following from the main unit: a) upper case b) rear panel c) front panel d) FDD/power supply block. 2. Follow instructions for a standard installation for the SOTA 286i in an 8086 - based system. Take care to fold the SOTA connector cable so as not to prevent reassembly. This will necessitate routing the cable SO that it does not conflict with the power connection to the main system board. The cable is sturdy and will tolerate being folded. 3. Reassemble the main unit and go through the testing and initialization procedure outlined in the SOTA manual.
-
 1
1 -
2
-
3
-
4
-
5
-
6
-
7
-
8
-
9
-
10
-
11
-
12
-
13
-
14
-
15
-
16
-
17
-
18
-
19
-
 20
20 -
 21
21 -
 22
22 -
 23
23 -
 24
24 -
 25
25 -
 26
26 -
 27
27 -
 28
28 -
 29
29 -
 30
30 -
31
-
32
-
33
-
34
-
35
-
36
-
37
-
38
-
39
-
40
-
41
-
42
-
43
-
44
-
45
-
46
-
47
-
48
-
49
-
50
-
51
-
52
-
53
-
54
-
55
-
56
-
57
-
58
-
59
-
60
-
61
-
62
-
63
-
64
-
65
-
66
-
67
-
68
-
69
-
70
-
71
-
72
-
73
-
74
-
75
-
76
-
77
 |
 |
