Epson FX-850 User Manual - Page 85
Defining your own characters, enhance - download
 |
View all Epson FX-850 manuals
Add to My Manuals
Save this manual to your list of manuals |
Page 85 highlights
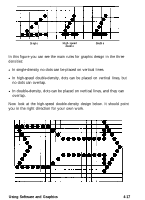
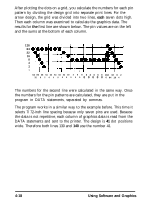
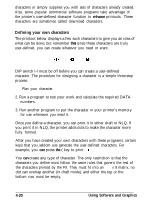
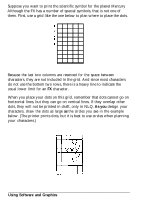
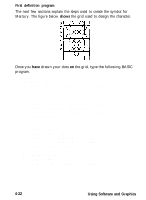
characters or simply supplies you with sets of characters already created. Also, some popular commercial software programs take advantage of the printer's user-defined character function to enhance printouts. These characters are sometimes called download characters. Defining your own characters The printout below displays a few such characters to give you an idea of what can be done, but remember that since these characters are truly user-defined, you can create whatever you need or want. DIP switch l-l must be off before you can create a user-defined character. The procedure for designing a character is a simple three-step process: 1. Plan your character. 2. Run a program to test your work and calculate the required DATA numbers. 3. Run another program to put the character in your printer's memory for use whenever you need it. Once you define a character, you can print it in either draft or NLQ. If you print it in NLQ, the printer adds dots to make the character more fully formed. After you have created your own characters with these programs, certain keys that you seldom use generate the user-defined characters. For example, you can press the ( key to print . You can create any type of character. The only restriction is that the characters you define must follow the same rules that govern the rest of the characters printed by the FX. They must fit into an 11 x 9 matrix, no dot can overlap another (in draft mode), and either the top or the bottom row must be empty. 4-20 Using Software and Graphics
-
 1
1 -
2
-
3
-
4
-
5
-
6
-
7
-
8
-
9
-
10
-
11
-
12
-
13
-
14
-
15
-
16
-
17
-
18
-
19
-
20
-
21
-
22
-
23
-
24
-
25
-
26
-
27
-
28
-
29
-
30
-
31
-
32
-
33
-
34
-
35
-
36
-
37
-
38
-
39
-
40
-
41
-
42
-
43
-
44
-
45
-
46
-
47
-
48
-
49
-
50
-
51
-
52
-
53
-
54
-
55
-
56
-
57
-
58
-
59
-
60
-
61
-
62
-
63
-
64
-
65
-
66
-
67
-
68
-
69
-
70
-
71
-
72
-
73
-
74
-
75
-
76
-
77
-
78
-
79
-
 80
80 -
 81
81 -
 82
82 -
 83
83 -
 84
84 -
 85
85 -
 86
86 -
 87
87 -
 88
88 -
 89
89 -
 90
90 -
91
-
92
-
93
-
94
-
95
-
96
-
97
-
98
-
99
-
100
-
101
-
102
-
103
-
104
-
105
-
106
-
107
-
108
-
109
-
110
-
111
-
112
-
113
-
114
-
115
-
116
-
117
-
118
-
119
-
120
-
121
-
122
-
123
-
124
-
125
-
126
-
127
-
128
-
129
-
130
-
131
-
132
-
133
-
134
-
135
-
136
-
137
-
138
-
139
-
140
-
141
-
142
-
143
-
144
-
145
-
146
-
147
-
148
-
149
-
150
-
151
-
152
-
153
-
154
-
155
-
156
-
157
-
158
-
159
-
160
-
161
-
162
-
163
-
164
-
165
-
166
-
167
-
168
-
169
-
170
-
171
-
172
-
173
-
174
-
175
-
176
-
177
-
178
-
179
-
180
-
181
-
182
-
183
-
184
-
185
-
186
-
187
-
188
-
189
-
190
-
191
-
192
-
193
-
194
-
195
-
196
-
197
-
198
-
199
-
200
-
201
-
202
-
203
-
204
-
205
-
206
-
207
-
208
-
209
-
210
-
211
-
212
-
213
-
214
-
215
-
216
-
217
-
218
-
219
-
220
-
221
-
222
-
223
 |
 |