Epson FX-86e User Manual - Page 155
Table E-4. Baud rate, setting, Table E-5. Bad, setting for 8145, Interface, number, Baud rate
 |
View all Epson FX-86e manuals
Add to My Manuals
Save this manual to your list of manuals |
Page 155 highlights
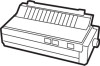
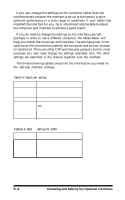
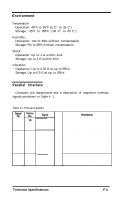
If you can, change the settings on the computer rather than the interface board because the interface is set up at the factory to give optimum performance in a wide range of conditions. If your dealer has installed the interface for you, he or she should also be able to adjust the computer and interface to achieve a good match. If you do need to change the settings on the interface yourself, (perhaps in order to use a different computer), the tables below will help you match the computer and interface. The settings given in the table cover the conventions used by the computer and printer as data is transferred. There are other DIP switches and jumpers, but for most purposes you only need change the settings described here. The other settings are described in the manual supplied with the interface. The three following tables contain all the information you need for the optional interface settings. Table E-4. Baud rate setting Interface number #8143 #8148 #8149(M) Baud rate 300 600 1200 2400 4800 9600 Switches used 1-7 1-1 1-4 1-3 1-5 1-6 1-7 1-8 2-5 2-6 2-7 2-8 Switch settings ON ON OFF OFF ON ON OFF ON ON OFF OFF O N OFF ON ON OFF OFF O N OFF ON OFF ON OFF OFF Table E-5. Bad rate setting for 8145 Baud rate 300 600 1200 2400 4800 9600 Switch Switch Switch Switch 1-1 1-2 1-3 1-4 O N OFF ON O F F ON OFF OFF O N ON OFF OFF OFF O F F ON O N OFF OFF ON OFF O N OFF O N OFF OFF E-.8 Choosing and Setting Up Optional Interfaces
-
 1
1 -
2
-
3
-
4
-
5
-
6
-
7
-
8
-
9
-
10
-
11
-
12
-
13
-
14
-
15
-
16
-
17
-
18
-
19
-
20
-
21
-
22
-
23
-
24
-
25
-
26
-
27
-
28
-
29
-
30
-
31
-
32
-
33
-
34
-
35
-
36
-
37
-
38
-
39
-
40
-
41
-
42
-
43
-
44
-
45
-
46
-
47
-
48
-
49
-
50
-
51
-
52
-
53
-
54
-
55
-
56
-
57
-
58
-
59
-
60
-
61
-
62
-
63
-
64
-
65
-
66
-
67
-
68
-
69
-
70
-
71
-
72
-
73
-
74
-
75
-
76
-
77
-
78
-
79
-
80
-
81
-
82
-
83
-
84
-
85
-
86
-
87
-
88
-
89
-
90
-
91
-
92
-
93
-
94
-
95
-
96
-
97
-
98
-
99
-
100
-
101
-
102
-
103
-
104
-
105
-
106
-
107
-
108
-
109
-
110
-
111
-
112
-
113
-
114
-
115
-
116
-
117
-
118
-
119
-
120
-
121
-
122
-
123
-
124
-
125
-
126
-
127
-
128
-
129
-
130
-
131
-
132
-
133
-
134
-
135
-
136
-
137
-
138
-
139
-
140
-
141
-
142
-
143
-
144
-
145
-
146
-
147
-
148
-
149
-
 150
150 -
 151
151 -
 152
152 -
 153
153 -
 154
154 -
 155
155 -
 156
156 -
 157
157 -
 158
158 -
 159
159 -
 160
160 -
161
-
162
-
163
-
164
-
165
-
166
-
167
-
168
-
169
-
170
-
171
-
172
-
173
 |
 |