Epson FX-86e User Manual - Page 23
Running the Self Test, DRAFT, FORM FEED
 |
View all Epson FX-86e manuals
Add to My Manuals
Save this manual to your list of manuals |
Page 23 highlights
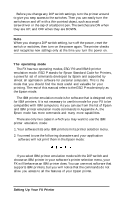
Note Also remember that control codes in your document will override the SelecType settings. Therefore, if you have a code for NLQ in your document and you press the DRAFT SelecType button, your printing will still be in NLQ. 8 Running the Self Test The FX has a built-in self test that prints out the characters in its memory so that you can see that the printer is working properly. The self test also prints the settings of the printer's DIP switches. You'll use this part of the printout in the last section of this chapter. Before running the self test, make sure that the power is OFF and paper is loaded in the printer. (Use wide paper in the FX-286e to avoid printing on the platen.) To run the self test in the Near Letter Quality (NLQ) mode, hold down the FORM FEED button at the same time you turn the printer on. When the printing starts, release the FORM FEED button. The self test first prints the version number of the printer and several lines of settings that are explained in the last section of this chapter. Then it prints the characters from its memory. The test continues until you turn the printer off. Part of a typical self test is shown below. Character mode Normal 1-1 OFF Shape of zero 0 (Unslashed) 1-2 OFF CG Table Italic6 1-3 OFF Protocol mode ESC/P 1-4 OFF Print Quality Country Draft U.S.A. 1-5 OFF 1-6 ON 1-7 ON 1-8 ON Page Length 11 inch 2-1 OFF CSF Mode Invalid 2-2 OFF Skip Perforation None 2-3 OFF Auto LF Depend on I/F 2-4 OFF 0123456789:;?@ABCDEFGHIJKLMNOPQRSTUVWXYZ[ 0123456789:;?@ABCDEFGHIJKLMNOPQRSTUVWXYZ[\ "#$%&'()*+,1./0123456789:;?@ABCDEFGHIJKLMNOPQRSTUVWXYZ[\] 0123456789:;?@ABCDEFGHIJKLMNOPQRSTUVWXYZ[\]~ $%&'()*+,-./0123456789:;?@ABCDEFGHIJKLMNOPQRSTUVWXYZ[\]- %&'()*+,-./0123456789:;?@ABCDEFGHIJKLMNOPQRSTUVWXYZ[\]!-. &'()*+,-./0123456789:;?@ABCDEFGHIJKLMNOPQRSTUVWXYZ[\]-.a '()*+,-./0123456789:;?@ABCDEFGHIJKLMNOPQRSTUVWXYZ[\]-.ab ()*+,-./0123456789:;?@ABCDEFGHIJKLMNOPQRSTUVWXYZ[\]~-.abc 1-16 Setting Up Your FX Printer
-
 1
1 -
2
-
3
-
4
-
5
-
6
-
7
-
8
-
9
-
10
-
11
-
12
-
13
-
14
-
15
-
16
-
17
-
 18
18 -
 19
19 -
 20
20 -
 21
21 -
 22
22 -
 23
23 -
 24
24 -
 25
25 -
 26
26 -
 27
27 -
 28
28 -
29
-
30
-
31
-
32
-
33
-
34
-
35
-
36
-
37
-
38
-
39
-
40
-
41
-
42
-
43
-
44
-
45
-
46
-
47
-
48
-
49
-
50
-
51
-
52
-
53
-
54
-
55
-
56
-
57
-
58
-
59
-
60
-
61
-
62
-
63
-
64
-
65
-
66
-
67
-
68
-
69
-
70
-
71
-
72
-
73
-
74
-
75
-
76
-
77
-
78
-
79
-
80
-
81
-
82
-
83
-
84
-
85
-
86
-
87
-
88
-
89
-
90
-
91
-
92
-
93
-
94
-
95
-
96
-
97
-
98
-
99
-
100
-
101
-
102
-
103
-
104
-
105
-
106
-
107
-
108
-
109
-
110
-
111
-
112
-
113
-
114
-
115
-
116
-
117
-
118
-
119
-
120
-
121
-
122
-
123
-
124
-
125
-
126
-
127
-
128
-
129
-
130
-
131
-
132
-
133
-
134
-
135
-
136
-
137
-
138
-
139
-
140
-
141
-
142
-
143
-
144
-
145
-
146
-
147
-
148
-
149
-
150
-
151
-
152
-
153
-
154
-
155
-
156
-
157
-
158
-
159
-
160
-
161
-
162
-
163
-
164
-
165
-
166
-
167
-
168
-
169
-
170
-
171
-
172
-
173
 |
 |