Epson FX-980 User Manual - Page 72
described below until it emerges between the platen and
 |
View all Epson FX-980 manuals
Add to My Manuals
Save this manual to your list of manuals |
Page 72 highlights
7. Make sure your paper has a clean, straight edge. Then open both sprocket covers. 8. Insert the paper into the front, bottom, or rear paper slot as 2 described below until it emerges between the platen and the ribbon guide. Then pull up the paper until the perforation between the first and second pages is even with the top of the printer's ribbon. Before you load paper in the front slot, remove the front paper guide. Then load paper printable side up. Load paper in the bottom slot printable side up (forward). Before you load paper in the rear slot, remove the paper guide base. Then load paper in the rear slot, printable side down and attach the paper guide base. Printing on Continuous Paper 2-25
-
 1
1 -
2
-
3
-
4
-
5
-
6
-
7
-
8
-
9
-
10
-
11
-
12
-
13
-
14
-
15
-
16
-
17
-
18
-
19
-
20
-
21
-
22
-
23
-
24
-
25
-
26
-
27
-
28
-
29
-
30
-
31
-
32
-
33
-
34
-
35
-
36
-
37
-
38
-
39
-
40
-
41
-
42
-
43
-
44
-
45
-
46
-
47
-
48
-
49
-
50
-
51
-
52
-
53
-
54
-
55
-
56
-
57
-
58
-
59
-
60
-
61
-
62
-
63
-
64
-
65
-
66
-
 67
67 -
 68
68 -
 69
69 -
 70
70 -
 71
71 -
 72
72 -
 73
73 -
 74
74 -
 75
75 -
 76
76 -
 77
77 -
78
-
79
-
80
-
81
-
82
-
83
-
84
-
85
-
86
-
87
-
88
-
89
-
90
-
91
-
92
-
93
-
94
-
95
-
96
-
97
-
98
-
99
-
100
-
101
-
102
-
103
-
104
-
105
-
106
-
107
-
108
-
109
-
110
-
111
-
112
-
113
-
114
-
115
-
116
-
117
-
118
-
119
-
120
-
121
-
122
-
123
-
124
-
125
-
126
-
127
-
128
-
129
-
130
-
131
-
132
-
133
-
134
-
135
-
136
-
137
-
138
-
139
-
140
-
141
-
142
-
143
-
144
-
145
-
146
-
147
-
148
-
149
-
150
-
151
-
152
-
153
-
154
-
155
-
156
-
157
-
158
-
159
-
160
-
161
-
162
-
163
-
164
-
165
-
166
-
167
-
168
-
169
-
170
-
171
-
172
-
173
-
174
-
175
-
176
-
177
-
178
-
179
-
180
-
181
-
182
-
183
-
184
-
185
-
186
-
187
-
188
-
189
-
190
-
191
-
192
-
193
-
194
-
195
-
196
-
197
-
198
-
199
-
200
-
201
-
202
-
203
-
204
-
205
-
206
-
207
-
208
-
209
-
210
-
211
-
212
-
213
-
214
-
215
-
216
-
217
-
218
-
219
-
220
-
221
-
222
-
223
-
224
-
225
-
226
-
227
-
228
-
229
-
230
-
231
-
232
-
233
-
234
-
235
-
236
-
237
-
238
-
239
-
240
-
241
-
242
-
243
-
244
-
245
 |
 |

2
Printing on Continuous Paper
2-25
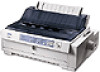
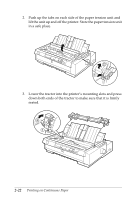
7.
Make sure your paper has a clean, straight edge. Then open
both sprocket covers.
8.
Insert the paper into the front, bottom, or rear paper slot as
described below until it emerges between the platen and the
ribbon guide. Then pull up the paper until the perforation
between the first and second pages is even with the top of the
printer’s ribbon.
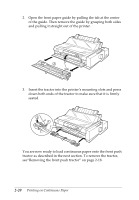
Before you load paper in the
front slot, remove the front
paper guide. Then load
paper printable side up.
Load paper in the bottom slot
printable side up (forward).
Before you load paper in the
rear slot, remove the paper
guide base. Then load paper
in the rear slot, printable side
down and attach the paper
guide base.