Epson GT-2500 Plus Product Information Guide - Page 6
Windows, Mac OS X - document imaging color scanner
 |
View all Epson GT-2500 Plus manuals
Add to My Manuals
Save this manual to your list of manuals |
Page 6 highlights
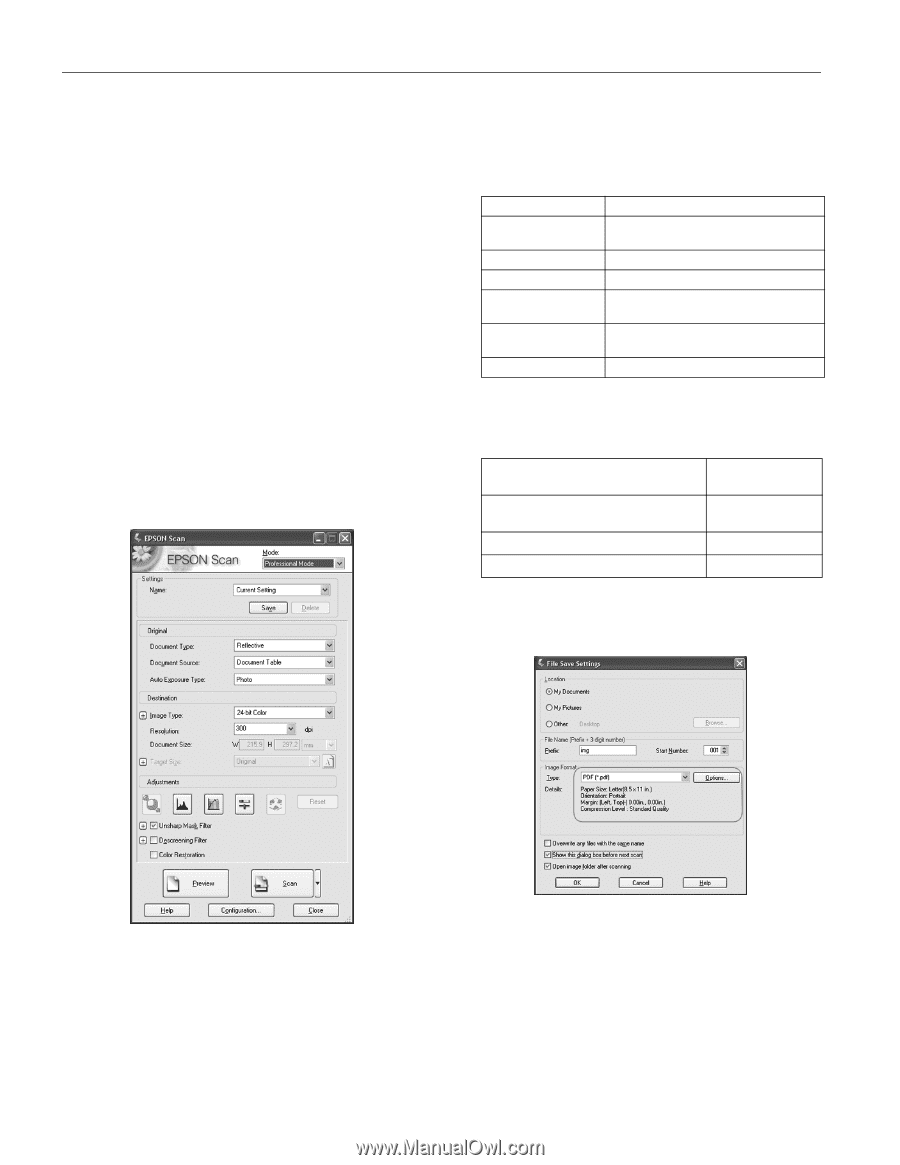
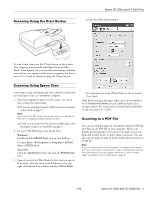
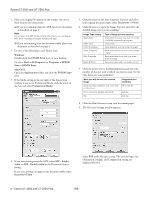
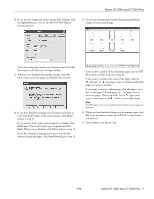
Epson GT-2500 and GT-2500 Plus 1. Place your original document on the scanner. See one of these sections for instructions: ❏ If you are scanning using the ADF, load your document as described on page 3. Note: Do not open the ADF while you are scanning or you will see an ADF error message and paper feeding will stop. ❏ If you are scanning from the document table, place your document as described on page 4. 2. Do one of the following to start Epson Scan: Windows: Double-click the EPSON Scan icon on your desktop. Or select Start > All Programs or Programs > EPSON Scan > EPSON Scan. Mac OS X: Open the Applications folder and click the EPSON Scan icon. 3. If the Mode setting in the top right of the Epson Scan window is not set to Professional Mode, click the arrow in the box and select Professional Mode. 5. Click the arrow in the Auto Exposure Type list and select your original document type; either Document or Photo. 6. Click the arrow to open the Image Type list and select the detailed image type you are scanning: Image Type setting 48-bit Color 24-bit Color Color Smoothing 16-bit Grayscale 8-bit Grayscale Black & White Type of image you are scanning Color photo that you may want to modify in a 48-bit image-editing program Color photo Color graphics, such as a chart or graph Black-and-white photo with many shades of gray Black-and-white photo with just a few shades of gray Document with black text and/or line art 7. Click the arrow next to the Resolution list and select the number of dots per inch at which you want to scan. See the table below for some guidelines: What you will do with the scanned image Suggested scan resolution Send via e-mail, upload to web, view only on the screen 96 to 150 dpi Print, convert to editable text (OCR) 300 dpi Fax 200 dpi 8. Click the Scan button to scan your document pages. 9. The File Save Settings window appears: 4. If you are scanning using the ADF, select ADF - Singlesided or ADF - Double-sided as the Document Source setting. If you are scanning one page on the document table, select Document Table. Select PDF as the file type setting. The current Paper Size, Orientation, Margin, and Compression setting are displayed below it. 6 - Epson GT-2500 and GT-2500 Plus 7/06
-
 1
1 -
 2
2 -
 3
3 -
 4
4 -
 5
5 -
 6
6 -
 7
7 -
 8
8 -
 9
9 -
 10
10
 |
 |