Epson P-2000 Product Information Guide - Page 11
Direct Printing, Connecting the P-2000 to a Printer, Printing Your Photos
 |
UPC - 010343852112
View all Epson P-2000 manuals
Add to My Manuals
Save this manual to your list of manuals |
Page 11 highlights
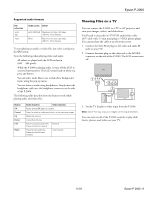
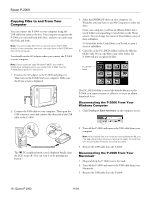
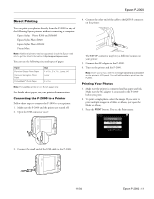
Epson P-2000 Direct Printing You can print your photos directly from the P-2000 to any of the following Epson printers without connecting a computer: ❏ Epson Stylus Photo R300 and R300M ❏ Epson Stylus Photo R320 ❏ Epson Stylus Photo RX600 ❏ PictureMate Note: Additional printers may be supported; check the Epson web site to get the latest information: http://support.epson.com. You can use the following sizes and types of paper: Paper Premium Glossy Photo Paper Premium Semigloss Photo Paper PictureMate™ Photo Paper Size 4 × 6 in., 5 × 7 in., Letter, A4 Letter 4 × 6 in. Note: PictureMate prints on 4 × 6-inch paper only. For details about paper, see your printer documentation. Connecting the P-2000 to a Printer Follow these steps to connect the P-2000 to your printer: 1. Make sure the P-2000 and the printer are turned off. 2. Open the USB connector cover: 4. Connect the other end of the cable to the EXT I/F connector on the printer. The EXT I/F connector may be in a different location on your printer. 5. Connect the AC adapter to the P-2000. 6. Turn on the printer and the P-2000. Note: Don't worry if you see the message Camera is connected on the printer's LCD panel. You will still be able to print from the P-2000. Printing Your Photos 1. Make sure the printer is connected and has paper and ink. Make sure the AC adapter is connected to the P-2000 before you print. 2. To print a single photo, select the image. If you want to print multiple images in a folder or album, just open the folder or album. 3. Press the PRINT button. You see the Print menu: Print Print This Image Print All Image Select Images to Print Number of Print Orders 2 3. Connect the small end of the USB cable to the P-2000. 11/04 Epson P-2000 - 11
-
 1
1 -
2
-
3
-
4
-
5
-
 6
6 -
 7
7 -
 8
8 -
 9
9 -
 10
10 -
 11
11 -
 12
12
 |
 |
