Epson P8000 Quick Reference - Page 39
magnification eye loupe to examine it., If the pattern does not have any gaps
 |
View all Epson P8000 manuals
Add to My Manuals
Save this manual to your list of manuals |
Page 39 highlights
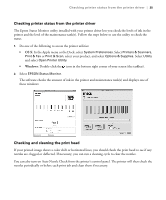
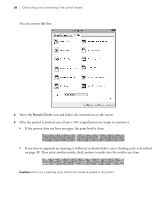
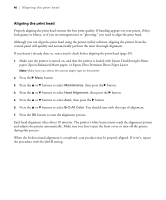
38 | Checking and cleaning the print head You see a menu like this: 3. Select the Nozzle Check icon and follow the instructions on the screen. 4. After the pattern is printed, use at least a 10× magnification eye loupe to examine it. • If the pattern does not have any gaps, the print head is clean. • If any dots or segments are missing or deflected, as shown below, run a cleaning cycle as described on page 39. Then print another nozzle check pattern to make sure the nozzles are clean. Caution: Don't run a cleaning cycle while thick media is loaded in the printer.
-
 1
1 -
2
-
3
-
4
-
5
-
6
-
7
-
8
-
9
-
10
-
11
-
12
-
13
-
14
-
15
-
16
-
17
-
18
-
19
-
20
-
21
-
22
-
23
-
24
-
25
-
26
-
27
-
28
-
29
-
30
-
31
-
32
-
33
-
 34
34 -
 35
35 -
 36
36 -
 37
37 -
 38
38 -
 39
39 -
 40
40 -
 41
41 -
 42
42 -
 43
43 -
 44
44 -
45
-
46
 |
 |

38
|
Checking and cleaning the print head
You see a menu like this:
3.
Select the
Nozzle Check
icon and follow the instructions on the screen.
4.
After the pattern is printed, use at least a 10
×
magnification eye loupe to examine it.
•
If the pattern does not have any gaps, the print head is clean.
•
If any dots or segments are missing or deflected, as shown below, run a cleaning cycle as described
on page 39. Then print another nozzle check pattern to make sure the nozzles are clean.
Caution:
Don’t run a cleaning cycle while thick media is loaded in the printer.