Epson Perfection 610 Scanner Basics - Page 27
Step-by-Step Scanning Instructions, Place Your Original Document - driver
 |
View all Epson Perfection 610 manuals
Add to My Manuals
Save this manual to your list of manuals |
Page 27 highlights
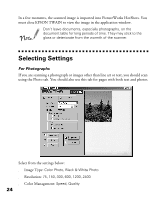
Step-by-Step Scanning Instructions This section contains step-by-step instructions for using the scanner drivers and creative software in Windows 98 and Macintosh. For more details on using the scanner software, see the EPSON TWAIN User's Guide on your CD-ROM. For instructions on using the creative software, see your application's online help or electronic manual (see "Viewing Your Electronic Manuals" on page 19). If your computer fails to recognize the scanner, you won't see the EPSON TWAIN driver when you try to select a scanner source from your host application. In addition, an error message may appear. If this happens, unplug your scanner and then plug it back in. Then restart the computer. Do not connect or disconnect the USB cable while you are using EPSON TWAIN. Place Your Original Document 1. Raise the scanner cover and place your document face down on the document table glass. 2. Position the document so the horizontal and vertical edges are carefully aligned with the scales on the top and right side of the document table. 3. Close the document cover slowly. Be careful not to move the document. corner of the document An area of 0.12 inches (3 mm) in from the horizontal and vertical guides is not scanned. The self-adjusting scanner cover allows you to place thick documents on the document table glass without removing it. If your document is too thick to fit under the cover, you can remove the cover as described on page 29. 22
-
 1
1 -
2
-
3
-
4
-
5
-
6
-
7
-
8
-
9
-
10
-
11
-
12
-
13
-
14
-
15
-
16
-
17
-
18
-
19
-
20
-
21
-
 22
22 -
 23
23 -
 24
24 -
 25
25 -
 26
26 -
 27
27 -
 28
28 -
 29
29 -
 30
30 -
 31
31 -
 32
32 -
33
-
34
-
35
-
36
-
37
-
38
-
39
-
40
-
41
-
42
-
43
-
44
-
45
-
46
-
47
-
48
-
49
-
50
-
51
-
52
-
53
-
54
-
55
-
56
-
57
-
58
-
59
-
60
-
61
-
62
-
63
-
64
-
65
-
66
-
67
-
68
-
69
-
70
-
71
-
72
-
73
-
74
-
75
-
76
-
77
-
78
-
79
-
80
 |
 |
