Epson PictureMate 400 - PM400 Quick Guide and Warranty - Page 14
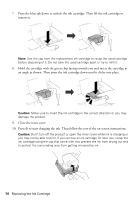
an angle as shown. Then press the ink cartridge down until it clicks into place.
 |
View all Epson PictureMate 400 - PM400 manuals
Add to My Manuals
Save this manual to your list of manuals |
Page 14 highlights
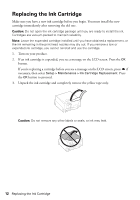
7. Press the blue tab down to unlock the ink cartridge. Then lift the ink cartridge to remove it. Note: Use the cap from the replacement ink cartridge to recap the used cartridge before disposing of it. Do not take the used cartridge apart or try to refill it. 8. Hold the cartridge with the green chip facing towards you and insert the cartridge at an angle as shown. Then press the ink cartridge down until it clicks into place. Caution: Make sure to insert the ink cartridge in the correct direction or you may damage the product. 9. Close the inner cover 10. Press x to start charging the ink. Then follow the rest of the on-screen instructions. Caution: Don't turn off the product or open the inner cover while ink is charging or you may not be able to print. If you remove an ink cartridge for later use, recap the ink cartridge using the cap that came with it to prevent the ink from drying out and to protect the surrounding area from getting smeared by ink. 14 Replacing the Ink Cartridge
-
 1
1 -
2
-
3
-
4
-
5
-
6
-
7
-
8
-
 9
9 -
 10
10 -
 11
11 -
 12
12 -
 13
13 -
 14
14 -
 15
15 -
 16
16 -
 17
17 -
 18
18 -
 19
19 -
20
-
21
-
22
-
23
-
24
-
25
-
26
-
27
-
28
-
29
-
30
-
31
-
32
-
33
-
34
-
35
-
36
-
37
-
38
-
39
-
40
-
41
-
42
-
43
-
44
-
45
-
46
-
47
-
48
-
49
-
50
-
51
-
52
 |
 |
