Epson PictureMate 400 - PM400 Quick Guide and Warranty - Page 7
Inserting the Card, Removing the Card, Windows
 |
View all Epson PictureMate 400 - PM400 manuals
Add to My Manuals
Save this manual to your list of manuals |
Page 7 highlights
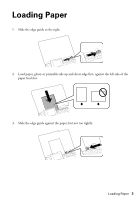
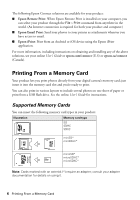
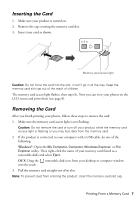
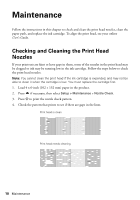
Inserting the Card 1. Make sure your product is turned on. 2. Remove the cap covering the memory card slot. 3. Insert your card as shown. Memory card access light Caution: Do not force the card into the slot; it won't go in all the way. Keep the memory card slot cap out of the reach of children. The memory card access light flashes, then stays lit. Now you can view your photos on the LCD screen and print them (see page 8). Removing the Card After you finish printing your photos, follow these steps to remove the card: 1. Make sure the memory card access light is not flashing. Caution: Do not remove the card or turn off your product while the memory card access light is flashing or you may lose data from the memory card. 2. If the product is connected to your computer with a USB cable, do one of the following: Windows®: Open the My Computer, Computer, Windows Explorer, or File Explorer utility. Then right-click the name of your memory card (listed as a removable disk) and select Eject. OS X: Drag the removable disk icon from your desktop or computer window into the trash. 3. Pull the memory card straight out of its slot. Note: To prevent dust from entering the product, insert the memory card slot cap. Printing From a Memory Card 7
-
 1
1 -
 2
2 -
 3
3 -
 4
4 -
 5
5 -
 6
6 -
 7
7 -
 8
8 -
 9
9 -
 10
10 -
 11
11 -
 12
12 -
13
-
14
-
15
-
16
-
17
-
18
-
19
-
20
-
21
-
22
-
23
-
24
-
25
-
26
-
27
-
28
-
29
-
30
-
31
-
32
-
33
-
34
-
35
-
36
-
37
-
38
-
39
-
40
-
41
-
42
-
43
-
44
-
45
-
46
-
47
-
48
-
49
-
50
-
51
-
52
 |
 |
