Epson PictureMate Flash - PM 280 Product Information Guide - Page 12
Saving Photos to the Built-in CD Burner, Using the Optional Battery, Installing the Battery - buy
 |
View all Epson PictureMate Flash - PM 280 manuals
Add to My Manuals
Save this manual to your list of manuals |
Page 12 highlights
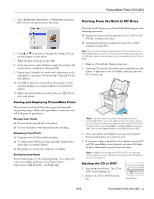
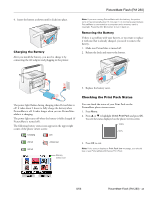
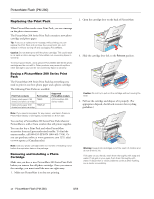
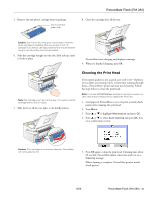
PictureMate Flash (PM 280) Saving Photos to the Built-in CD Burner You can save photos to a CD using the built-in CD drive in PictureMate Flash. Use only 12-cm CDs and select a quality brand. The following types are compatible with this printer: ❏ CD-R ❏ CD-RW Multi ❏ CD-RW High ❏ CD-RW Ultra Note: PictureMate supports both 650MB (74 min.) and 700MB (80 min.) capacities for each type of CD. You can also have PictureMate automatically print a "proof sheet" of your saved photos. A proof sheet provides small thumbnail images-up to 56 per sheet-of all the photos you've copied. 1. Make sure PictureMate Flash is turned on. Note: Saving to a CD takes extra energy. If you're using the optional battery, make sure it's fully charged, or connect the AC power adapter. 2. Insert your memory card into PictureMate. 3. Insert a CD into the slot until it goes completely into the printer. A light next to the slot flashes, indicating that the CD is being read. 4. If you see a message that frames are not found on the disk, press OK. 5. If you want to copy all the photos on your memory card, skip to the next step. To copy individual photos, select the ones you want to copy. (Press or to view your photos. Then press OK when you see a photo you want to copy.) 6. Press Save. (Or press Menu, highlight Save to CD, then press OK.) 7. At the next screen, select whether to copy all photos or just the selected photos, then press OK. 8. At the confirmation screen, press OK. 9. When you see a message asking if you want to print a proof sheet or index of your copied photos, select Yes or No. If necessary, make sure paper is loaded. The sheet automatically prints once the backup is complete. 10. Follow the instructions on the screen to complete the backup. The CD is ejected automatically when the backup is finished. Each time you copy photos to the same CD, PictureMate creates a new numbered folder (001, 002, etc.) where it stores your photos. Caution: Avoid handling the printer during backup. Also, do not remove the memory card or CD while photos are being saved, or you may lose photos on your card or CD. If you need to stop the backup, press Cancel. Note: If you have any problems writing to a particular CD, set the CD Backup Speed setting to Normal in the Setup menu and save to the CD again. Using the Optional Battery To buy the optional battery, check with your PictureMate retailer or go to www.MyPictureMate.com. With a fully charged battery, you can print about 100 photos (or 60 photos when printing from PictureMate Flash's built-in CD drive). Installing the Battery 1. Make sure PictureMate is turned off. 2. Unplug the AC adapter from PictureMate. 3. Release the latch and remove the battery cover from the back of the printer. 12 - PictureMate Flash (PM 280) 8/06
-
 1
1 -
2
-
3
-
4
-
5
-
6
-
 7
7 -
 8
8 -
 9
9 -
 10
10 -
 11
11 -
 12
12 -
 13
13 -
 14
14 -
 15
15 -
 16
16 -
 17
17 -
18
 |
 |