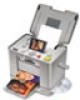
Epson PictureMate Flash - PM 280 Product Information Guide - Page 15
Cleaning the Print Head
 |
View all Epson PictureMate Flash - PM 280 manuals
Add to My Manuals
Save this manual to your list of manuals |
Page 15 highlights
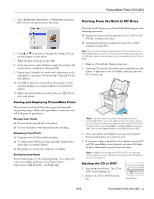
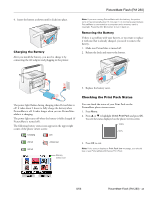
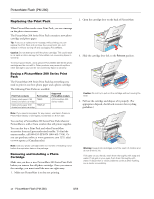
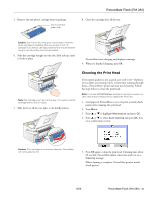
5. Remove the new photo cartridge from its package. Don't touch the green chip PictureMate Flash (PM 280) 8. Close the cartridge door all the way. Caution: Don't touch the small green circuit board. Install the photo cartridge immediately after you remove it from its package. If you leave a cartridge unpacked for a long time before using it, normal printing may not be possible. 6. Slide the cartridge straight into the slot, label side up, until it clicks in place. PictureMate starts charging and displays a message. 9. When it's finished charging, press OK. Note: The cartridge won't go in all the way. You need to use the cartridge lever to lock it in place. 7. Slide the lever all the way right, to the Lock position. Cleaning the Print Head If your print quality is not as good as it used to be-if photos are too light, are missing colors, or have lines running through them-PictureMate's print head may need cleaning. Follow the steps below to clean the print head. Note: If you see a Print Pack low message on the photo viewer, you can't clean the print head until you replace the Print Pack. 1. Load paper in PictureMate so you can print a nozzle check pattern after cleaning the print head. 2. Press Menu. 3. Press or to highlight Maintenance and press OK. 4. Press or to select Auto Cleaning and press OK. You see a confirmation screen: Caution: If the cartridge is not inserted correctly, PictureMate will not be able to print. 5. Press OK again to clean the print head. Cleaning takes about 60 seconds. PictureMate makes some noise and you see a Cleaning message. When cleaning is complete, PictureMate prints a nozzle check pattern. 8/06 PictureMate Flash (PM 280) - 15
-
 1
1 -
2
-
3
-
4
-
5
-
6
-
7
-
8
-
9
-
 10
10 -
 11
11 -
 12
12 -
 13
13 -
 14
14 -
 15
15 -
 16
16 -
 17
17 -
 18
18
 |
 |
