Epson PictureMate Flash - PM 280 Product Information Guide - Page 17
Related Documentation, PictureMate Snap/PictureMate Flash
 |
View all Epson PictureMate Flash - PM 280 manuals
Add to My Manuals
Save this manual to your list of manuals |
Page 17 highlights
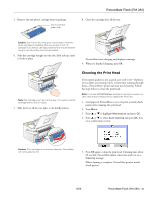
7. Close the paper support and output tray. PictureMate Flash (PM 280) 8. Pack PictureMate in the box that it came in or in the optional carrying case. Place the power cable and adapter in the accessory box that came with PictureMate and pack it with the PictureMate. Caution: Make sure the photo cartridge is installed. Do not remove the photo cartridge before transporting. Don't place PictureMate on its side or upside down, or ink may leak. Note: If your prints don't look as good after PictureMate has been moved, try aligning the print head. See page 16. Related Documentation CPD-22153 CPD-22154 CPD-22158 PictureMate Snap/PictureMate Flash Start Here PictureMate Snap/PictureMate Flash Basics book PictureMate Flash (PM 280) CD-ROM with HTML User's Guide 8/06 PictureMate Flash (PM 280) - 17
-
 1
1 -
2
-
3
-
4
-
5
-
6
-
7
-
8
-
9
-
10
-
11
-
 12
12 -
 13
13 -
 14
14 -
 15
15 -
 16
16 -
 17
17 -
 18
18
 |
 |
