Epson PowerLite 1825 Product Information Guide - Page 3
Positioning the Projector, Turning On and Off the Projector
 |
View all Epson PowerLite 1825 manuals
Add to My Manuals
Save this manual to your list of manuals |
Page 3 highlights
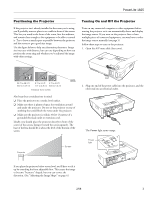
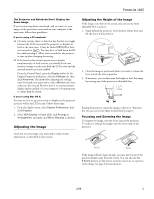
PowerLite 1825 Positioning the Projector If the projector isn't already installed in the room you're using, you'll probably want to place it on a table in front of the screen. This lets you stand in the front of the room, face the audience, and remain close enough to the equipment to be able to control it. Try to leave as much space as possible between the projector and the screen to get a good-size image. Use the figure below to help you determine placement. Image size increases with distance, but can vary depending on how you position the zoom ring and whether you've adjusted the image with other settings. TBD Turning On and Off the Projector Turn on any connected computer or video equipment before starting the projector so it can automatically detect and display the image source. If you turn on the projector first or have multiple pieces of connected equipment, you may have to select the image source manually (see page 5). Follow these steps to turn on the projector: 1. Open the A/V mute slide (lens cover). 29.7 to 48.2 ft (9.0 to 14.7 m) 5.7 to 9.4 ft 2.7 to 4.6 ft (1.7 to 2.9 m) (0.8 to 1.4 m) Distance from screen Also keep these considerations in mind: ❏ Place the projector on a sturdy, level surface. ❏ Make sure there is plenty of space for ventilation around and under the projector. Do not set the projector on top of anything that could block the vents under the projector. ❏ Make sure the projector is within 10 feet (3 meters) of a grounded electrical outlet or extension cord. Ideally, you should place the projector directly in front of the center of the screen, facing it toward the screen squarely. The base of the lens should be at about the level of the bottom of the screen. 2. Plug one end of the power cable into the projector, and the other end into an electrical outlet. The Power light turns orange. Projector Screen Power light If you place the projector below screen level, you'll have to tilt it up by extending the front adjustable foot. This causes the image to become "keystone" shaped, but you can correct the distortion. (See "Adjusting the Image Shape" on page 6.) 2/08 3
-
 1
1 -
 2
2 -
 3
3 -
 4
4 -
 5
5 -
 6
6 -
 7
7 -
 8
8 -
 9
9 -
10
-
11
-
12
-
13
 |
 |
