Epson PowerLite 50c Product Information Guide - Page 4
Positioning the Projector, Displaying an Image, Turning On Your Equipment - mount
 |
View all Epson PowerLite 50c manuals
Add to My Manuals
Save this manual to your list of manuals |
Page 4 highlights
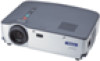
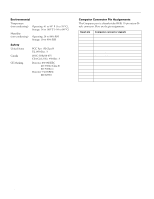
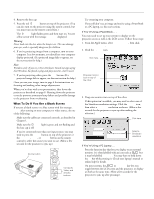
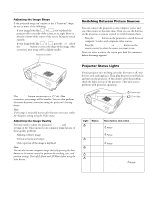
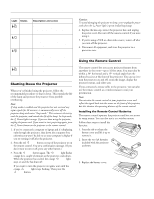
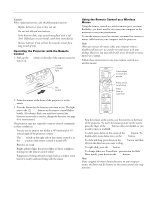
EPSON Powerlite 50c/70c Positioning the Projector The location in which you choose to set up your projector depends on the size of the room and your presentation style. t Place the projector on a sturdy, level surface, within this distance from the screen: 3.3 to 36 feet in Wide mode 3.9 to 43.2 feet in Tele mode (see page 6 for more information on these modes) t Make sure there is plenty of space for ventilation around and under the projector. t Make sure the projector is within 6 feet of a grounded electrical outlet or extension cord, and within 5 feet of your computer and/or video source. t Place the projector directly in front of the center of the screen, facing it toward the screen squarely. Otherwise, your image will not be square. Note: It's best to position the screen directly in front of the room. If it's placed diagonally in a corner, it's much more difficult to aim the projector at the screen correctly and get a square image. Most presenters find it convenient to place the screen in the front of the room with the projector back near the front of the audience, leaving ample room between the screen and projector to get a good-sized image. Then the presenter can stand in front of the room, facing the audience and control the equipment from there. Use the figure below as a guideline to help you determine how far from the screen to place the projector. Your image size may not exactly match these sizes; its actual size depends on whether you have adjusted the image size setting (using keystone correction or the Wide/Tele button). If you have to raise the projector by adjusting its feet (described on page 6), you'll need to square-up the sides of image by pressing the Keystone button (also on page 7). If you'll be projecting from overhead, you'll get the bestlooking picture by mounting the projector upside-down, parallel to the ceiling, with the bottom of its lens level with the top of the screen. (You'll also need to select ceiling projection mode in the projector's Advanced menu.) Displaying an Image Once you've connected the projector to your computer or other equipment, you're ready to turn on the projector, adjust the image, and give your presentation. Turning On Your Equipment Make sure your projector and other equipment are set up and connected correctly. Then plug in and turn on your equipment, as described below. Note: If you have more than one source connected, you may have to switch to the one you want to use, as described on page 5. Follow these steps to plug in and turn on your equipment: 1. If you're projecting video, first plug in and turn on your VCR, DVD player, or other video source. (If you're projecting from a computer, go to step 2.) 2. To turn on the projector, first connect one end of the power cord to the projector's power inlet on its left side. 40 ft. 8 ft. 4 ft. distance from the screen When projecting from a table, the ideal arrangement is to set the projector flat on its surface with the base of the lens at about the level of the bottom of the screen. This delivers the best-looking picture. 3. Connect the other end to a grounded electrical outlet. The Power light on the projector turns orange, indicating that the projector is receiving power and is in sleep mode, but is not yet turned on. 4 - EPSON Powerlite 50c/70c 01/01
-
 1
1 -
 2
2 -
 3
3 -
 4
4 -
 5
5 -
 6
6 -
 7
7 -
 8
8 -
 9
9 -
 10
10 -
11
-
12
 |
 |