Epson RX-80 User Manual - Page 17
Loading continuous-feed paper, Setting, Move the print head to the center of the printer. Remember
 |
View all Epson RX-80 manuals
Add to My Manuals
Save this manual to your list of manuals |
Page 17 highlights
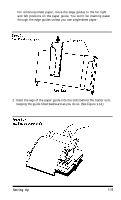
6. In each tractor slot, located at each side of the paper slot, is a peg that fits into the notch on each of the rear tractor legs. Tilt the tractor back so that the rear notches fit over these pegs. See Figure 1-9. Figure 1-9. Installing the tractor unit 7. Then tilt the unit forward until the front legs snap into place. Loading continuous-feed paper Once the tractor unit is installed, load continuous-feed paper as follows: 1. Make sure that the printer is turned off. 2. Remove the front lid of the printer. 3. Move the print head to the center of the printer. Remember, the printer must be turned off whenever you move the print head. Also, if you've been using the printer, the print head may be hot. Be careful not to touch it unless you let it cool for a few minutes. 1-10 Setting Up
-
 1
1 -
2
-
3
-
4
-
5
-
6
-
7
-
8
-
9
-
10
-
11
-
 12
12 -
 13
13 -
 14
14 -
 15
15 -
 16
16 -
 17
17 -
 18
18 -
 19
19 -
 20
20 -
 21
21 -
 22
22 -
23
-
24
-
25
-
26
-
27
-
28
-
29
-
30
-
31
-
32
-
33
-
34
-
35
-
36
-
37
-
38
-
39
-
40
-
41
-
42
-
43
-
44
-
45
-
46
-
47
-
48
-
49
-
50
-
51
-
52
-
53
-
54
-
55
-
56
-
57
-
58
-
59
-
60
-
61
-
62
-
63
-
64
-
65
-
66
-
67
-
68
-
69
-
70
-
71
-
72
-
73
-
74
-
75
-
76
-
77
-
78
-
79
-
80
-
81
-
82
-
83
-
84
-
85
-
86
-
87
-
88
-
89
-
90
-
91
-
92
-
93
-
94
-
95
-
96
-
97
-
98
-
99
-
100
-
101
-
102
-
103
-
104
-
105
-
106
-
107
-
108
-
109
-
110
-
111
-
112
-
113
-
114
-
115
-
116
-
117
-
118
-
119
-
120
-
121
-
122
-
123
-
124
-
125
-
126
-
127
-
128
-
129
-
130
-
131
-
132
-
133
-
134
-
135
-
136
-
137
-
138
-
139
-
140
-
141
-
142
-
143
-
144
-
145
-
146
-
147
-
148
-
149
 |
 |
