Epson RX-80 User Manual - Page 19
Installing the paper guide, Setting Up
 |
View all Epson RX-80 manuals
Add to My Manuals
Save this manual to your list of manuals |
Page 19 highlights
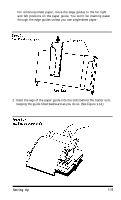
7. Feed the paper into the paper slot. Push and maneuver the paper through the slot until it comes up between the ribbon guide and the platen. 8. Pull the paper up until the top is above the pin feed holders. Fit the holes along the left edge of the paper over the pins in the left holder, as shown in Figure 1-12, and close the pin feed cover. Figure 1-12. Fitting the paper into the left pin feed holder 9. Fit the right side of the paper into the right holder, moving the holder as needed to match the width of the paper. Close the second pin feed cover. 10. Make sure that the paper has no dips or wrinkles, then push the locking lever back to lock the right holder in place. Installing the paper guide Install the paper guide, which is used here as a paper separator, as described below. Note that the guide is installed in one of two different positions depending on the type of paper you use. It lies flat when you use continuous-feed paper, as described here, and sits upright for loading single-sheet paper. 1. If the edge guides are not yet in place, install them by hooking the tab on the back of each guide over the top of the paper guide, as shown in Figure 1-13. Snap the bottom of each guide into place. 1-12 Setting Up
-
 1
1 -
2
-
3
-
4
-
5
-
6
-
7
-
8
-
9
-
10
-
11
-
12
-
13
-
 14
14 -
 15
15 -
 16
16 -
 17
17 -
 18
18 -
 19
19 -
 20
20 -
 21
21 -
 22
22 -
 23
23 -
 24
24 -
25
-
26
-
27
-
28
-
29
-
30
-
31
-
32
-
33
-
34
-
35
-
36
-
37
-
38
-
39
-
40
-
41
-
42
-
43
-
44
-
45
-
46
-
47
-
48
-
49
-
50
-
51
-
52
-
53
-
54
-
55
-
56
-
57
-
58
-
59
-
60
-
61
-
62
-
63
-
64
-
65
-
66
-
67
-
68
-
69
-
70
-
71
-
72
-
73
-
74
-
75
-
76
-
77
-
78
-
79
-
80
-
81
-
82
-
83
-
84
-
85
-
86
-
87
-
88
-
89
-
90
-
91
-
92
-
93
-
94
-
95
-
96
-
97
-
98
-
99
-
100
-
101
-
102
-
103
-
104
-
105
-
106
-
107
-
108
-
109
-
110
-
111
-
112
-
113
-
114
-
115
-
116
-
117
-
118
-
119
-
120
-
121
-
122
-
123
-
124
-
125
-
126
-
127
-
128
-
129
-
130
-
131
-
132
-
133
-
134
-
135
-
136
-
137
-
138
-
139
-
140
-
141
-
142
-
143
-
144
-
145
-
146
-
147
-
148
-
149
 |
 |
