Epson RX500 User's Guide - Page 106
button to enter scan mode., You see an LCD screen similar
 |
UPC - 010343848467
View all Epson RX500 manuals
Add to My Manuals
Save this manual to your list of manuals |
Page 106 highlights
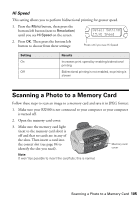
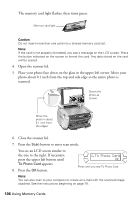
The memory card light flashes, then turns green. Memory card light Caution: Do not insert more than one card into a shared memory card slot. Note: If the card is not properly formatted, you see a message on the LCD screen. Press the button indicated on the screen to format the card. Any data stored on the card will be erased. 4. Open the scanner lid. 5. Place your photo face down on the glass in the upper left corner. Move your photo about 0.1 inch from the top and side edge so the entire photo is scanned. Orient the photo as shown Move the photo in about 0.1 inch from the edges 6. Close the scanner lid. 7. Press the Scan button to enter scan mode. You see an LCD screen similar to the one to the right. If necessary, press the upper left button until To Photo Card appears. 8. Press the OK button. 1.To Photo Card OK Press until you see To Photo Card Note: You can also scan to your computer or create an e-mail with the scanned image attached. See the instructions beginning on page 79. 106 Using Memory Cards
-
 1
1 -
2
-
3
-
4
-
5
-
6
-
7
-
8
-
9
-
10
-
11
-
12
-
13
-
14
-
15
-
16
-
17
-
18
-
19
-
20
-
21
-
22
-
23
-
24
-
25
-
26
-
27
-
28
-
29
-
30
-
31
-
32
-
33
-
34
-
35
-
36
-
37
-
38
-
39
-
40
-
41
-
42
-
43
-
44
-
45
-
46
-
47
-
48
-
49
-
50
-
51
-
52
-
53
-
54
-
55
-
56
-
57
-
58
-
59
-
60
-
61
-
62
-
63
-
64
-
65
-
66
-
67
-
68
-
69
-
70
-
71
-
72
-
73
-
74
-
75
-
76
-
77
-
78
-
79
-
80
-
81
-
82
-
83
-
84
-
85
-
86
-
87
-
88
-
89
-
90
-
91
-
92
-
93
-
94
-
95
-
96
-
97
-
98
-
99
-
100
-
 101
101 -
 102
102 -
 103
103 -
 104
104 -
 105
105 -
 106
106 -
 107
107 -
 108
108 -
 109
109 -
 110
110 -
 111
111 -
112
-
113
-
114
-
115
-
116
-
117
-
118
-
119
-
120
-
121
-
122
-
123
-
124
-
125
-
126
-
127
-
128
-
129
-
130
-
131
-
132
-
133
-
134
-
135
-
136
-
137
-
138
 |
 |
