Epson RX700 Basics - Page 34
Other Ways to View and Select Your Photos
 |
UPC - 010343853775
View all Epson RX700 manuals
Add to My Manuals
Save this manual to your list of manuals |
Page 34 highlights
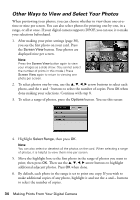
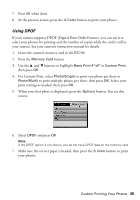
Other Ways to View and Select Your Photos When previewing your photos, you can choose whether to view them one-at-atime or nine per screen. You can also select photos for printing one-by-one, in a range, or all at once. If your digital camera supports DPOF, you can use it to make your selections beforehand. 1. After making your print settings (page 30), you see the first photo on your card. Press the Screen View button. Your photos are displayed nine per screen. Note: Press the Screen View button again to view your images as a slide show. (You cannot select the number of prints in this mode.) Press Screen View again to return to viewing one photo per screen. 2. To select photos one-by-one, use the u, d, l, r arrow buttons to select each photo, and the + and - buttons to select the number of copies. Press OK when done making your selections. Continue with step 8. 3. To select a range of photos, press the Options button. You see this screen: 4. Highlight Select Range, then press OK. Note: You can also select or deselect all the photos on the card. When selecting a range of photos, it is helpful to view them nine per screen. 5. Move the highlight box to the first photo in the range of photos you want to print, then press OK. Then use the u, d, l, r arrow buttons to highlight additional adjacent photos. Press OK when done. 6. By default, each photo in the range is set to print one copy. If you wish to make additional copies of any photo, highlight it and use the + and - buttons to select the number of copies. 34 Making Prints From Your Digital Camera
-
 1
1 -
2
-
3
-
4
-
5
-
6
-
7
-
8
-
9
-
10
-
11
-
12
-
13
-
14
-
15
-
16
-
17
-
18
-
19
-
20
-
21
-
22
-
23
-
24
-
25
-
26
-
27
-
28
-
 29
29 -
 30
30 -
 31
31 -
 32
32 -
 33
33 -
 34
34 -
 35
35 -
 36
36 -
 37
37 -
 38
38 -
 39
39 -
40
-
41
-
42
-
43
-
44
-
45
-
46
-
47
-
48
-
49
-
50
-
51
-
52
-
53
-
54
-
55
-
56
-
57
-
58
-
59
-
60
-
61
-
62
-
63
-
64
-
65
-
66
-
67
-
68
-
69
-
70
-
71
-
72
-
73
-
74
-
75
-
76
-
77
-
78
-
79
-
80
-
81
-
82
-
83
-
84
-
85
-
86
-
87
-
88
-
89
-
90
-
91
-
92
-
93
-
94
-
95
-
96
-
97
-
98
 |
 |
