Epson RX700 Basics - Page 36
Selecting Special Print Settings, Prints the date your photo was taken in one of the following
 |
UPC - 010343853775
View all Epson RX700 manuals
Add to My Manuals
Save this manual to your list of manuals |
Page 36 highlights
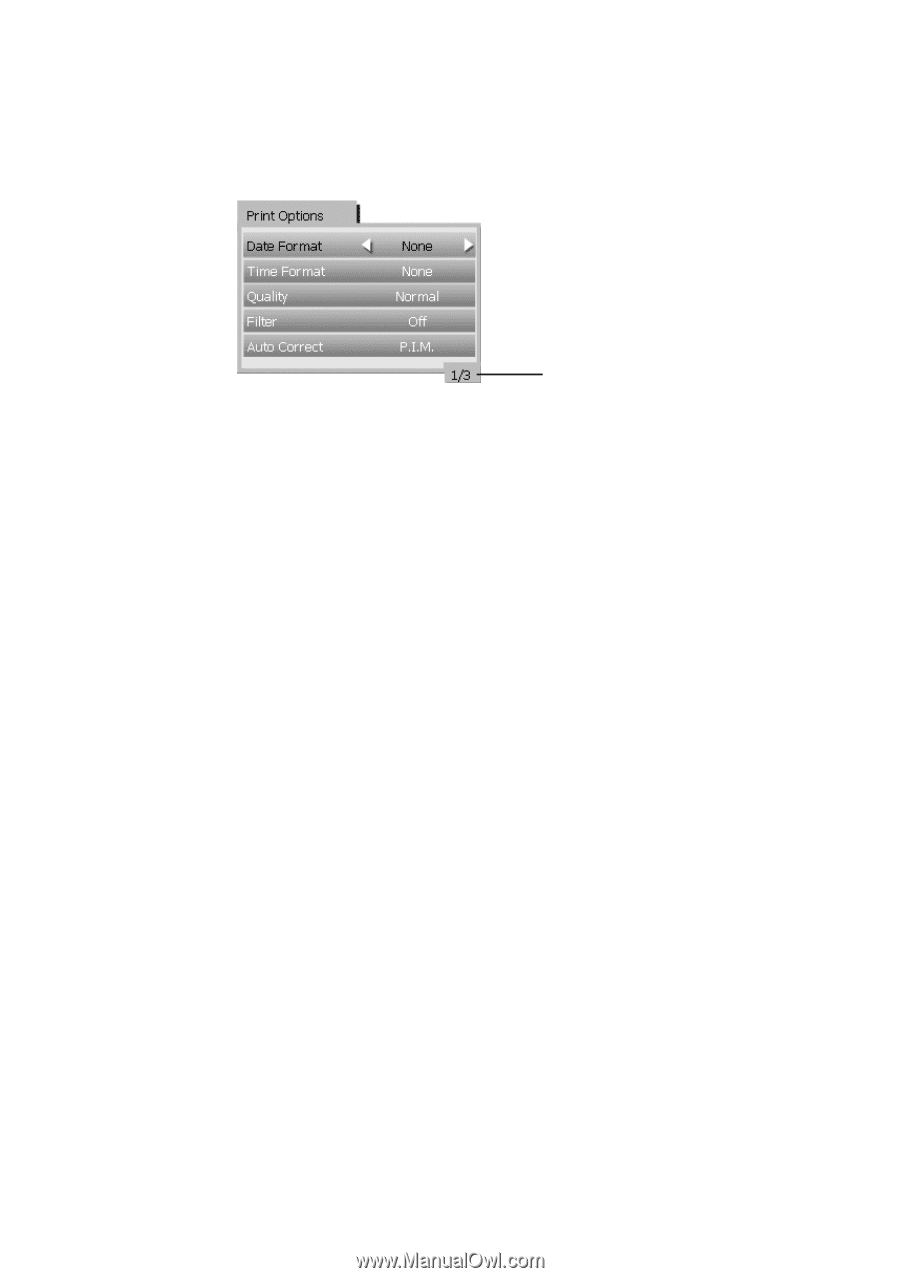
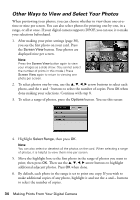
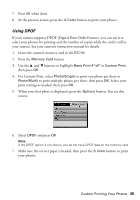
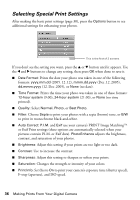
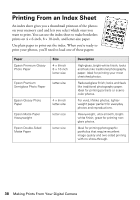
Selecting Special Print Settings After making the basic print settings (page 30), press the Options button to see additional settings for enhancing your photos. This is the first of 3 screens If you don't see the setting you want, press the u or d button until it appears. Use the l and r buttons to change any setting, then press OK when done to save it. ■ Date Format: Prints the date your photo was taken in one of the following formats: yyyy.mm.dd (2005.12.12), mmm.dd.yyyy (Dec.12.2005), dd.mmm.yyyy (12.Dec.2005), or None (no date). ■ Time Format: Prints the time your photo was taken in one of these formats: 12-hour system (9:00), 24-hour system (21:00), or None (no time printed). ■ Quality: Select Normal, Photo, or Best Photo. ■ Filter: Choose Sepia to print your photos with a sepia (brown) tone, or B/W to print in monochrome black-and-white. ■ Auto Correct: P.I.M. and Exif use your camera's PRINT Image MatchingTM or Exif Print settings (these options are automatically selected when your pictures contain P.I.M. or Exif data). PhotoEnhance adjusts the brightness, contrast, and saturation of your photos. ■ Brightness: Adjust this setting if your prints are too light or too dark. ■ Contrast: Use to increase the contrast. ■ Sharpness: Adjust this setting to sharpen or soften your prints. ■ Saturation: Changes the strength or intensity of your colors. ■ Print Info: Set this to On to print your camera's exposure time (shutter speed), F-stop (aperture), and ISO speed. 36 Making Prints From Your Digital Camera
-
 1
1 -
2
-
3
-
4
-
5
-
6
-
7
-
8
-
9
-
10
-
11
-
12
-
13
-
14
-
15
-
16
-
17
-
18
-
19
-
20
-
21
-
22
-
23
-
24
-
25
-
26
-
27
-
28
-
29
-
30
-
 31
31 -
 32
32 -
 33
33 -
 34
34 -
 35
35 -
 36
36 -
 37
37 -
 38
38 -
 39
39 -
 40
40 -
 41
41 -
42
-
43
-
44
-
45
-
46
-
47
-
48
-
49
-
50
-
51
-
52
-
53
-
54
-
55
-
56
-
57
-
58
-
59
-
60
-
61
-
62
-
63
-
64
-
65
-
66
-
67
-
68
-
69
-
70
-
71
-
72
-
73
-
74
-
75
-
76
-
77
-
78
-
79
-
80
-
81
-
82
-
83
-
84
-
85
-
86
-
87
-
88
-
89
-
90
-
91
-
92
-
93
-
94
-
95
-
96
-
97
-
98
 |
 |