Epson Stylus CX4600 Product Information Guide - Page 12
Epson Stylus CX4600, Open the cartridge cover and squeeze the tab at the back - printer
 |
View all Epson Stylus CX4600 manuals
Add to My Manuals
Save this manual to your list of manuals |
Page 12 highlights
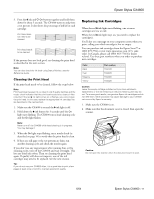
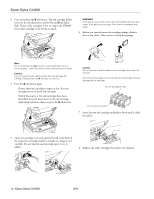
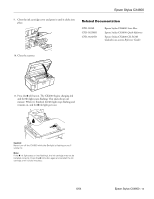
Epson Stylus CX4600 3. Press and release the B ink button. The ink cartridge holder moves to the check position and the On and B ink lights flash. If one of the cartridges is low or empty, the CX4600 moves that cartridge to the _ ink out mark. WARNING: If ink gets on your hands, wash them thoroughly with soap and water. If ink gets into your eyes, flush them immediately with water. 6. Before you open the new ink cartridge package, shake it four or five times. Then remove it from the package. Note: Do not hold down the B ink button; when held down for 3 or more seconds, it tells the printer to start cleaning the print head. Caution: Do not move the print head by hand; this may damage the CX4600. Always press the B ink button to move it. 4. Press the B ink button again. ❏ If more than one cartridge is empty or low, the next cartridge moves to the _ ink out mark. ❏ If all of the empty or low ink cartridges have been identified, the print head moves to the ink cartridge replacement position when you press the B ink button. Caution: Do not remove or tear the label on the cartridge; otherwise, ink will leak. Do not touch the green chip on the side of the cartridge. This can damage the ink cartridge. Do not damage the tab Do not touch this part 7. Insert the new ink cartridge and push it down until it clicks into place. 5. Open the cartridge cover and squeeze the tab at the back of the empty/low cartridge and lift it straight out. Dispose of it carefully. Do not take the used cartridge apart or try to refill it. 8. Replace any other cartridges that need to be replaced. 12 - Epson Stylus CX4600 6/04
-
 1
1 -
2
-
3
-
4
-
5
-
6
-
 7
7 -
 8
8 -
 9
9 -
 10
10 -
 11
11 -
 12
12 -
 13
13
 |
 |
