Epson Stylus Pro 3880 Graphic Arts Edition Managing Color Guide
Epson Stylus Pro 3880 Graphic Arts Edition Manual
 |
View all Epson Stylus Pro 3880 Graphic Arts Edition manuals
Add to My Manuals
Save this manual to your list of manuals |
Epson Stylus Pro 3880 Graphic Arts Edition manual content summary:
- Epson Stylus Pro 3880 Graphic Arts Edition | Managing Color Guide - Page 1
Epson Professional Imaging Color Management Guide Printing With Epson Premium ICC Profiles - Epson Stylus Pro 3880 Graphic Arts Edition | Managing Color Guide - Page 2
operating and maintenance instructions. Seiko Epson Corporation shall not be liable for any damages or problems arising from the use of any options or any consumable products other than those designated as Original Epson Products or Epson Approved Products by Seiko Epson Corporation. Responsible Use - Epson Stylus Pro 3880 Graphic Arts Edition | Managing Color Guide - Page 3
, and you may also have downloaded Premium ICC profiles from Epson when you installed your printer software. To print using Premium ICC profiles with Adobe® Photoshop® CS3, CS4, or Adobe Photoshop Lightroom®, follow the instructions in these sections for your operating system: ■ "Windows 7, Windows - Epson Stylus Pro 3880 Graphic Arts Edition | Managing Color Guide - Page 4
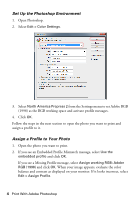
Set Up the Photoshop Environment 1. Open Photoshop. 2. Select Edit > Color Settings. 3. Select North America Prepress 2 from the Settings menu to set Adobe RGB ( color balance and contrast as displayed on your monitor. If it looks incorrect, select Edit > Assign Profile. 4 Print With Adobe Photoshop - Epson Stylus Pro 3880 Graphic Arts Edition | Managing Color Guide - Page 5
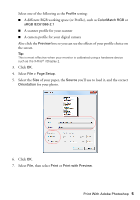
Select one of the following as the Profile setting: ■ A different RGB working space (or Profile), such as ColorMatch RGB or sRGB IEC61966-2.1 ■ A scanner profile for your scanner ■ A camera profile for your digital camera Also click the Preview box so you can see the effects of your profile choice - Epson Stylus Pro 3880 Graphic Arts Edition | Managing Color Guide - Page 6
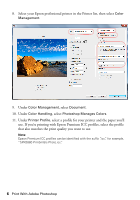
Color Management, select Document. 10. Under Color Handling, select Photoshop Manages Colors. 11. Under Printer Profile, select a profile for your printer and the paper you'll use. If you're printing with Epson Premium ICC profiles, select the profile that also matches the print quality you want to - Epson Stylus Pro 3880 Graphic Arts Edition | Managing Color Guide - Page 7
the steps in the next section to select print settings to match the profile and print. Print Your Color-Managed Photo 1. Make sure your Epson professional printer is selected, then click the Preferences or Properties button. 2. Select the Source and Media Type settings for the paper you'll use for - Epson Stylus Pro 3880 Graphic Arts Edition | Managing Color Guide - Page 8
the drop-down menu. IMPORTANT: Select Off (No Color Adjustment) Note: Make sure that you select Off (No Color Adjustment). If you don't, the printer driver will apply additional correction to the image, producing inaccurate results. 7. Click OK or Print to print. If you get unexpected results, see - Epson Stylus Pro 3880 Graphic Arts Edition | Managing Color Guide - Page 9
Print With Adobe Photoshop Lightroom First select your printer and page setup options in Lightroom. Then set the color management options, select Select the Print module, and click the Page Setup button. 4. Make sure your Epson professional printer is selected. Print With Adobe Photoshop Lightroom 9 - Epson Stylus Pro 3880 Graphic Arts Edition | Managing Color Guide - Page 10
5. Select the Size of your paper, the Source you'll use to load it, and the correct Orientation for your photo. 6. Click OK. 7. Scroll down to the Print Job panel in Lightroom. 8. Under Color Management in the Print Job panel, select Other as the Profile setting. 10 Print With Adobe Photoshop - Epson Stylus Pro 3880 Graphic Arts Edition | Managing Color Guide - Page 11
want to add to the Profile list that correspond to the printer and the papers you'll use. If you're printing with Epson Premium ICC profiles, select the profiles that also match the Print Quality you want to use. Note: Epson Premium ICC profiles can be identified with the suffix ".icc," for - Epson Stylus Pro 3880 Graphic Arts Edition | Managing Color Guide - Page 12
paper you're going to print on. If you're printing with Epson Premium ICC profiles, select the profile that also matches the print quality select Perceptual. This reduces the color saturation so that the colors fit within the printer's color gamut. 13. Click the Print button. Follow the steps in the - Epson Stylus Pro 3880 Graphic Arts Edition | Managing Color Guide - Page 13
Print Your Color-Managed Photo 1. Make sure your Epson professional printer is selected, then click the Preferences or Properties button. 2. Select the Source and Media Type settings for the paper you'll use for the print. 3. - Epson Stylus Pro 3880 Graphic Arts Edition | Managing Color Guide - Page 14
drop-down menu. IMPORTANT: Select Off (No Color Adjustment) Note: Make sure that you select Off (No Color Adjustment). If you don't, the printer driver will apply additional correction to the image, producing inaccurate results. 7. Click OK to print. If you get unexpected results, see "Solve Color - Epson Stylus Pro 3880 Graphic Arts Edition | Managing Color Guide - Page 15
Mac OS X 10.6 and 10.5 Follow the instructions in these sections: ■ "Print With Adobe Photoshop" below ■ balance and contrast in your image. Set Up the Photoshop Environment 1. Open Photoshop. 2. Select Edit > Color Settings. 3. Select North America Prepress 2 from the Settings menu to set Adobe RGB - Epson Stylus Pro 3880 Graphic Arts Edition | Managing Color Guide - Page 16
(1998) and click OK. When your image appears, evaluate the color balance and contrast as displayed on your monitor. If it looks incorrect, select Edit > Assign Profile. Select one of the following as the Profile setting: ■ A different RGB working space (or Profile), such as ColorMatch RGB or sRGB - Epson Stylus Pro 3880 Graphic Arts Edition | Managing Color Guide - Page 17
4. Select File > Page Setup. 5. Select your Epson professional printer in the Format for pop-up menu, then change the Paper Size and Orientation settings as necessary, and click OK. 6. Select File, then click Print or Print with Preview. Print With Adobe Photoshop 17 - Epson Stylus Pro 3880 Graphic Arts Edition | Managing Color Guide - Page 18
Color Management, select Document. 9. Under Color Handling, select Photoshop Manages Colors. 10. Under Printer Profile, select a profile for your printer and the paper you'll use. If you're printing with Epson Premium ICC profiles, select the profile that also matches the print quality you want to - Epson Stylus Pro 3880 Graphic Arts Edition | Managing Color Guide - Page 19
Adjustment) Note: Make sure you select Off (No Color Adjustment). If you don't, the printer driver will apply additional correction to the image data, producing inaccurate results. 6. If you are using an Epson Premium ICC profile, set the Print Quality setting to match your profile. 7. Turn off the - Epson Stylus Pro 3880 Graphic Arts Edition | Managing Color Guide - Page 20
Print With Adobe Photoshop Lightroom 1.4 - 2.x First select your printer and page setup options in Lightroom. Then set the color Print module, and click the Page Setup button. 4. Select your Epson professional printer in the Format for pop-up menu. 20 Print With Adobe Photoshop Lightroom 1.4 - 2.x - Epson Stylus Pro 3880 Graphic Arts Edition | Managing Color Guide - Page 21
5. Select the Paper Size setting for the paper size and source you are using, and the correct Orientation for your photo. 6. Click OK. 7. Scroll down to the Print Job panel in Lightroom. 8. Under Color Management in the Print Job panel, select Other as the Profile setting. Print With Adobe Photoshop - Epson Stylus Pro 3880 Graphic Arts Edition | Managing Color Guide - Page 22
want to add to the Profile list that correspond to the printer and the papers you'll use. If you're printing with Epson Premium ICC profiles, select the profiles that also match the print quality you want to use. Note: Epson Premium ICC profiles can be identified with the suffix ".icc," for - Epson Stylus Pro 3880 Graphic Arts Edition | Managing Color Guide - Page 23
select print settings to match the profile and print. Print Your Color-Managed Photo 1. Select your Epson professional printer in the Printer list. 2. Click d to expand the Print window, if necessary. 3. Select Printer Settings from the pop-up menu. 4. Select the Media Type setting for the paper you - Epson Stylus Pro 3880 Graphic Arts Edition | Managing Color Guide - Page 24
) Note: Make sure that you select Off (No Color Adjustment). If you don't, the printer driver will apply additional correction to the image data, producing inaccurate results. 6. If you are using an Epson Premium ICC profile, set the Print Quality setting to match your profile. 7. Turn off the - Epson Stylus Pro 3880 Graphic Arts Edition | Managing Color Guide - Page 25
Mac OS X 10.4.11 Follow the instructions in these sections: ■ "Print With Adobe Photoshop" below ■ "Print With Adobe Photoshop Lightroom" on color balance and contrast in your image. Set Up the Photoshop Environment 1. Open Photoshop. 2. Select Edit > Color Settings. Print With Adobe Photoshop 25 - Epson Stylus Pro 3880 Graphic Arts Edition | Managing Color Guide - Page 26
(1998) and click OK. When your image appears, evaluate the color balance and contrast as displayed on your monitor. If it looks incorrect, select Edit > Assign Profile. Select one of the following as the Profile setting: ■ A different RGB working space (or Profile), such as ColorMatch RGB or sRGB - Epson Stylus Pro 3880 Graphic Arts Edition | Managing Color Guide - Page 27
and source you are using, and the correct Orientation for your photo. 7. Click OK. 8. Select File, then click Print or Print with Preview. 9. Select your Epson professional printer in the Printer list, if necessary, then select Color Management. Print With Adobe Photoshop 27 - Epson Stylus Pro 3880 Graphic Arts Edition | Managing Color Guide - Page 28
Photoshop Manages Colors. 12. Under Printer Profile, select a profile for your printer and the paper you'll use. If you're printing with Epson Premium ICC profiles, select the profile Color-Managed Photo 1. Select your Stylus professional printer in the Printer list. 28 Print With Adobe Photoshop - Epson Stylus Pro 3880 Graphic Arts Edition | Managing Color Guide - Page 29
. 3. Select the Media Type setting for the paper you'll use for the print. 4. Select Advanced as the Mode setting. 5. If you are using an Epson Premium ICC profile, set the Print Quality setting to match your profile. 6. Turn off the High Speed option. Print With Adobe Photoshop 29 - Epson Stylus Pro 3880 Graphic Arts Edition | Managing Color Guide - Page 30
(No Color Adjustment) 8. Select Off (No Color Adjustment). Note: Make sure that you select Off (No Color Adjustment). If you don't, the printer driver will apply additional correction to the image data, producing inaccurate results. 9. Click Print to print your photo. If you get unexpected results - Epson Stylus Pro 3880 Graphic Arts Edition | Managing Color Guide - Page 31
Print With Adobe Photoshop Lightroom First select your printer and page setup options in Lightroom. Then set the color management Select the Print module, and click the Page Setup button. 4. Select your Epson professional printer in the Format for pop-up menu. Print With Adobe Photoshop Lightroom 31 - Epson Stylus Pro 3880 Graphic Arts Edition | Managing Color Guide - Page 32
5. Select the Paper Size setting for the paper size and source you are using, and the correct Orientation for your photo. 6. Click OK. 7. Scroll down to the Print Job panel in Lightroom. 8. Under Color Management in the Print Job panel, select Other as the Profile setting. 32 Print With Adobe - Epson Stylus Pro 3880 Graphic Arts Edition | Managing Color Guide - Page 33
want to add to the Profile list that correspond to the printer and the papers you'll use. 10. If you're printing with Epson Premium ICC profiles, select the profiles that also match the print quality you want to use. Note: Epson Premium ICC profiles can be identified with the suffix ".icc - Epson Stylus Pro 3880 Graphic Arts Edition | Managing Color Guide - Page 34
paper you're going to print on. If you're printing with Epson Premium ICC profiles, select the profile that also matches the print quality select Perceptual. This reduces the color saturation so that the colors fit within the printer's color gamut. 14. Click the Print button. Follow the steps in the - Epson Stylus Pro 3880 Graphic Arts Edition | Managing Color Guide - Page 35
Color-Managed Photo 1. Select your Epson professional printer in the Printer list. 2. Select Print Settings from the pop-up menu. 3. Select the Media Type setting for the paper you'll use for the print. 4. Select Advanced as the Mode setting. 5. If you are using an Epson Premium ICC profile, set the - Epson Stylus Pro 3880 Graphic Arts Edition | Managing Color Guide - Page 36
(No Color Adjustment) 8. Select Off (No Color Adjustment). Note: Make sure that you select Off (No Color Adjustment). If you don't, the printer driver will apply additional correction to the image data, producing inaccurate results. 9. Click Print to print your photo. If you get unexpected results - Epson Stylus Pro 3880 Graphic Arts Edition | Managing Color Guide - Page 37
expected and/or has a yellow-brown cast, you probably turned off color management in both the application and the Epson printer driver. In Photoshop, return to the Print or Print with Preview instructions for Windows, Mac OS X 10.6 and 10.5, or Mac OS X 10.4.11 Make sure the Document option is not
-
 1
1 -
 2
2 -
 3
3 -
 4
4 -
 5
5 -
 6
6 -
 7
7 -
8
-
9
-
10
-
11
-
12
-
13
-
14
-
15
-
16
-
17
-
18
-
19
-
20
-
21
-
22
-
23
-
24
-
25
-
26
-
27
-
28
-
29
-
30
-
31
-
32
-
33
-
34
-
35
-
36
-
37
 |
 |

Epson Professional Imaging
Color Management Guide
Printing With Epson Premium ICC Profiles