Epson Stylus Pro User Manual - Birmy Mac - Page 17
Manual
 |
View all Epson Stylus Pro manuals
Add to My Manuals
Save this manual to your list of manuals |
Page 17 highlights
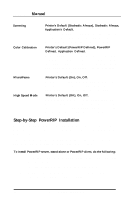
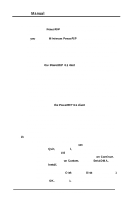
PowerRIP Manual 6. The custom installation window is now displayed with all installation options listed. PowerRIP 3.1, the default installation option, is highlighted. If you select the Minimum PowerRIP 3.1 Server option, only those files necessary to run PowerRIP will be installed. PowerRIP client files to support printing from the PowerRIP server will not be copied. In this case, you may also select/unselect additional options by holding down the Command key and clicking on the name of the option. If you are installing the program on a PowerRIP client, you should choose only the PowerRIP 3.1 dent option to install the PSPrinter PostScript printer driver and PostScript Printer Descriptions (PPDs) for Epson imaging devices supported by PowerRIP When you have selected all appropriate options, click on Install. 7. A standard Save File dialog is now displayed requesting a name and location of a folder in which you would like folders and files to be installed. The default folder name is PowerRIP 3.1. Note that some folders and files are not copied to the specified folder but rather to the System Folder. If you have selected the PowerRIP 3.1 client option, this dialog is skipped, since all files are copied to the System Folder. 8. Insert the other diskettes as requested by the installation program. 9. When the installation is complete, click on Quit or Continue. If your EPSON Stylus is plugged into the serial port, and your Macintosh is running System 7.5.1 or earlier, it is suggested that you update your serial driver. 10. If PowerRIP installation is being performed on a: a. Macintosh 68040 other than an AV model, Power Macintosh 500 series, or Power Macintosh 100 series running System 7.5.2; click on Quit, eject Disk 1, and reboot your Macintosh. b. Power Macintosh 100 series, CentrislQuadra 66OAV, or Quadra 84OAV, all running System 7.5.1 or less; click on Continue. On the next menu click on Custom. Highlight SeriaIDMA, then click on Install. This places an updated serial driver, from Apple Computer, Inc., into the Extensions Folder. Follow the screen prompts for inserting Disk 2 through Disk 4, and then Disk 1 again. You will get a message saying installation was successful. Click on OK, eject Disk 1, and reboot your Macintosh. 12 Birmy Graphics Corporation
-
 1
1 -
2
-
3
-
4
-
5
-
6
-
7
-
8
-
9
-
10
-
11
-
 12
12 -
 13
13 -
 14
14 -
 15
15 -
 16
16 -
 17
17 -
 18
18 -
 19
19 -
 20
20 -
 21
21 -
 22
22 -
23
-
24
-
25
-
26
-
27
-
28
-
29
-
30
-
31
-
32
-
33
-
34
-
35
-
36
-
37
-
38
-
39
-
40
-
41
-
42
-
43
-
44
 |
 |