Epson SureColor T5270 User Manual - Page 107
Printing Multiple Documents (the Layout Manager) (Windows Only), Setting Procedures for Printing
 |
View all Epson SureColor T5270 manuals
Add to My Manuals
Save this manual to your list of manuals |
Page 107 highlights
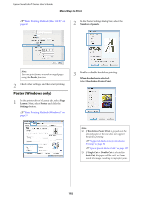
Epson SureColor T-Series User's Guide More Ways to Print Printing Multiple Documents (the Layout Manager) (Windows Only) Documents created in different applications can be printed together in your choice of layout. The Layout Manager can be used to improve efficiency and conserve paper. Sample Multi-Document Layout Setting Procedures for Printing 1 Open the file you want to print in your application. 2 In the printer driver's Printer Settings tab, select Layout Manager and in the Size Settings area select the Paper Size chosen for the document in the source application. U"Basic Printing Methods (Windows)" on page 57 Sample Free Vertical/Horizontal Layout Note: The Paper Size is the size of the document in the Layout Manager. The actual printing paper size is set in the screen in Step 6. 3 Click OK. When printing with an application, the Layout Manager screen opens. The print data is not printed, but one page is placed on the paper of the Layout Manager screen as one object. 4 Leaving the Layout Manager screen open, repeat Steps 1 to 3 until all the documents have been added to the layout. The objects are added to the Layout Manager screen. 5 Arrange the objects on the Layout Manager screen. Objects can be dragged to new positions and resized; in addition, they can be rearranged or rotated using the options in the Object menu. 107
-
 1
1 -
2
-
3
-
4
-
5
-
6
-
7
-
8
-
9
-
10
-
11
-
12
-
13
-
14
-
15
-
16
-
17
-
18
-
19
-
20
-
21
-
22
-
23
-
24
-
25
-
26
-
27
-
28
-
29
-
30
-
31
-
32
-
33
-
34
-
35
-
36
-
37
-
38
-
39
-
40
-
41
-
42
-
43
-
44
-
45
-
46
-
47
-
48
-
49
-
50
-
51
-
52
-
53
-
54
-
55
-
56
-
57
-
58
-
59
-
60
-
61
-
62
-
63
-
64
-
65
-
66
-
67
-
68
-
69
-
70
-
71
-
72
-
73
-
74
-
75
-
76
-
77
-
78
-
79
-
80
-
81
-
82
-
83
-
84
-
85
-
86
-
87
-
88
-
89
-
90
-
91
-
92
-
93
-
94
-
95
-
96
-
97
-
98
-
99
-
100
-
101
-
 102
102 -
 103
103 -
 104
104 -
 105
105 -
 106
106 -
 107
107 -
 108
108 -
 109
109 -
 110
110 -
 111
111 -
 112
112 -
113
-
114
-
115
-
116
-
117
-
118
-
119
-
120
-
121
-
122
-
123
-
124
-
125
-
126
-
127
-
128
-
129
-
130
-
131
-
132
-
133
-
134
-
135
-
136
-
137
-
138
-
139
-
140
-
141
-
142
-
143
-
144
-
145
-
146
-
147
-
148
-
149
-
150
-
151
-
152
-
153
-
154
-
155
-
156
-
157
-
158
-
159
-
160
-
161
-
162
-
163
-
164
-
165
-
166
-
167
-
168
-
169
-
170
-
171
-
172
-
173
-
174
-
175
-
176
-
177
-
178
-
179
-
180
-
181
-
182
-
183
-
184
-
185
-
186
-
187
-
188
-
189
-
190
-
191
-
192
-
193
-
194
-
195
-
196
-
197
-
198
-
199
-
200
-
201
-
202
-
203
-
204
-
205
-
206
-
207
-
208
-
209
-
210
-
211
-
212
-
213
 |
 |
