Epson SureColor T5270 User Manual - Page 34
Removing Roll paper or Roll 1, Remove, Paper, Roll 1, Roll Paper Remaining, T7270/T5270/T3270, Press
 |
View all Epson SureColor T5270 manuals
Add to My Manuals
Save this manual to your list of manuals |
Page 34 highlights
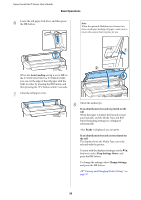
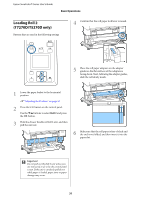
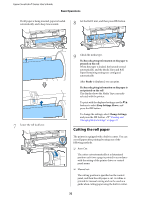
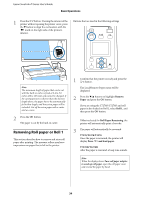
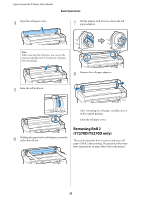
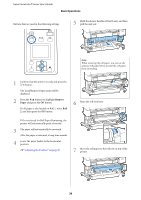
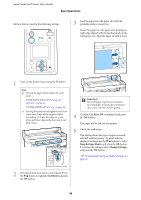
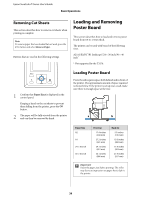
Epson SureColor T-Series User's Guide Basic Operations 1 Press the)button. Viewing the interior of the printer without opening the printer cover, press the d button to align the cut location with the mark on the right side of the printer's interior. Buttons that are used in the following settings Note: The minimum length of paper that can be cut with the built-in cutter is fixed at 2.4 to 5.0 inches (60 to 127 mm) and cannot be changed. If the cutting position is shorter than the shortest length above, the paper has to be automatically fed to that length, and thus extra paper will be included. Cut off the extra paper with a cutter sold at a store. 2 Press the Z button. The paper is cut by the built-in cutter. Removing Roll paper or Roll 1 This section describes how to remove and store roll paper after printing. The pressure rollers may leave impressions on paper that is left in the printer. 1 Confirm that the printer is ready and press the ( button. The Load/Remove Paper menu will be displayed. 2 Press the d/u buttons to highlight Remove Paper and press the Z button. If you are using the T7270D/T5270D and roll paper is also loaded on Roll 2, select Roll 1, and then press the Z button. If On is selected for Roll Paper Remaining, the printer will automatically print a barcode. 3 The paper will automatically be rewound. T7270/T5270/T3270 Once the paper is rewound, the printer will display Press and load paper. T7270D/T5270D After the paper is rewound, a beep tone sounds. Note: When the display shows Turn roll paper adapter to wind up roll paper, open the roll paper cover and rewind the paper by hand. 34
-
 1
1 -
2
-
3
-
4
-
5
-
6
-
7
-
8
-
9
-
10
-
11
-
12
-
13
-
14
-
15
-
16
-
17
-
18
-
19
-
20
-
21
-
22
-
23
-
24
-
25
-
26
-
27
-
28
-
 29
29 -
 30
30 -
 31
31 -
 32
32 -
 33
33 -
 34
34 -
 35
35 -
 36
36 -
 37
37 -
 38
38 -
 39
39 -
40
-
41
-
42
-
43
-
44
-
45
-
46
-
47
-
48
-
49
-
50
-
51
-
52
-
53
-
54
-
55
-
56
-
57
-
58
-
59
-
60
-
61
-
62
-
63
-
64
-
65
-
66
-
67
-
68
-
69
-
70
-
71
-
72
-
73
-
74
-
75
-
76
-
77
-
78
-
79
-
80
-
81
-
82
-
83
-
84
-
85
-
86
-
87
-
88
-
89
-
90
-
91
-
92
-
93
-
94
-
95
-
96
-
97
-
98
-
99
-
100
-
101
-
102
-
103
-
104
-
105
-
106
-
107
-
108
-
109
-
110
-
111
-
112
-
113
-
114
-
115
-
116
-
117
-
118
-
119
-
120
-
121
-
122
-
123
-
124
-
125
-
126
-
127
-
128
-
129
-
130
-
131
-
132
-
133
-
134
-
135
-
136
-
137
-
138
-
139
-
140
-
141
-
142
-
143
-
144
-
145
-
146
-
147
-
148
-
149
-
150
-
151
-
152
-
153
-
154
-
155
-
156
-
157
-
158
-
159
-
160
-
161
-
162
-
163
-
164
-
165
-
166
-
167
-
168
-
169
-
170
-
171
-
172
-
173
-
174
-
175
-
176
-
177
-
178
-
179
-
180
-
181
-
182
-
183
-
184
-
185
-
186
-
187
-
188
-
189
-
190
-
191
-
192
-
193
-
194
-
195
-
196
-
197
-
198
-
199
-
200
-
201
-
202
-
203
-
204
-
205
-
206
-
207
-
208
-
209
-
210
-
211
-
212
-
213
 |
 |
