Epson WF-100 Network Installation Guide
Epson WF-100 Manual
 |
View all Epson WF-100 manuals
Add to My Manuals
Save this manual to your list of manuals |
Epson WF-100 manual content summary:
- Epson WF-100 | Network Installation Guide - Page 1
Network Installation Guide WF-100 - Epson WF-100 | Network Installation Guide - Page 2
- Epson WF-100 | Network Installation Guide - Page 3
Contents Network Installation Guide ...5 Using the Control Panel ...6 Control Panel Buttons ...6 The LCD Problems ...35 Product Cannot Connect to a Wireless Router or Access Point 35 Network Software Cannot Find Product on a Network 36 Product Does Not Appear in OS X Printer Window 37 Cannot Print - Epson WF-100 | Network Installation Guide - Page 4
- Epson WF-100 | Network Installation Guide - Page 5
Network Installation Guide Welcome to the Network Installation Guide. Before You Begin Make sure you installed the ink cartridges and loaded paper as described in the Quick Guide. Then follow the instructions in this guide to set up the product for use on a wireless network. 5 - Epson WF-100 | Network Installation Guide - Page 6
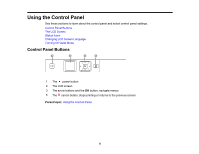
The LCD Screen Status Icons Changing LCD Screen Language Turning On Quiet Mode Control Panel Buttons 1 The power button 2 The LCD screen 3 The arrow buttons and the OK button; navigate menus 5 The cancel button; stops printing or returns to the previous screen Parent topic: Using the Control Panel 6 - Epson WF-100 | Network Installation Guide - Page 7
The LCD Screen 1 Color Adjustment icon 2 Plain Paper Density Setting icon 3 Network status 4 Battery status 5 Ink and maintenance box status Parent topic: Using the Control Panel Status Icons Status icons may be displayed on the LCD screen depending on the product's status. Icons Description - Epson WF-100 | Network Installation Guide - Page 8
battery is charging. Approximate ink levels. Approximate service life remaining for the maintenance box. Ink is low or the maintenance box is nearly full. An ink cartridge is expended. A Wi-Fi network error AP mode connection has been established. Print density has been increased. Color darkness has - Epson WF-100 | Network Installation Guide - Page 9
You see this screen: 2. Press the arrow buttons to select Printer Setup and press the OK button. 3. Press the arrow buttons to select Language and press by turning on Quiet Mode. Note: Turning on this setting may reduce print speed. 1. From the home screen, select Menu and press the OK button. 9 - Epson WF-100 | Network Installation Guide - Page 10
You see this screen: 2. Press the arrow buttons to select Printer Setup and press the OK button. 3. Press the arrow buttons to select Quiet Mode and press the OK button. 4. Select On and press the OK button. Parent topic: Using the Control Panel 10 - Epson WF-100 | Network Installation Guide - Page 11
a Found New Hardware screen, click Cancel and disconnect the USB cable. 2. Insert the product CD or download your product's software package from global.latin.epson.com/Support/WF100. 3. Select your language and click Next (Windows), or click Continue and click Continue again (OS X). 4. Accept the - Epson WF-100 | Network Installation Guide - Page 12
OS X Note: With OS X, make sure you install Software Updater to receive firmware and software updates for your product. Software installation may take several minutes. Wait for the installation to complete. 6. OS X: If you see the following message, click Yes or No to continue. 12 - Epson WF-100 | Network Installation Guide - Page 13
7. When the Printer Setup screen appears, click Next (Windows) or Start (OS X) to begin setting up your product on your network. 8. When you see this screen, select Wireless connection and click Next (Windows) or Continue (OS X). 13 - Epson WF-100 | Network Installation Guide - Page 14
9. When you see this screen, select Set up printer for the first time and click Next (Windows) or Continue (OS X). 14 - Epson WF-100 | Network Installation Guide - Page 15
10. The screen you see next depends on whether your computer can wirelessly connect with your product automatically or not. • If your computer can connect automatically, you see the screen below. Go to step 12. 15 - Epson WF-100 | Network Installation Guide - Page 16
To set up your product using the buttons on your product control panel, select Using printer buttons and click Next (Windows) or Continue (OS X). • To set up your automatically, see the link for the auto connect instructions below. • To set up your product using the buttons on your product control panel, - Epson WF-100 | Network Installation Guide - Page 17
Setting Up Your Product with Wi-Fi Auto Connect 1. When you see this screen, select Yes and click Next (Windows) or Continue (OS X). 17 - Epson WF-100 | Network Installation Guide - Page 18
You see a screen like this: 2. Click Next to continue. Note: If you see a firewall alert message, click Unblock or Allow to let EpsonNet Setup continue. Do not select Ask Me Later, Keep Blocking, or Block. 18 - Epson WF-100 | Network Installation Guide - Page 19
EpsonNet Setup access your password information. 4. Follow the on-screen instructions to let the system automatically configure your product on your network. Your product broadcasts its network information for 60 minutes from the time ink charging begins. If you do not complete Wi-Fi setup within 60 - Epson WF-100 | Network Installation Guide - Page 20
6. OS X: When you see this screen, click Add Printer and follow the on-screen instructions to add your product and the print queue to your system. Then click Continue. Note: Be sure to select your Epson product in the Use or Print Using drop-down list. 20 - Epson WF-100 | Network Installation Guide - Page 21
7. When you see this screen, print a test page and click Next (Windows) or Continue (OS X). 8. Windows: The system begins searching for the latest firmware for your product. If you see this screen, new firmware is available. Click Next and follow the on-screen instructions. When you are ready, click - Epson WF-100 | Network Installation Guide - Page 22
Your Product Using the Control Panel 1. When you see the Know Your Wireless Network screen, click Next (Windows) or Continue (OS X). 2. Follow the on-screen instructions to select your wireless network settings from your product control panel. When you finish, continue with the steps here. 22 - Epson WF-100 | Network Installation Guide - Page 23
3. When you see the Firewall Warning screen, click Next. Note: If you see a firewall alert message, click Unblock or Allow to let EpsonNet Setup continue. Do not select Ask Me Later, Keep Blocking, or Block. 23 - Epson WF-100 | Network Installation Guide - Page 24
4. OS X: When you see this screen, click Add Printer and follow the on-screen instructions to add your product and the print queue to your system. Then click Continue. Note: Be sure to select your Epson product in the Use or Print Using drop-down list. 24 - Epson WF-100 | Network Installation Guide - Page 25
5. When you see this screen, print a test page and click Next (Windows) or Continue (OS X). 6. Windows: The system begins searching for the latest firmware for your product. If you see this screen, new firmware is available. Click Next and follow the on-screen instructions. When you are ready, click - Epson WF-100 | Network Installation Guide - Page 26
YOUR PRODUCT OR INTERRUPT THE FIRMWARE SEARCH PROCESS IN ANY WAY. 7. Follow the on-screen instructions to complete product setup. When you see this screen, click Exit (Windows) or Close next screen, make sure your product has finished charging the ink, then click Next (Windows) or Continue (OS X). 26 - Epson WF-100 | Network Installation Guide - Page 27
3. When you see this screen, connect a USB cable as shown and wait for the installer to detect your product. Note: If your product is not detected, make sure that it is turned on. 27 - Epson WF-100 | Network Installation Guide - Page 28
4. When you see this screen, click Next (Windows) or Start Network Setup (OS X). 5. When you see the Firewall Warning screen, click Next. Note: If you see a firewall alert message, click Unblock or Allow to let EpsonNet Setup continue. Do not select Ask Me Later, Keep Blocking, or Block. 6. If you - Epson WF-100 | Network Installation Guide - Page 29
• OS X: If you have a wireless computer or laptop and you see the following messages, click OK and click Allow to let EpsonNet Setup access your password information. Then continue with step 10. • All other users: Continue with step 8. 29 - Epson WF-100 | Network Installation Guide - Page 30
8. If you see this screen, wait while your system searches for your network name (SSID), then select the SSID from the displayed list and click Next. Note: If your WPA passphrase contains upper- or lowercase letters, be sure to note it correctly. If you do not know your wireless network name (SSID), - Epson WF-100 | Network Installation Guide - Page 31
9. When you see this screen, enter your network password and click Next. 10. Wait several minutes for wireless network configuration to finish and display a confirmation message. When you see this prompt, disconnect the USB cable and click OK. Then click Finish on the Installation Complete screen. - Epson WF-100 | Network Installation Guide - Page 32
11. OS X: When you see this screen, click Add Printer and follow the on-screen instructions to add your product and the print queue to your system. Then click Continue. Note: Be sure to select your Epson product in the Use or Print Using drop-down list. 32 - Epson WF-100 | Network Installation Guide - Page 33
. When you see this screen, print a test page and click Next (Windows) or Continue (OS X). 13. Windows: The system begins searching for the latest firmware for your product. If you see this screen, new firmware is available. Click Next and follow the on-screen instructions. When you are ready, click - Epson WF-100 | Network Installation Guide - Page 34
IMPORTANT: DO NOT TURN OFF YOUR PRODUCT OR INTERRUPT THE FIRMWARE SEARCH PROCESS IN ANY WAY. 14. Follow the on-screen instructions to complete product setup. When you see this screen, click Exit (Windows) or Close (OS X) to close the installation program. Parent topic: Setting Up Your - Epson WF-100 | Network Installation Guide - Page 35
if you have problems setting up or using your product on a network. For details, see your product User's Guide. Product Cannot Connect to a Wireless Router or Access Point Network Software Cannot Find Product on a Network Product Does Not Appear in OS X Printer Window Cannot Print Over a Network - Epson WF-100 | Network Installation Guide - Page 36
your router, so note the next step before initializing it. 4. Download your product software from the Epson website using the instructions in the Quick Guide. • If you have replaced your router, reinstall your product software to connect to the new router. Note: If you are using a 5 GHz wireless - Epson WF-100 | Network Installation Guide - Page 37
correctly. If necessary, reinstall your software. Note: If you are using a 5 GHz wireless router, set the router to operate in dual band (2.4 GHz and 5 GHz) mode. See your router documentation for instructions. Parent topic: Solving Network Problems Cannot Print Over a Network If you cannot - Epson WF-100 | Network Installation Guide - Page 38
• If you are connecting the product wirelessly via EpsonNet Setup and the Wi-Fi connection icon is not lit or does not appear on the product's LCD screen, make sure your product software was installed correctly. If necessary, reinstall your software. Parent topic: Solving Network Problems 38 - Epson WF-100 | Network Installation Guide - Page 39
or alterations to this product, or (excluding the U.S.) failure to strictly comply with Seiko Epson Corporation's operating and maintenance instructions. Seiko Epson Corporation shall not be liable for any damages or problems arising from the use of any options or any consumable products other than - Epson WF-100 | Network Installation Guide - Page 40
from electromagnetic interference that occurs from the use of any interface cables other than those designated as Epson approved Products by Seiko Epson Corporation. This information is subject to change without notice. Copyright Attribution Parent topic: Notices Copyright Attribution © 2015
-
 1
1 -
 2
2 -
 3
3 -
 4
4 -
 5
5 -
 6
6 -
 7
7 -
8
-
9
-
10
-
11
-
12
-
13
-
14
-
15
-
16
-
17
-
18
-
19
-
20
-
21
-
22
-
23
-
24
-
25
-
26
-
27
-
28
-
29
-
30
-
31
-
32
-
33
-
34
-
35
-
36
-
37
-
38
-
39
-
40
 |
 |

Network Installation Guide WF-100