Fender Passport 150 Pro Owners Manual - Page 6
Passport® 150 Pro - speakers
 |
View all Fender Passport 150 Pro manuals
Add to My Manuals
Save this manual to your list of manuals |
Page 6 highlights
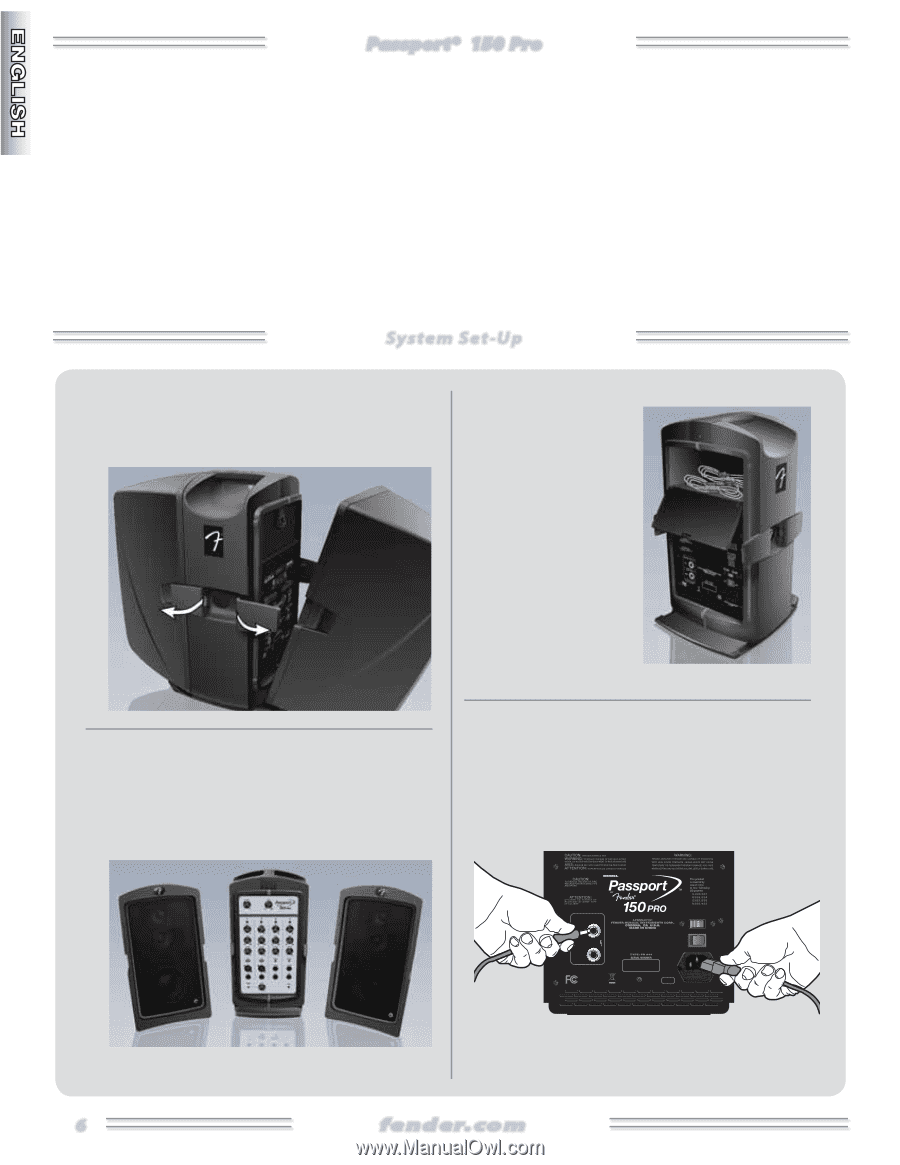
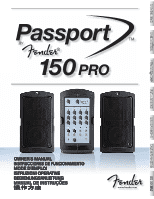
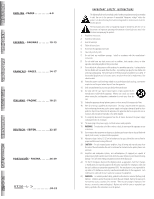
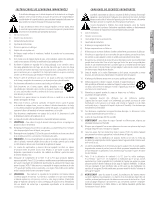
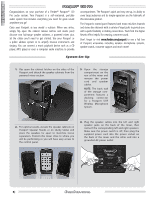
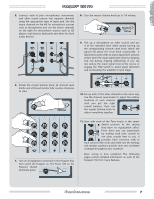
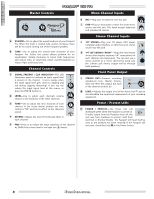
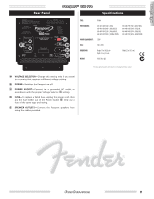
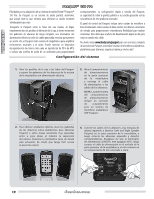
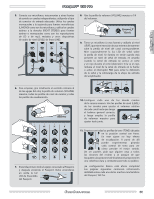
Passport® 150 Pro Congratulations on your purchase of a Fender® Passport® 150 Pro audio system. Your Passport is a self-contained, portable audio system that includes everything you need for great sound anywhere you go! Carry your Passport as you would a suitcase. When you arrive, simply flip open the cabinet release latches and inside you'll discover two full-range speaker cabinets, a powered mixer, plus all the cables you'll need to get started. Use your Passport as a public address system or to amplify musical instruments and singing. You can connect a music playback device such as a CD player, MP3 player or even a computer audio interface to provide accompaniment. The Passport's quick and easy set-up, its ability to cover large audiences and its simple operation are the hallmarks of this innovative product. The Passport's control panel features both mono mic/line channels and stereo line channels with a variety of input jacks to provide you with superb flexibility in making connections. You'll find the digital Reverb effect helpful for creating a warmer sound. Don't forget to visit www.fender.com/passport to see a full line of Passport accessories including wireless microphone systems, speaker stands, customer support and much more! System Set-Up 1. Flip open the cabinet latches on the sides of the Passport and detach the speaker cabinets from the powered mixer section. 3. Open the storage compartment on the rear of the mixer and remove the power cord and speaker cables. NOTE: The back wall of the storage compartment features a docking connector for a Passport UHF Wireless Microphone System. 2. For optimal results, elevate the speaker cabinets on Passport Speaker Stands or on sturdy tables and place the speakers far apart to maximize stereo separation. Position the mixer close to where you will be performing so you will have easy access to the control panel. 4. Plug the speaker cables into the left and right speaker jacks on the back of the mixer, then connect the corresponding left and right speakers. Make sure the power switch is off, then plug the supplied power cord into the power socket on the back of the mixer and the other end into a grounded AC power outlet. SPEAKER OUTPUTS LEF T 150W total 4½ MIN 75W RIGHT Use only with supplied 4 ohm speakers 15000/-16200HVz~ 25200/- 26400HVz~ ON OFF FUSE T4A H 250V INPUT POWER 225W 6 f e n d e r. c o m
-
 1
1 -
 2
2 -
 3
3 -
 4
4 -
 5
5 -
 6
6 -
 7
7 -
 8
8 -
 9
9 -
 10
10 -
 11
11 -
 12
12 -
13
-
14
-
15
-
16
-
17
-
18
-
19
-
20
-
21
-
22
-
23
-
24
-
25
-
26
-
27
-
28
-
29
-
30
-
31
-
32
-
33
-
34
-
35
-
36
 |
 |