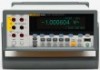
Fluke 8846A FE 8845A & 8846A Users Manual - Page 49
Setting the Diode Test Voltage and Current, Setting the Default Temperature Scale (8846A Only)
 |
View all Fluke 8846A manuals
Add to My Manuals
Save this manual to your list of manuals |
Page 49 highlights
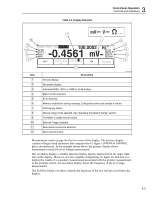
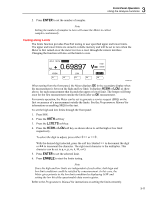
3 Front-Panel Operation Using the Analyze Functions Refer to the "Testing Continuity" section in Chapter 4 to test continuity. Setting the Diode Test Voltage and Current To set the diode test current: 1. Press S twice on the 8846A , or press D once on the 8845A, to select the Diode function. 2. Press the 1mA or 0.1mA soft key to set the diode test current. 3. Press the 5V or 10V soft key to set the diode test voltage. Refer to the "Checking Diodes" section in Chapter 4 to check diodes. Setting the Default Temperature Scale (8846A Only) When the temperature function is selected, the Meter displays temperature measurements based on a preselected (default) temperature scale. To change the default temperature scale: 1. Press Lto see the measurement setup selection menu. 2. Press the TEMP UNITS soft key to display the temperature scale selection menu. Available temperature scales are C for Celsius (°C), F for Fahrenheit (°F) and K for Kelvin (K). 3. Press the soft key labeled with the desired scale. Refer to the "Measuring Temperature" section in Chapter 4 to make a temperature measurement with the Meter. Enabling Automatic Input Impedance The input impedance of the Meter is normally approximately 10 MΩ. However, enabling the automatic input impedance feature allows the input impedance to go as high as 10 GΩ depending on the applied signal at the input of the Meter. To enable automatic input impedance: 1. Press Lto see the Measurement Setup menu. 2. Press the MORE soft key. 3. Press the AUTO INPUT Z soft key. The soft key label becomes highlighted to indicate auto input Z is activated. Press the soft key again to disable the function. Using the Analyze Functions The Meter is capable of performing mathematical operations with measured values, as well as tracking a series of measurements. With the exception of Diode Test and Continuity, all Meter functions work with all analysis functions. The mathematical functions include statistics, limits, offset, and mX + b. Meter measurement tracking is performed through the TrendPlot and Histogram functions. To access the analyze functions press J. 3-9
-
 1
1 -
2
-
3
-
4
-
5
-
6
-
7
-
8
-
9
-
10
-
11
-
12
-
13
-
14
-
15
-
16
-
17
-
18
-
19
-
20
-
21
-
22
-
23
-
24
-
25
-
26
-
27
-
28
-
29
-
30
-
31
-
32
-
33
-
34
-
35
-
36
-
37
-
38
-
39
-
40
-
41
-
42
-
43
-
 44
44 -
 45
45 -
 46
46 -
 47
47 -
 48
48 -
 49
49 -
 50
50 -
 51
51 -
 52
52 -
 53
53 -
 54
54 -
55
-
56
-
57
-
58
-
59
-
60
-
61
-
62
-
63
-
64
-
65
-
66
-
67
-
68
-
69
-
70
-
71
-
72
-
73
-
74
-
75
-
76
-
77
-
78
-
79
-
80
-
81
-
82
-
83
-
84
-
85
-
86
-
87
-
88
-
89
-
90
-
91
-
92
-
93
 |
 |
