Fluke 8846A FE 8845A & 8846A Users Manual - Page 68
Measuring Frequency and Period, Frequency, Input
 |
View all Fluke 8846A manuals
Add to My Manuals
Save this manual to your list of manuals |
Page 68 highlights
8845A/8846A Users Manual accommodate the various impedances that a dBm measurement can be made across, the Meter allows for the selection of 21 different impedance values. To set the dB reference impedance: 1. Press L. 2. Press the soft key labeled dBm REF. The available impedance settings are presented in sets of three values. To move to a higher set of impedance values, press ++ -->. Press
-
 1
1 -
2
-
3
-
4
-
5
-
6
-
7
-
8
-
9
-
10
-
11
-
12
-
13
-
14
-
15
-
16
-
17
-
18
-
19
-
20
-
21
-
22
-
23
-
24
-
25
-
26
-
27
-
28
-
29
-
30
-
31
-
32
-
33
-
34
-
35
-
36
-
37
-
38
-
39
-
40
-
41
-
42
-
43
-
44
-
45
-
46
-
47
-
48
-
49
-
50
-
51
-
52
-
53
-
54
-
55
-
56
-
57
-
58
-
59
-
60
-
61
-
62
-
 63
63 -
 64
64 -
 65
65 -
 66
66 -
 67
67 -
 68
68 -
 69
69 -
 70
70 -
 71
71 -
 72
72 -
 73
73 -
74
-
75
-
76
-
77
-
78
-
79
-
80
-
81
-
82
-
83
-
84
-
85
-
86
-
87
-
88
-
89
-
90
-
91
-
92
-
93
 |
 |

8845A/8846A
Users Manual
4-6
accommodate the various impedances that a dBm measurement can be
made across, the Meter allows for the selection of 21 different
impedance values.
To set the dB reference impedance:
1.
Press
L
.
2.
Press the soft key labeled
dBm REF
.
The available impedance settings are presented in sets of three
values. To move to a higher set of impedance values, press
++
-->
. Press
<--
--
to go to a lower set of impedance
values.
3.
With the impedance highlighted, press the soft key under the
value selected.
2ND MEAS
Cycles the secondary display through the measurement functions
listed below, and then off. When a second measurement function is
selected, the
2ND MEAS
soft key label is highlighted.
VDC
- Displays the dc voltage on which the ac signal may be riding.
Frequency
- Displays the frequency of the ac signal applied to the
Input
HI
and
LO
connectors of the Meter.
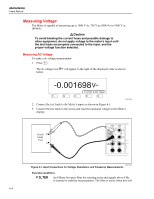
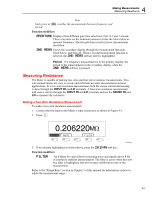
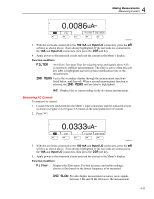
Measuring Frequency and Period
The Meter measures the frequency, or period of ac signals between 3 Hz and 1 MHz,
applied between the Meter’s HI and LO connectors.
The
G
key not only activates the Meter’s Frequency/Period function, but also toggles
the Meter’s primary display between the signal’s frequency and period measurement.
Therefore, whether a frequency or period measurement appears after pressing
G
depends on the condition this function was left in the last time it was used.
To make a frequency measurement:
1.
Press
G
.
0.000000
Hz
F1
F2
F3
F4
F5
caw06f.eps
If
S
is displayed, press
G
again to switch the primary display to frequency.
2.
Connect the Meter to the signal as shown in Figure 4-1.
To make a period measurement:
1.
Press
G
.
If
Hz
is displayed, press
G
again to switch the primary display to period.
2.
Connect the Meter to the signal as shown in Figure 4-1.