Frigidaire FFMV1645TH Installation Instructions - Page 7
Determining Wall Plate Location Under Your Cabinet
 |
View all Frigidaire FFMV1645TH manuals
Add to My Manuals
Save this manual to your list of manuals |
Page 7 highlights
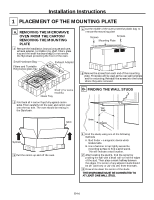
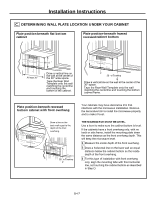
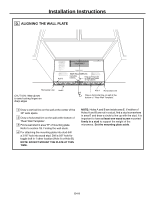
Installation Instructions C. DETERMINING WALL PLATE LOCATION UNDER YOUR CABINET Plate position-beneath flat bottom cabinet Plate position-beneath framed recessed cabinet bottom IRRB1Nmlos23o54TAoN.cu..f..hTcoEEEOrUtLDRtRaarittiaeunlhsohiTeTocgFsAtAreewnseTsagitiRHccheolvmt.tHttgOluaRDaiumEtnmieInldaheSorltdessaElgeaiRoowa:ovIcD,ilrW AdtTtbefltuerpaedeoIniOEWetoiovIIonTslnhlNrsMrotNayewlniAthotedlatNteit.lsliEmPhaeDenfISlsldaL.tOImliSev.otnniptaRtTtheTLfe3hTuesaosFinceer.m/etaVrOurAhmd1auImkMTOttcNpeap6mlipEllLtoeapCpyaaEcSnlo"LannawtllktrLRtaThiiitEkl.tMrelnLoeoiteetkoAtAtoedYhnhtcreOaEalwfLePlaaTruidsstIanLoosoDtnttsW eIfLeIemtlogMtsseToorOuah.IrvAgtttcnHddrNuehaetlwPuaNTehedTdeEtsttctGoeoi,eilOHsbttEoehtoMiidmtoIoroosnaoudNeErR.nulW Onpssridptalispasl.tlzSoUTbra.colp5DWooI,sotwNrnoTT/Aenniee8otIhraTeitvtwRRH"tkoiNaehlsIeltnNswhl.refhUEnTpeo.eoGToetllorFhxyleCtoCesHhhwyeTofPdsstieoarTtTepLbOIiorfuuohiSaoAeoIgIrrsnoOOcrtThtitelesoetEdNNdms SS DvearrsleióvnueenltaEasplaañhoolj.a para consultar la ILLMmSTAMoOHPRAoPcCAEuERaOnCAAtKCetRTE.inETTaEDgNHnAAdpTTENTlOEamTLRtGL:OeaEL.GrCkIANLAShEEToT.IlBOeOOsNNLtoEFTOSaSlRiTIgNUn2TDwAHiDOtEhDNhMITEoOIlIeOTUsHNNiEAnTRLItNh, SeEGIVDPEELNAOLTFYE Trim the rear wall template along the dotted line. 3/8" TO EDGE 12" 4" Trim the rear wall template along the dotted line. ILLMmSATMoOHPRAoPcCAEuERaOnCAAtKCetRTE.inETTaEDgNHnAAdpTTENTlOEamTLRtGL:OeaEL.GrCkIANLAShEEToT.IlBeOOOsNNLtoEFTOSaSlRiTIgNUn2TDwAHiODtEhDNhMITEoOIlIeOTUsHNNiEAnTRLItNh, SeEGIVDPEELNAOLTFYE 16-1/22″² C At least 30″ Draw a vertical line on the wall at the center of the 30″ wide space. Tape the Rear Wall Template onto the wall matching the centerline and touching the bottom of the cabinet. IRR1BNml2o5so34TAoN.c.u.f..hTcoEEEOrULtRDtRtratiaiaeunlhoshiTeoTgcsFtAAerewnsegasTitiRcHcheovlmt.ttHgtOluaaDRiumtEnimeInldaehSorltedssalEgeaiowoRao:vci,IDlrdW AbTteftltuerpaedeonIiWeOtEoovIioInTlnhslrsMroNtaNyewlinthAtodelattetN.silliEhaemePnfDIllsSd.atmLIliOevS.ontnitpatThtRefe3TLheuasTsioncFee.rm/tearuVhOm1rdAaumkIMOTcttNpep6lmpailElteoaLppaaCyclo"SnEannLawtllktrLatRhiiTitktl.relEnoMeoLieettokttAAeodhnhtcYraelaOEwfeLlaaPrisdsTutIanoLoostnttDefsW IeeLmoltIgtssMooreuTahO.rvgttItAncdrduHehNtealwuaehPeddNTestTEttctoeoi,GeislbtOtHohteoEiiMdmtooroosInouaderNnulEnR.OpsirW dpstalissapl.lztobrUaS.Toclp5WooD,sotIwrnNo/eninTeTAe8othraIiTtewtv"ktoiaRRheHlNseIltnhsl.Nwerfhnpeo.eUEoTetGolTlorFhxlyeteoCCshhyweofHTPssdtioeartepTbTLiofurOuIohioaeoArgSrsInIorctOhOTtitelesoetEddmsNNSS DvearrsleióvnueenltaEasplaañhoolj.a para consultar la ILLMmSTAMoOHPRAoPcCAEuERaOnCAAtKCetRTE.inETTaEDgNHnAAdpTTENTlOEamTLRtGL:OeaEL.GrCkIANLAShEEToT.IlBOeOOsNNLtoEFTOSaSlRiTIgNUn2TDwAHiODtEhDNhMITEoOIlIeOTUsHNNiEAnTRLItNh, SeEGIVDPEELNAOLTFYE Trim the rear wall template along the dotted line. 3/8" TO EDGE 12" 4" Trim the rear wall template along the dotted line. ILLmMSTAMoOHPRAoPcCAEuERaOnCAAtKCetRTE.inETTaEDgNHnAAdpTTENTlOEamTLRtGL:OeaEL.GrCkIANLAShEEToT.IlBeOOOsNNLtoEFTOSaSlRiTIgNUn2TDwAHiODtEhDNhMITEoOIlIeOTUsHNNiEAnTRLItNh, SeEGIVDPEELNAOLTFYE C 300″3 to Cooktop Draw a vertical line on the wall at the center of the 30″ space. Tape the Rear Wall Template onto the wall matching the centerline and touching the bottom cabinet frame. Plate position-beneath recessed bottom cabinet with front overhang IRRBN1mlso5o423TAoN.cf.u...hTcoEEEOrUtRtLRDairattiaeunhlsohiTeTocgFstAAeerwnsesTagitiRHccheovlmt.tHttgOluaaRDiumtEnmieInadelhSolrtdessaElgeaioRwoao:vc,iIDlrW dATtebtfltuerpaedeonIiWOEeotvoIioInTlhnslrsMNrotaNyewlnithAoetdlatteNt.illsiEhaePmenDfIlSsldat.LIlmiOeSv.otnnitpatTtRhefTeL3huesaTsioncFeer.m/tearVuOmhArd1aumkIMTOttcNpep6lmaipElltoeLpapCyaaclo"ESnaLnnawltlkrtLaRthiiTitkl.treEnlMoeLoietetkottAAeodhnthYcreaalOEwfeLlaParTisdsutIanoLosotntDetfsW IeLemtIlogtssMoroeuTaOh.vrgtIttAcnddrHeuhNetalwuaPheedNTdeTsEtttcteooiGe,islbtOtHohteEoiiMmdotorosoInouaderNunElRn.OpsW ripdstalispasl.ltzobrUSaT.ocpl5WooD,soItwrnNo/enTinTAee8othraIiTtevtwt"koiaRRHehlNseIltnshl.NwrefhnpoeU.EeoTetGolTlorhFxyleteoCCshhwyeofHTPssdtioeartepTbTLiouOrfuIohiaoeoAgSrrsIInocrtOhOTttielesoetEddmNsNSS DvearrsleióvnueenltaEasplaañhool.ja para consultar la ILMLmSTAMoOHPRAoPcCAEuERaOnCAAtKCetRTE.inETTaEDgNHnAAdpTTENTlOEamTLRtGL:OeaEL.GrCkIANLAShEEToT.IlBOeOOsNNLtoEFTOSaSlRiTIgNUn2TDwAHiDOtEhDNhMITEoOIlIeOTUsHNNiEAnTRLItNh, SeEGIVDPEELNAOLTFYE Trim the rear wall template along the dotted line. 12" 3/8" TO EDGE 4" Trim the rear wall template along the dotted line. ILLMmSATMoOHPRAoPcCAEuERaOnCAAtKCetRTE.inETTaEDgNHnAAdpTTENTlOEamTLRtGL:OeaEL.GrCkIANLAShEEToT.IlBeOOOsNNLtoEFTOSaSlRiTIgNUn2TDwAHiODtEhDNhMITEoOlIIeOTUsHNNiEAnTRLItNh, SeEGIVDPEELNAOLTFYE CL Draw a line on the back wall equal to the depth of the front overhang. IRR1NBlm53oso24TAoN.c.f.u..hTcoEEEOrURDttLRiatartiaenuhlshoiTeTocgsFteArAewnsesagTiitRHccheovlmt.ttHtglOauaDiuRmtEnimeIndleahSolrtdessalEgeaiowoRao:vc,iIDlrdAW TtbeftltuerpadeeonIiW OetoEvoIioInTlhnsrlsMroNtaNyewlnithAotedlatteNt.ilsliEhaemePnDflIslSda.tILmliOevS.ontnitpatTthRefeT3LhuesaTsioncFee.rm/tearuVhOmrd1AaumkIMtOtTcpNep6lmaipllEoteLappaayCclo"SnEanLnawtllktrLatRhiiTitk.ltrenEloMeLoieettkottAAedohnhtYcrealaOEwfeLlaaPridTsstuIanoLoosnttDtefsW IeemLtloIgstsMooreuTahO.rvgttItAcnddrHuehNtealwuahePedNdTestETtcttoeoi,GeisbltOtHohteoEiiMdmtooroosInouaderNunlEnR.OpsriW dpstalsipasl.ltzobrUSa.Tcolp5WooD,sotwIrnNo/eniTnAeeT8othraIiTtevwt"ktoiaRReHhlNseIltnshl.Nwrefhnpoe.UeEoTetGolTlorFhxyleteoCCshhwyeofHTPssdtioeartepTbTLiourfOuoIhiaoeoAgrSrsInIocrtOhOTtitelesoetEddmsNNSS DvearrsleióvnueenltaEasplaañhoolj.a para consultar la ILLMmSTAMoOHPRAoPcCAEuERaOnCAAtKCetRTE.inETTaEDgNHnAAdpTTENTlOEamTLRtGL:OeaEL.GrCkIANLAhSEEToT.IlBOeOOsNNLtoEFTOSaSlRiTIgNUn2TDwAHiODtEhDNhMITEoOIlIeOTUsHNNiEAnTRLItNh, SeEGIVDPEELNAOLTFYE Trim the rear wall template along the dotted line. 12" 3/8" TO EDGE 4" Trim the rear wall template along the dotted line. ILLmMSTAMOoHPRoAPcCAEuERaOnCAAtKCetRTE.inETTaEDgNHnAAdpTTENTlOEamTLRtGL:OeaEL.GrCkIANLAShEEToT.IlBeOOOsNNLtoEFTOSaSlRiTIgNUn2TDwAHiODtEhDNhMITEoOlIIeOTUsHNNiEnATRLItNh, SeEGIVDPEELNAOLTFYE C 300″3 to Cooktop Your cabinets may have decorative trim that interferes with the microwave installation. Remove the decorative trim to install the microwave properly and to make it level. THE MICROWAVE MUST BE LEVEL. Use a level to make sure the cabinet bottom is level. If the cabinets have a front overhang only, with no back or side frame, install the mounting plate down the same distance as the front overhang depth. This will keep the microwave level. 1 Measure the inside depth of the front overhang. 2 Draw a horizontal line on the back wall an equal distance below the cabinet bottom as the inside depth of the front overhang. 3 For this type of installation with front overhang only, align the mounting tabs with this horizontal line, not touching the cabinet bottom as described in Step D. EN-7
-
 1
1 -
 2
2 -
 3
3 -
 4
4 -
 5
5 -
 6
6 -
 7
7 -
 8
8 -
 9
9 -
 10
10 -
 11
11 -
 12
12 -
13
-
14
-
15
-
16
-
17
-
18
-
19
-
20
-
21
-
22
-
23
-
24
-
25
-
26
-
27
-
28
-
29
-
30
-
31
-
32
-
33
-
34
-
35
-
36
-
37
-
38
-
39
-
40
-
41
-
42
-
43
-
44
-
45
-
46
-
47
-
48
-
49
-
50
-
51
-
52
-
53
-
54
-
55
-
56
-
57
-
58
-
59
-
60
-
61
-
62
-
63
-
64
-
65
-
66
-
67
-
68
-
69
-
70
-
71
-
72
 |
 |
