Frigidaire FGIF3061NF Use and Care Guide - Page 17
Before Setting Oven Controls - parts
 |
View all Frigidaire FGIF3061NF manuals
Add to My Manuals
Save this manual to your list of manuals |
Page 17 highlights
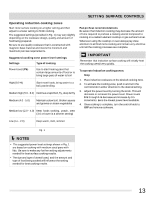
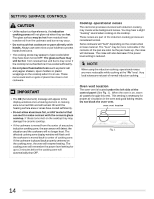
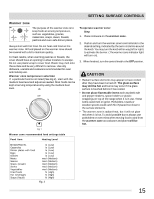
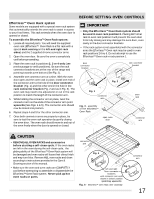
Effortless™ Oven Rack system Some models are equipped with a special oven rack system that automatically extends the oven rack to assist in access to your food items. This rack extends when the oven door is opened or closed. To assemble the Effortless™ Oven Rack system: 1. Locate all required parts. You will need the supplied oven rack (Effortless™ Oven Rack is a flat rack with a special dark coating on the left and right rack sides) and the 2 supplied chrome connector arms. 2. Open the oven door. Be sure the oven is completely cool before proceeding. 3. Place the oven rack in positions 2, 3 or 4 only (see previous page to verify positions). Be sure the rack connector brackets are at the rear of the range and pointing towards oven bottom (See Fig. 2). 4. Assemble one connector arm at a time. With the oven door open and the oven rack in place, install one end of the connector arm to the hole in the door connector bracket (Fig. 1) and the other end in the hole in the rack connector bracket (Fig. 2 and as in Fig. 3). The oven rack may need to be adjusted in or out in the rack position to match the length of the connector arm. 5. While holding the connector arm in place, twist the connector arm so the ends of the connector arm point upwards (See Figs. 4 & 5). The connector arm should now be locked into position. 6. Repeat steps 4 and 5 for the other connector arm. 7. Once both connector arms are properly in place, be sure to test the oven rack operation by gently closing the oven door. The oven rack should move in and out of the oven freely when the door is opened or closed. BEFORE SETTING OVEN CONTROLS IMPORTANT • Only the Effortless™ Oven Rack system should be used in oven rack position 2. Placing ANY other rack in oven rack position 2 will prevent the oven door from fully closing and may damage the oven door, oven cavity or the door connector brackets. • If the rack system is not assembled with the connector arms the Effortless™ Oven rack may be used in oven rack positions 2 thru 6. Do not attempt to use the Effortless™ Oven rack in rack position 1. door connector bracket rack connector bracket Fig. 2 Fig. 1 connector arm Fig. 3 - assembly of the Effortless™ Oven Rack open oven door oven rack connector arm CAUTION • REMOVE ALL OVEN RACKS and accessories before starting a self-clean cycle. If the oven racks are left in the oven during the self-clean cycle, the gliding ability of the Effortless™ Oven Rack system will be damaged and oven racks will loose their shiny finish and may turn blue. Remove ALL oven racks and clean according to instructions provided in the Care & Cleaning section of this manual. • Make sure the oven and oven racks are COMPLETLY cool before attempting to assemble or disassemble the Effortless™ Oven Rack system. Never pick up hot oven racks or parts. connector arm Fig. 4 connector arm Fig. 5 left and right door connector brackets with connector arm ends shown in locked position (pointing upwards) Fig. 6 - Effortless™ Oven Rack after assembly 17
-
 1
1 -
2
-
3
-
4
-
5
-
6
-
7
-
8
-
9
-
10
-
11
-
 12
12 -
 13
13 -
 14
14 -
 15
15 -
 16
16 -
 17
17 -
 18
18 -
 19
19 -
 20
20 -
 21
21 -
 22
22 -
23
-
24
-
25
-
26
-
27
-
28
-
29
-
30
-
31
-
32
-
33
-
34
-
35
-
36
-
37
-
38
-
39
-
40
-
41
-
42
-
43
-
44
 |
 |
