Fujitsu FI-4120C2 Operator Manual - Page 71
Replacing the Pad ASSY, fi-4120C2 Image Scanner Operator's Guide - fi pad
 |
UPC - 097564306204
View all Fujitsu FI-4120C2 manuals
Add to My Manuals
Save this manual to your list of manuals |
Page 71 highlights
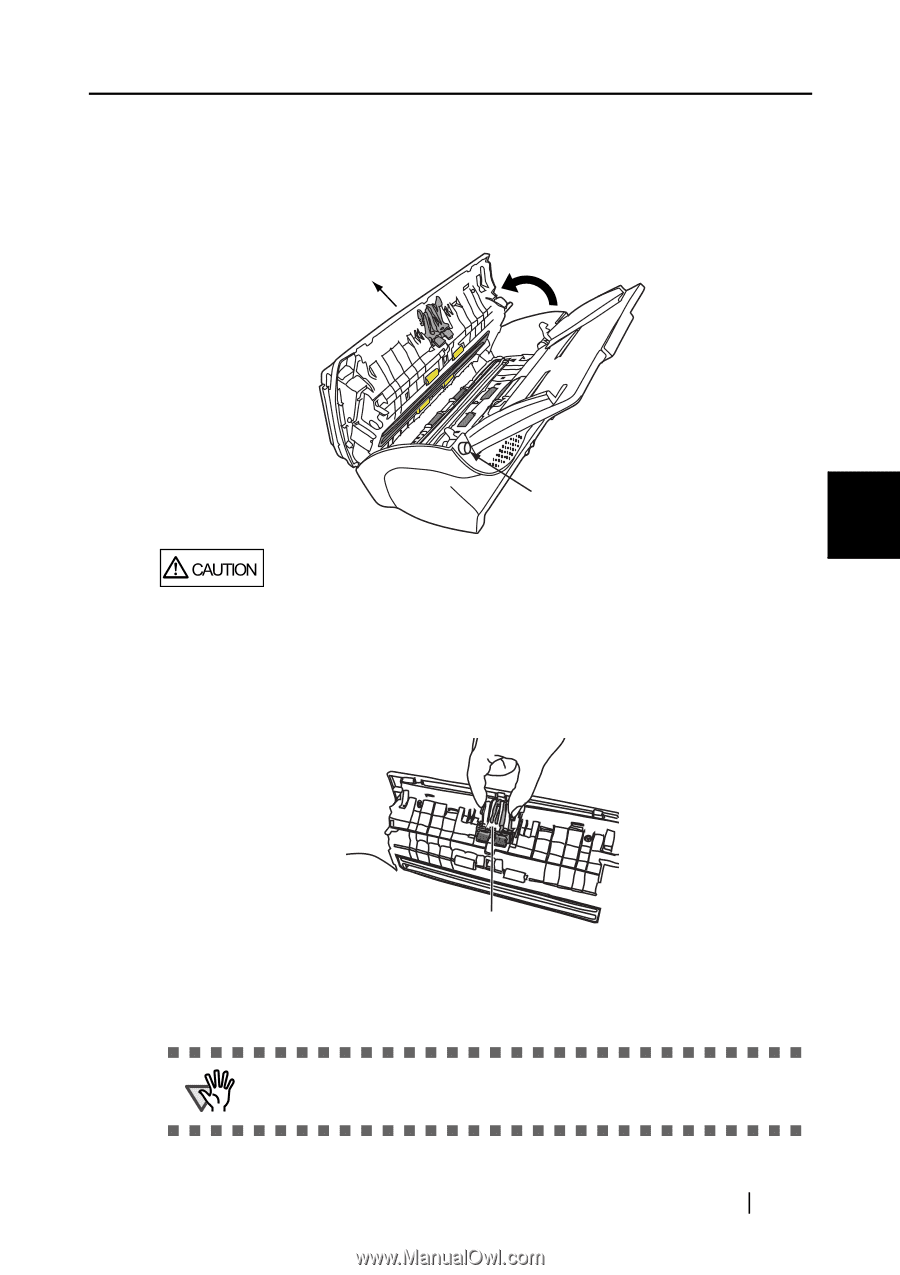
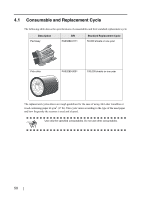
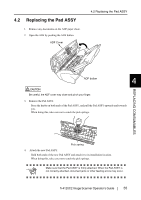
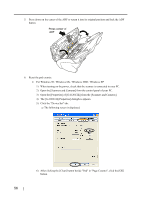
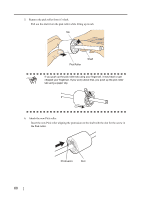
4.2 Replacing the Pad ASSY 1. Remove any documents on the ADF paper chute. 2. Open the ADF by pushing the ADF button. ADF Cover 4.2 Replacing the Pad ASSY REPLACING CONSUMABLES ADF button 4 CAUTION Be careful, the ADF cover may close and pinch your finger. 3. Remove the Pad ASSY. Press the knobs on both ends of the Pad ASSY, and pull the Pad ASSY upwards and towards you. When doing this, take care not to catch the pick springs. Pick spring 4. Attach the new Pad ASSY. Hold both ends of the new Pad ASSY and attach it to its installation location. When doing this, take care not to catch the pick springs. ATTENTION Make sure that the Pad ASSY is firmly attached. When the Pad ASSY is not correctly attached, document jams or other feeding errors may occur. fi-4120C2 Image Scanner Operator's Guide 55
-
 1
1 -
2
-
3
-
4
-
5
-
6
-
7
-
8
-
9
-
10
-
11
-
12
-
13
-
14
-
15
-
16
-
17
-
18
-
19
-
20
-
21
-
22
-
23
-
24
-
25
-
26
-
27
-
28
-
29
-
30
-
31
-
32
-
33
-
34
-
35
-
36
-
37
-
38
-
39
-
40
-
41
-
42
-
43
-
44
-
45
-
46
-
47
-
48
-
49
-
50
-
51
-
52
-
53
-
54
-
55
-
56
-
57
-
58
-
59
-
60
-
61
-
62
-
63
-
64
-
65
-
 66
66 -
 67
67 -
 68
68 -
 69
69 -
 70
70 -
 71
71 -
 72
72 -
 73
73 -
 74
74 -
 75
75 -
 76
76 -
77
-
78
-
79
-
80
-
81
-
82
-
83
-
84
-
85
-
86
-
87
-
88
-
89
-
90
-
91
-
92
-
93
-
94
-
95
-
96
-
97
-
98
-
99
-
100
-
101
-
102
-
103
-
104
-
105
-
106
-
107
-
108
-
109
-
110
-
111
-
112
-
113
-
114
-
115
-
116
-
117
-
118
-
119
-
120
-
121
-
122
-
123
-
124
-
125
-
126
-
127
-
128
-
129
-
130
 |
 |